Culling Hens
Culling hens refers to the identification and removal of the non-laying or low producing hens from a laying flock. Unless the birds are diseased, they are suitable for marketing or home cooking. The following topics will address the molting process:
- Sight Culling
- Culling by Individual Inspection
- General Condition
- Body Characteristics
- Identification of Poor Layers
- Molt
- Estimating Duration of Molt
- Checking Your Culling Technique
Removing the inferior birds reduces the cost of producing eggs, reduces the incidence of disease, and increases the available space for more productive hens. Hens eat feed whether or not they are laying. Removing the cull birds will make more feed and space for more productive birds.
Two types of culling are usually used to remove the inferior birds: (1) sight culling at the time of housing and (2) culling by individual inspection, which evaluates the bird's ability to lay or her past productive performance.
Sight Culling
Sight culling of pullets when being placed in the laying house removes the obviously undersized, underdeveloped, weak, crippled, or diseased birds which have very little chance of becoming good laying hens. The number of birds culled partly depends on space available in the laying house. Allow two and one-half to three square feet of floor space for each hen from light breeds and three to four square feet for each hen from heavy breeds of chickens.
Do not be too critical when evaluating the pullet's size and development, since some good laying hens mature late. Give the birds a chance to mature if they show characteristics that they may develop into good layers.
Remove any bird which has a permanent genetic or injury-produced deformity such as crossed beak, slipped wing, one or both eyes blind, or any leg deformity that can interfere with the bird's ability to mate or to reach feed, water, or the laying nest. It is most economical to remove these birds from the flock as soon as you notice them. This will eliminate feeding birds with little or no chance of becoming good laying hens.
Sick or unthrifty birds will often have short, narrow, emaciated bodies and appear listless or droopy. Small, pale combs and wattles generally indicate chronic poor health. Remove these birds from the flock as soon as possible to avoid disease problems that may spread to the flock.
Culling by Individual Inspection
The modern egg producing strains of chickens usually have fewer poor producing hens if you manage the birds properly as pullets. In commercial egg laying operations the birds are not usually culled after being placed in the laying house unless the birds become diseased or crippled. In the small laying flock the hens should be culled about eight to ten weeks after being placed in the laying house. This allows the birds plenty of time to adjust to their new surroundings and reach peak production. It also provides extra time for the development of the slower maturing pullets. Often you can detect the non-laying or poor producing birds by observing the condition of the comb and head characteristics. Body characteristics will indicate if the bird is capable of being a good layer.
| Character | Layer | Non-Layer |
| Comb & Wattles | Large, bright red, glossy |
Small, dull, shriveled |
| Head | Neat, refined | Beefy, weak |
| Eye | Bright, prominent | Dull, sunken |
| Eye ring | Bleached | Yellow tinted |
| Beak | Bleached | Yellow |
| Abdomen | Deep, soft, pliable | Shallow, tough, tight |
| Pubic bones | Flexible, wide apart | Stiff, close together |
| Vent | Large, moist, bleached |
Small, dry, puckered, yellow |
Culling at night is recommended, since the birds are less likely to be frightened and reduce egg production. A flashlight with the lens covered with blue cellophane will make it easier to detect poor layers without disturbing the flock. Handle the birds as little as possible so that production will not be greatly reduced. Delay culling if a significant portion of the flock is suffering or recovering from a minor disease or molt. Culling a diseased or molting flock often removes some of the better laying birds.
General Condition
The general condition of a good layer will reflect health and vitality. The comb and wattles will be large, bright red, and glossy. The head will be trim and refined with large, bright eyes that reflect proper health. The eye rings will be bleached, indicating an onset of lay. The beak may either be fully bleached or becoming bleached.
In contrast to the good layer, the poor layer usually has smaller, poorly colored wattles and comb as well as dull, sunken dyes which reflect low vitality. The eye rings and beak of yellow skinned breeds of chickens will be yellow tinted.
Body Characteristics
A good layer will have a large, smooth, moist, almost white vent. The two small bones at the sides of the vent are called the pubic bones. They should be flexible and wide apart, with at least two finger widths between them. The abdomen should be deep, soft, and pliable without an accumulation of body fat. The depth of the abdomen is measured between the tip of the keel or breast bone and the pubic bones. Laying hens should have a depth of three or four finger widths.
The non-layer will usually have a smaller body with a shallow, firm abdomen. Pullets and non- laying hens have a depth of about two finger widths between the pubic bones and keel. The pubic bones are usually stiff and close together when the hen is not laying. The distance between the pubic bones is one finger width or less. The vent of a non-layer is usually small, puckered, and round.
Identification of Poor Layers
After the laying flock has reached peak egg production and production begins to decrease, you should occasionally check your flock for poor producing hens. These poor producers have highly pigmented (yellow) beaks and shanks.
Bleaching of Yellow Coloring
| Body Part | Time After First Egg |
| Vent | 4-7 days |
| Eye Ring | 7-10 days |
| Ear Lobes (white leghorn) | 14-21 days |
| Base of Beak | 4-6 weeks |
| Tip of Beak | 6-8 weeks |
| Bottom of Feet | 8-10 weeks |
| Front of Shanks | 15-18 weeks |
| Rear of Shanks | 20-24 weeks |
| Hock Joint | about 24 weeks |
As the hen produces eggs, she diverts yellow color from certain portions of her body and deposits it into the yolks of the eggs. Bleaching of various parts of the hen's body is a very good indicator of the time the hen has been in production. The loss of color is easily seen in yellow-skinned breeds such as the white leghorns and birds on diets containing sources of the coloring agents. In the white-skinned breeds the bleaching effect is less pronounced and more difficult to detect.
The vent is the first site of color bleaching. When a pullet begins to lay, the color fades from the vent within the first week of lay. A good producing hen will have a white, pink, or bluish-white vent.
The eye rings start to bleach soon after the vent and are usually completely bleached within the first two weeks of lay. In leghorn strains the eye ring bleaching is closely followed by bleaching of the ear lobes.
The beak is the first significant portion of the body generally used to judge the bleaching effect of egg production. The beak will lose its color, progressing from the base to the tip. It takes from four to eight weeks for the beak to bleach after the hen begins laying eggs. The beak will often have a striped appearance then. The lower beak loses color more rapidly than the upper beak. If is often used as a bleaching indicator when the upper beak has a heavy brown or black pigment. A hen whose beak is fully pigmented has not laid for at least four weeks.
Bleaching of pigment from the shanks is a good indicator of a long production time. The pigment bleaches from the shanks in this order: bottom of feet, front of shank, back of shank, and hock joint. The shanks have no coloring between two and six months after the onset of continuous lay.
When the hen ceases to lay, the body parts are recolored in the same order as they were bleached, with the vent first and the shanks last. The speed at which the color returns depends on the type of feed and the state of the bird's health, but it usually returns in about half the time required to bleach.
Molt
 Each year chickens molt, or lose the older feathers, and grow new ones. Most hens stop producing eggs until after the molt is completed. The rate of lay for some hens may not be affected, but their molting time is longer. Hens referred to as "late molters" will lay for 12 to 14 months before molting, while others, referred to as "early molters," may begin to molt after only a few months in production. Late molters are generally the better laying hens and will have a more ragged and tattered covering of feathers. The early molters are generally poorer layers and have a smoother, better-groomed appearance.
Early molters drop only a few feathers at a time and may take as long as four to six months to complete the molt. Early molters are usually poor producers in a flock. Late molting hens will produce longer before molting and will shed the feathers quicker (two to three months). The advantage of late molters is that the loss of feathers and their replacement takes place at the same time. This enables the hen to return to full production sooner.
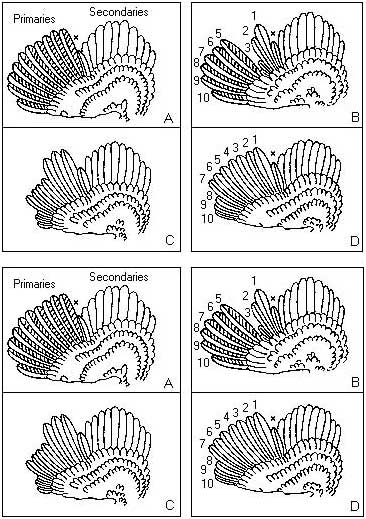
The order in which birds lose their feathers is fairly definite. The feathers are lost from the head first, followed in order by those on the neck, breast, body, wings, and tail. A definite order of molting is also seen within each molting section, such as the loss of primary flight feathers before secondary flight feathers on the wings.
The primary wing feathers determine whether a hen is an early or late molter. These large, stiff flight feathers are observed on the outer part of each wing when the wing is spread. Usually 10 primary feathers on each wing are separated from the smaller secondary feathers by a short axial feather.
Molting birds lose the primary feathers in regular order, beginning with the feather nearest the axial feather and progressing to the outer wing-tip feathers. Late molting hens will lose primary feathers in groups of two or more feathers, whereas early molters lose feathers individually. Replacement feathers begin to grow shortly after the old feathers are shed. Late molting birds can be distinguished by groups of replacement feathers showing similar stages of growth.
Estimating Duration of Molt
The time a bird has been molting can be determined by examination of the large primary wing feathers. Length of molt can be estimated by allowing six weeks for the first mature group of primaries and two weeks for each additional feather or group of feathers. If the primary feathers are not fully grown, the time of molt can be estimated based on the feathers' present stage of growth.
A primary feather reaches half its full length after two weeks, two-thirds its growth after three weeks, and completes its growth six weeks after the old primary is lost. The growth rate of the replacement feathers is the same for both early and late molting hens.
Often pullets undergo a partial molt, involving the neck and tail feathers. This condition can usually be eliminated by purchasing pullets hatched in April or later in each year and by following proper management practices. The length and incidence of a molt are influenced considerably by the bird's body weight, physical condition and environmental conditions such as nutrition and management.
Check Your Culling Technique
You may be unsure of your culling ability and avoid culling your flock for fear that you might eliminate good hens. If a wire-bottomed broody coop or extra laying cages are available, you can check your culling technique by separating the hens and observing their egg production for a few days. Give the birds plenty of feed and water. Be careful when culling to avoid upsetting the hens and affecting their normal rate of egg production.
Publications
News
STARKVILLE, Miss. -- Until an avian flu vaccine for chickens or other alternative is federally approved, commercial poultry operations in the U.S.
STARKVILLE, Miss. -- If egg prices have seemed higher than ever lately, it’s because they are, and consumers can place much of the blame squarely at the feet of the ongoing bird flu outbreak.
With highly pathogenic avian influenza, or HPAI, in the environment in Mississippi, owners of backyard flocks have to take extra steps to keep their chickens healthy.
Avian influenza poses an extremely low risk to human health and none to food safety in Mississippi, but its presence poses a risk to backyard flocks and the state’s $3 billion commercial poultry industry.


