
Best Foot Forward: Helping 4-H'ers Create Dynamic Presentations
For a fillable form, download the PDF above.
First Things First
Visual presentations using software such as Microsoft PowerPoint are an important aspect of being a successful 4-H member. Presentations can be helpful as you work through the experiential learning model. Sharing what has happened with others after an activity helps everyone process what is important. It helps you organize your thoughts and encourages you to apply what you have learned. Learning good presentation habits and skills now will help you as you prepare for college and your future career.
This guide will help you create masterful presentations you can use in county demonstrations and contests. Let’s learn by doing!
Before you even turn the computer on, the very first thing you must ask yourself is, “Who is my audience?” Knowing who your audience is will determine what type of presentation you will give, how long it should be, what colors and graphics to use, and so forth.
My audience is:
My audience members consist of (examples: Cloverbuds, junior 4-H’ers, senior 4-H’ers, adults, senior citizens, judges, elected officials):
What’s important to my audience?
Besides knowing your audience, it’s also important to know your location. Location, like your audience, can determine how well your presentation is received.
I will be presenting at (location):
The room size is:
Can people at the back of the room hear me?
Do I need a microphone?
Are there any distracting noises (air conditioners, noisy vents, or other noise sources)?
What type of light is at the location?
Draw your room plan.
Choosing a Topic
Choosing the right topic is critical to your presentation’s success. Audiences can tell if you are interested in the topic, so be sure to choose a topic you like. Off the top of your head (don’t think about it), list three things you like to do and three things you’re interested in.
I like to
(1)
(2)
(3)
I’m interested in
(1)
(2)
(3)
Guidelines
Be sure to know and follow the presentation guidelines.
What are the rules?
What is the presentation subject?
What is the time limit?
Brainstorming
Pick two of your topics (from your likes and interests lists) and write them in the box. Once you’ve done that, start listing all things you could possibly talk about during your presentation.
Looking at your ideas, compare them with what you wrote about your audience.
Which topic will be of most interest and relevance to your audience?
Why?
Which topic are you most comfortable with?
Research Your Topic
Now that you have a topic in mind, it is time to do some research. Ask your Extension agent if there are 4-H project books that you can look through for ideas and fun facts. Next, you will most likely use the internet to search for information. While the internet has a great deal of good information, it is very important to be careful when trusting information you find there.
Several junior 4-H’er-friendly search engines allow you to safely search the internet. They include kiddle.co and swiggle.org.uk. Using a search engine, type in the keywords for the topic. For example, if your presentation is about healthy living for teens, your keywords would be “healthy living and teens.” The “and” is what is known as a Boolean operator. It tells the search engine to only find results that include “healthy living” and “teens.” If you were to type “healthy living -teens” into the search engine, it would exclude results that mention teens.
Once you find a possible reference site for your article, it is extremely important to verify the information’s accuracy. Ask yourself the following questions:
- Does the information come from a well-known source?
- Is the source credible? (Ask yourself who wrote it, when it was published, what references are available, where the domain is from—a domain name tells you who is hosting the site. For example, a domain name ending in .edu is from an educational institution.)
- Is the information compatible with the information from your 4-H project book, Extension agents, or specialists?
Once you’ve determined the information’s credibility, you are ready to use it as a source or reference in your presentation. As you research, make a note of the articles or photos you will reference—you’ll need this information at the end of your presentation.
The last slide in your presentation is called the reference slide. This allows the audience to see where you got your information if they want to follow up and learn more about your topic.
Each bullet point on the reference slide is a reference. A good presentation will have three to five references. List your references by the author’s last name in alphabetical order.
To reference a book: Author’s Last Name, Author’s First Initial. (Year Published). Title of the book. Where it was published. The name of the publishers.
To reference a website article: Author’s Last Name, Author’s First Initial. (Year Published, Date Published). Name of the website article. Retrieved from: www.website.
To reference a photo on the internet: Slide #. Description of picture. Retrieved from: www.website.
Get Going!
No Microsoft PowerPoint?
If you don’t have Microsoft PowerPoint, download Open Office. This free software will let you create presentation slides much like in PowerPoint. Using software like Prezi, Google Slides, or Haiku Deck depends on where you are presenting and whether the location has internet access. For 4-H competitions, be sure to check with your Extension agent or the specialist in charge of the contest for rules about presentation software.
You have your game plan in hand, and now you are ready to start putting your PowerPoint presentation together one slide at a time. Let’s start with the title slide.
What Makes a Good Title Slide?
- Each word in the title is capitalized.
- The title is short, catchy, and to the point.
- The title font size is at least 44 points.
- The subtitle includes the words “Prepared by: Your Name.”
- The subtitle is between 18 and 28 points.
Making a Title Slide
- Left-click on the Microsoft PowerPoint icon (or Start/Programs/Microsoft/Microsoft PowerPoint).
- A dialogue box shows a list of possible PowerPoint themes. Select blank presentation.
The title slide will be the first slide your audience sees, so be sure to make it count.
Hmmm…what do I want my audience to take away from the presentation? How can my title convey that in a fun and creative way and in just three to six words? Try creating a title by writing six words separately.
The Slide as Your Canvas (Background)
To create a background for your canvas, you have three options: design template, solid color, and gradient. Remember, all of your slides should have a matching background.
Applying a design template will also load font sizes, styles, and colors.
- Left-click Design from the ribbon toolbar.
- Left-click the arrows to scroll through the default themes.
- Left-click on the design you want to use. (Note: Once you select a theme, variants of that theme appear to the right.)
- Notice that the theme template has been applied. It is also the design template that determines the font style, size, and color.
TIP: If your background is dark, make your font color light and vice versa.

Once you have your background set, it’s time to figure out what your font style will be. People tend to pick a sans serif font for readability. A sans serif font is a font without any “wings.” Can you pick out the sans serif fonts in the figure below?

Sans serif fonts include Arial, Berlin Sans, Calibri, Franklin, Tahoma, and Verdana. Can you think of others?
Changing Your Font Style
- Left-click on the Home tab from the ribbon toolbar.
- Locate the Font Style menu and left-click on the drop-down arrow.
- Select a sans serif font.
Changing Your Font Color
- Select (left-click and drag) the text you wish to change.
- Left-click on the Font color icon.
- In the drop-down menu, left-click on the color you wish to apply.
On the Road Again (Agenda/Objectives Slide)
Why do I have to have an agenda (or objectives) slide? The first reason you need an agenda slide is that it forces you to organize your thoughts. The second reason is that the agenda slide tells your audience where they are going. Think about it. If you’re driving down the highway on the way to the beach, you’re looking for signs that point to the beach. It is the same for your audience: If they know where they are going, they know what to listen for and in what direction to go.
Label each cone with an important element of your presentation.

Creating a New Slide for the Agenda Slide
- Left-click the Home tab on the ribbon toolbar.
- Left-click the down arrow next to New Slide, and in the pop-up window, left-click Title and Content.
If you want to make your PowerPoint slides stronger, try creating grammatically parallel sentences. Huh? Grammatically parallel sentences? What’s that? It’s when each of your sentences (or bullets) starts with the same type of word. Look at the slide below. What do you notice about it?
![Example slide with the following text: [Heading] Looking Ahead [Body] Selecting the right soil; finding the best seeds; starting your seedlings; nurturing the mulberry bush; harvesting the collective fruit; and creating delicious recipes.](/sites/default/files/publication-images/P2888/Untitled-4.png)
That’s right! Each bullet starts with the same type of word. Verbs are often used at the beginning of a bullet to create a dynamic presentation that engages the audience.
Types of Words
adverbs: quickly
adjectives: big, red
gerunds: looking
nouns: computer
verbs: create
The Meat and Potatoes (Content Slides)
Do you know the 7x7 rule? The 7x7 rule states that there should be no more than seven vertical lines of text and no more than seven words in each line. Most presenters tend to want to put all of their information on the slide so they can read the slides. This helps them deal with being nervous, but it makes for a bad presentation. A slide is an aid; it should only be used to guide the audience through the presentation.
Content slides are when you give the audience the “meat and potatoes” of your presentation. This is the point in the presentation where you are helping the audience understand your topic. You are the guide—this is where you take each of the objectives (from your agenda slide) and develop them more fully. When it comes to your content slide, always have one slide for each major point found on the agenda slide. Don’t try to cram a lot of information onto one slide—remember the 7x7 rule. Keep in mind that slides don’t have to be all text. A content slide could be made up of photos, graphs/charts, SmartArt, and other content.
Objective 1:
Objective 2:
Objective 3:
Remember: Slides don’t have to be all text. A content slide could be made up of photos, graphs/charts, or illustrations.

Which do you prefer—text, photos, or something else? Your audience will enjoy a variety as well. Variety is the spice of life!
Bullets are an excellent way to show the information hierarchy of a slide. It is important to remember that if you have one bullet, you must have two. Capitalize only the first letter of the first word (except for proper nouns). It is generally a good idea to have bullets the same color as the text.
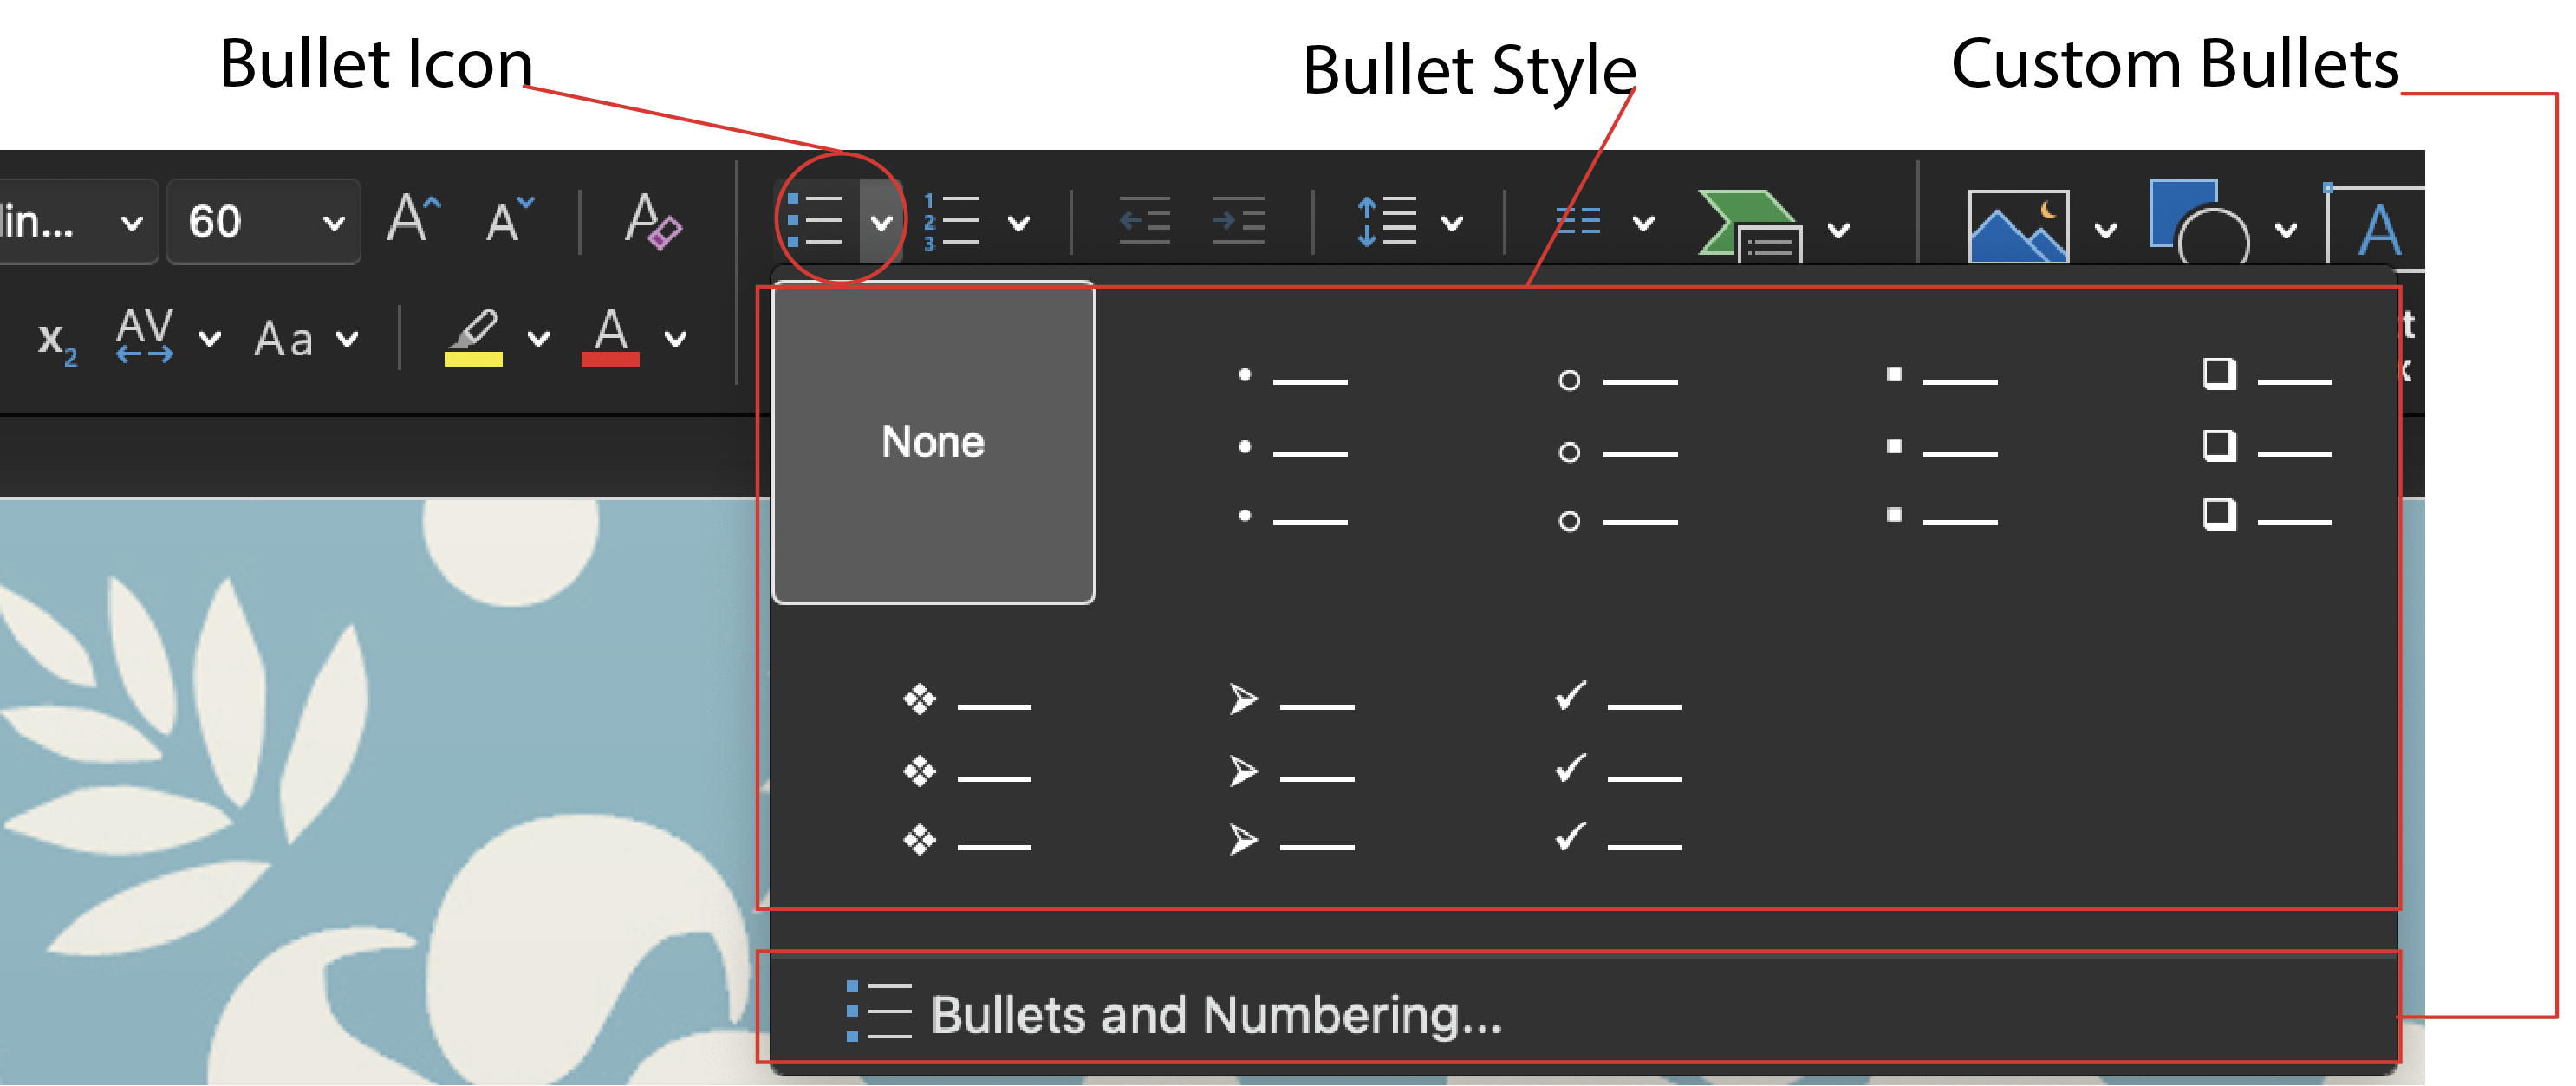
Changing Bullet Style
- Left-click on the arrow next to the bullet icon.
- Left-click on the desired bullet style.
Creating Custom Bullets
- Left-click on the arrow next to the bullet icon.
- Left-click Bullets and Numbering at the bottom.
- Under Customize, left-click on the down arrow
- Select the desired icon, emoji, or glyph. (You can even select a custom picture.)
- Left-click OK again in the Bullets and Numbering window.
A Picture Is Worth a Thousand Words
Graphics are a great way to get your point across, but they have to be used appropriately. Here are some rules to remember when using graphics:
- Use relevant graphics.
- Use graphics that draw the audience’s attention.
- Avoid using animated clipart.
- Use graphics that reflect your audience’s race, gender, and/or age.
Inserting Graphics
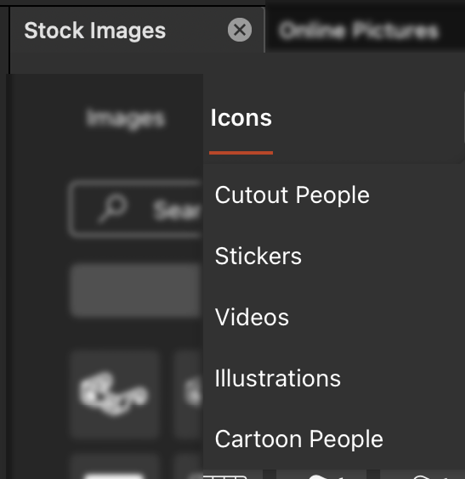
You can insert graphics from your computer, online, or a special stock by Microsoft. The stock by Microsoft is quite extensive. It includes pictures, icons, illustrations, videos, and more. They are freely available for use. There are plenty of online resources as well, but be careful of copyrights.

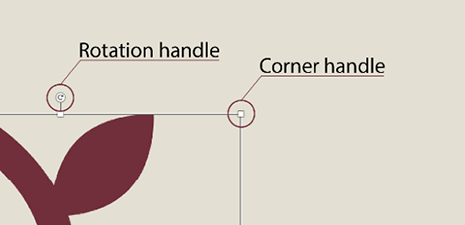
Resizing an Image
- Select the photo so that the corner handles appear.
- Place your cursor on a corner handle. Hold down the left mouse button and drag in to make the image smaller. Drag away from the picture to make it larger.
Wrapping Up (Conclusion Slide)
Whew, you’ve almost made it! The last thing you need to do is tie up the loose ends and leave your audience with something to remember. The conclusion slide is the last opportunity you have to impress upon your audience the importance of your speech. Your conclusion slide will mirror your agenda slide, but it will not be an exact copy. In your conclusion, you want to restate the issue, briefly review the highlights, and answer the question, “so what?”
What does this information mean to your audience?
Why is it important?
What are they supposed to do with this information?
How to End Your Presentation
You might end it with a story, quote, visual, or short video. Any story or quote should have meaning; don’t tell a story just for the fun of it—make sure it is relevant to the presentation. Never introduce new information in your conclusion. Keep yourself and your audience focused. It’s important to send your audience out on a good note because it will be the first thing they remember!
Leave time at the end of the presentation for people to ask questions, and be prepared to answer them. What type of questions might people ask about your topic?
Tip: During a Q&A session, people may ask a question that others in the audience cannot hear. When this happens, repeat the question for the benefit of others. For example, “Her question was...”
Printing Handouts
When conducting a presentation or demonstration for your local county Extension program, it may be necessary to provide handouts. If you think the audience will need to take notes during your presentation, do the following:
- Left-click File in the ribbon toolbar.
- Left-click Print.
- Under Layout, left-click the arrows next to Slides.
- In the drop-down menu, select Handouts (3 slides per page).
This creates blank lines next to your slide for the audience to write on. If you think your audience does not need to take notes during the presentation, tell them at the beginning you will have a handout for them at the conclusion of the presentation. Print six slides to a page to save on paper or four slides if the slides contain graphs or charts that may be difficult to read.

Transitions
To begin with … Transitions (both verbal and between your slides) make your presentation smooth and consistent. Transitions are used to link ideas and move you from one point of your speech to the next point. Look at the (verbal) transitions below. Where do you think you would use them in a presentation?
-
Now let me close with …
-
To conclude …
-
In the second place …
-
Third, we have …
-
Finally …
-
Furthermore …
-
For example …
-
On the other hand …
-
Therefore …
-
As a result …
-
On the contrary …
-
With this in mind …
-
In closing …
-
Let’s look at it this way …
What are some other transitions you can think of?
Creating Transitions Between Slides
Another type of transition is the transition that occurs between slides, or when you advance a slide. It is best to use the same transition for each slide so it won’t distract your audience unnecessarily. Remember, you want them to be watching you, not your slide doing cartwheels in the background.
- Left-click on Transition from the ribbon toolbar.
- Left-click on the More button in the Transition to This Slide window.
- Select the appropriate transition (fade, push, cover, wipe).
- Be sure that the box next to On Mouse Click is selected.
- Left-click Apply to All.
Always set your transition to advance (go to the next slide) when you click on the mouse. This way, you can advance the slide when you are ready. Using a timer can create unnecessary stress for young presenters.

Think It Through!
Let’s put what you have learned into practice! Using the slides on the next page, create a draft of your presentation. Make more copies of the page if you need more space.
Lights, Camera, Action!
Finally, you have finished all of the slides, edited each one, had somebody else proof them, and practiced and practiced until you’re blue in the face. It’s time. Time to get up and give that presentation you’ve been working so hard on. Don’t get this far to let the technology scare you. In some places, you may have to set up your own equipment, and in other places it may be provided for you. Either way, you should be able to handle the situation confidently. So, when you get ready to present, you need to have the following: a laptop, a projector, and a backup plan.
What is my backup plan?
Hooking Up a Laptop and Projector
- Set up your laptop and plug it into an electrical outlet, but don’t turn it on.
- Take a VGA or HDMI cable and connect one end to the port on your laptop and one end to the port on the projector.
- Connect the power cable from the projector to the electrical outlet.
- Turn the projector on. Now turn the laptop on.

Opening Your Presentation in Show Mode
- Left-click Slide Show from the ribbon toolbar.
- Left-click From Beginning (or simply press the F5 key on your keyboard).
Opening Your Presentation from a USB Jump Drive
- Insert the USB jump drive into the USB port on the computer. Wait a few seconds for the computer to recognize the jump drive.
- Double left-click the Computer icon from the desktop.
- In the Computer window, locate the jump drive (usually assigned to the letter E) and double left-click.
- Locate your PowerPoint file and double left-click on it.
- Left-click Slide Show/From Beginning.
What If I Want to Use an iPad or Tablet?
Be sure to first clear it with your Extension agent or specialist. You are responsible for bringing the appropriate cables to connect the device to the projector.
My Presentation Design and Structure
Background color:
Font color:
Font style:
Font size:
Slide 1 description:
Slide 2 description:
Slide 3 description:
Slide 4 description:
Slide 5 description:
Slide 6 description:
Piece of Cake
Becoming a good presenter takes practice! The more presentations you give, the better you will become. Use these tips to make presentations a piece of cake. These good habits will ensure your presentation is the very best it can be.
- Make sure all your information is accurate and current.
- Spellcheck your presentation and make sure somebody else proofs it.
- Make sure your text and graphics can be seen clearly.
- Avoid using really bright colors and red. Red should only be used in very small amounts to draw the audience’s attention.
- Never exceed seven lines of text on a slide. Remember: If it doesn’t fit on the palm of your hand, you don’t need it on the slide.
- The slide doesn’t care if you talk to it or not. The audience does! Do not talk to the computer.
- Look up, look out! Find two to three people in the audience and make eye contact with those individuals.
- Start and end on time. Don’t go over your allotted time limit.
- Practice, practice, practice. Arrive at the room at least 15 minutes early to make sure your equipment is working and ready to go.
- Always have a backup plan. It might be handouts or transparencies, but always have a plan B. You are the reason people have come to hear about the topic—you are the expert! Be ready to present even if your PowerPoint doesn’t cooperate.
Reference
DiResta, D. (2009). Knockout presentations: How to deliver your message with power, punch, and pizazz. Worcester, MA. Chandler House Press.
Publication 2888 (POD-06-24)
By Mariah Smith Morgan, PhD, Associate Extension Professor, Center for 4-H Youth Development.

The Mississippi State University Extension Service is working to ensure all web content is accessible to all users. If you need assistance accessing any of our content, please email the webteam or call 662-325-2262.
Authors
