Brooder Elevation Is Important When Heating Broiler Houses
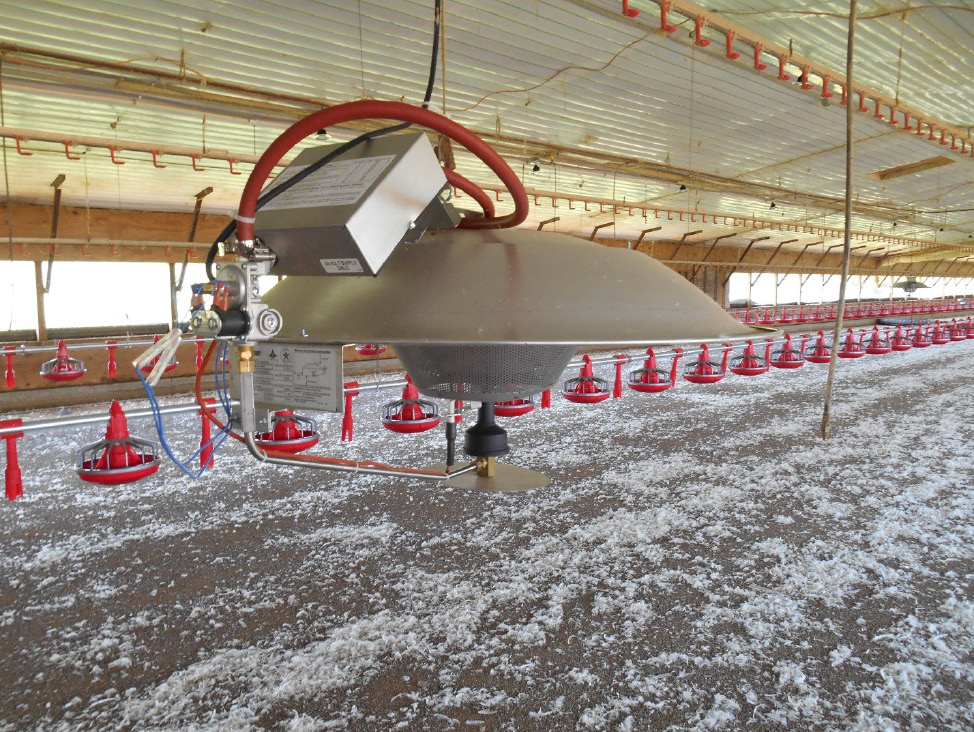
Young chicks require a warm environment to survive and to ensure good performance during later stages of growth. Round radiant brooders (Figure 1) are commonly used to create a warm environment in the house by providing supplemental heat during the brooding phase, which lasts approximately 8–14 days, depending on the integrator and weather conditions. Where round radiant brooders are used, they are the single most important piece of equipment because they ensure proper brooding temperatures. Their performance is dependent on a number of factors. This publication will show the effect that brooder elevation above the litter has on heat distribution and the overall thermal environment.

Brooder elevation recommendations differ slightly by manufacturer, but they are all between 5 and 7.5 feet above the litter. Brooders are usually spaced 20–40 feet apart in the brood chamber, and they are most often installed over feed and water lines to create a comfortable thermal environment that encourages chicks to eat and drink. In a typical 40-by-250-foot brood chamber, a minimum of 14 radiant brooders are usually installed. Additional brooders will also be installed in the off end in case supplemental heat is needed after the brooding phase is over and birds are turned out to the whole house. Individual integrators must decide the exact number of radiant brooders needed; this number will be listed in the integrator’s housing specifications.
There are advantages and disadvantages to using round radiant brooders. The primary disadvantage is that workers must raise the brooders before clean-out and catching to allow tractors and equipment to safely enter the house. Then, workers must lower the brooders before the next flock, which adds some stress to the equipment and is labor-intensive for workers. An advantage is the freedom to adjust brooder elevation above the litter. Producers can manipulate the heating pattern on the floor, which changes the thermal environment experienced by the chicks.
Czarick and Fairchild (2005) provide a real-world example of how changing brooder elevation can alter a house’s overall thermal environment. They used an infrared camera to investigate litter temperatures in a house with 5-day-old chicks. They found that the chicks appeared comfortable between the feed lines and the center of the house but were showing signs of being chilled in the area between the feed line and the sidewall. The environmental controller was programmed to maintain an air temperature of 86°F.
Czarick and Fairchild (2005) suggested that this situation could have been improved by raising the brooder elevation from 5 feet to 6 feet and by increasing the set point temperature to 90°F. The proposed change would more than likely have led to increased gas consumption and may have overheated the center of the house, but it would have provided more heat to the cold area of the house and probably improved the overall environment. Keep in mind that this scenario was for a house with a single row of brooders down the center of the house, but the principle of changing the heat distribution at the litter remains the same no matter how the brooders are arranged. New housing construction and many retrofitted houses now utilize two rows of brooders near the feed lines staggered on both the north and south sides of the house.
This publication focuses on the effects of radiant brooder elevation on heat distribution (specifically radiant flux) patterns created on the floor and on the thermal environment experienced by chicks during brooding. For more in-depth information on all the different types of heaters that are used in modern poultry facilities, see MSU Extension Publication 3034 Modern Broiler House Heating Systems. For more detailed information on the topics presented in this publication, refer to Linhoss et. al. (2017).
What Is Radiant Flux?
Radiant flux is a way of expressing power density at a flat surface. It is the power (Btu/hr) produced by a brooder that reaches a given area (ft2) of a flat surface (like a poultry house floor). Radiant flux units are Btu/hr·ft2. To illustrate, if a brooder with a power rating of 40,000 Btu/hr is placed above poultry litter, the heat that it emits will be distributed over an area (ft2) of the litter. If all 40,000 Btu of energy make it to the floor over the course of an hour and are uniformly distributed over a litter area of 500 ft2, the amount of power reaching 1 ft2 of the litter is 80 Btu/hr·ft2 (40,000 Btu/hr ÷ 500 ft2). For the sake of simplicity, this example assumes that the radiant flux is the same over the entire litter area. In reality, radiant flux at the litter will be much higher near the brooder and will decrease with distance from the brooder.
How Does Elevation Affect the Thermal Environment During Brooding?
1) Maximum Radiant Flux at the Litter Surface
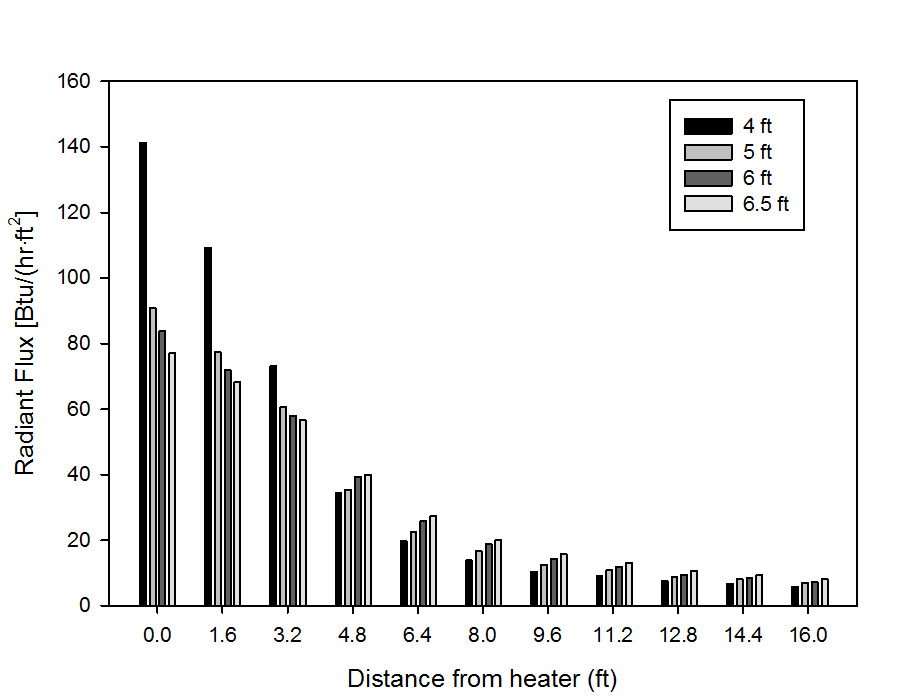
Radiant flux at the litter is usually strongest directly below the brooder and decreases with distance from the brooder (Figure 2). This is beneficial to chicks because it allows them to move around in the heated area and “choose” a spot that is comfortable to them. A chilled chick can move closer to the brooder, while a warm chick can move farther away.
Maximum radiant flux values experienced at the litter are inversely related to brooder elevation. This means that, as brooder elevation increases, maximum radiant flux decreases, and vice versa. Figure 2 clearly shows that maximum radiant flux is experienced directly below the brooder center (distance = 0.0 feet) at all brooder elevations. Figure 2 also shows that maximum radiant flux decreases as the brooder is raised from 4 feet to 6.5 feet. Czarick and Lacy (1995) showed similar relationships between brooder elevation and maximum litter temperature.
The nature of the relationship between brooder elevation and maximum radiant flux does have real-world implications. Brooders placed below recommended elevations (< 5 feet) have the potential to create “hot spots,” or floor areas that are too warm for chicks to use. This scenario not only reduces the amount of heated floor area that is usable by chicks, but it also is an inefficient use of fuel. On the other hand, radiant fluxes produced by brooders at higher elevations (6–6.5 feet) may not be large enough to create a warm environment for chicks.

2) Heated Area
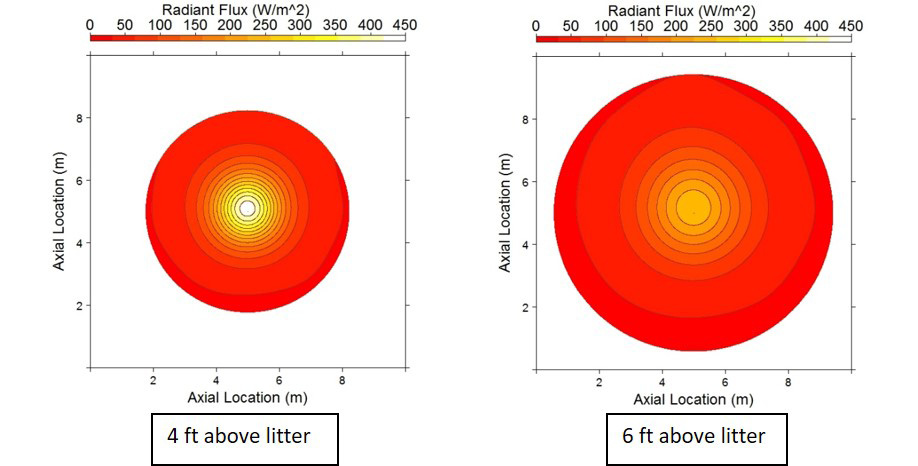
As brooder elevation increases, so does the magnitude of radiant fluxes at distances farthest from the brooder. Figure 2 shows that, at 4.8–16 feet from the brooder, radiant fluxes are highest at 6.5 feet. The best way to explain this is with a flashlight analogy. If you place a lit flashlight 6 inches from a wall, the light distribution on the wall will cover a small area, but it will be very intense and bright. Move the flashlight back 3 feet from the wall and the light distribution changes dramatically. Now, the light covers a larger area of the wall but is less bright because the light has been diffused over a larger wall area. The way in which heat is distributed to the litter from a radiant brooder can be thought of like a beam of light created by a flashlight. Figure 3 does a good job of illustrating this point. It shows the radiant flux distribution for the same brooder at 4 feet and 6 feet above the litter. At a brooder elevation of 4 feet, maximum radiant fluxes are higher than at 6 feet, but the area of the floor that is influenced by the heat at an elevation of 4 feet (353 ft2) is almost half of that at 6 feet (662 ft2).

3) Brooder Run Times, Gas Consumption, and Heat Distribution at the Litter
Brooder run times are influenced by several factors, including:
- Outside air temperature
- Temperature sensor location
- Temperature set-point
- Brooder elevation
- Minimum ventilation run time
Heat production from birds is an important consideration, as well, but usually not during brooding when the birds are small and not generating a lot of heat. Outside air temperature and temperature set-point at the controller are two of the most obvious factors that influence brooder run times. Temperature sensor placement in the house and brooder elevation are important, but the effects on run times and heat distributions at the litter may be a little less obvious. Temperature sensors placed closer to the brooder result in shorter run times and will prevent hot spots from forming directly under the brooder. A pitfall of having temperature sensors close to the brooder is that run times may be too short to ensure adequate heating at areas farther away from the brooder. Run times will increase as distance from the brooder to the temperature sensor increases. While this will increase temperatures farther away from the brooder, it can create hot spots directly below the brooder and will more than likely result in increased gas consumption. Most temperature sensors are placed between the inside feeder and drinker line to create a comfortable environment near where chicks eat and drink.
Increasing the elevation of a brooder will increase brooder run times and gas consumption, similar to moving a temperature sensor farther from the brooder. As mentioned earlier, though, increasing the elevation of a brooder will decrease the maximum radiant fluxes at the litter but increase the total heated area. It could also lead to hot spots directly below the heater, as a result of the longer run times. Decreasing brooder elevation will have the exact opposite effect. It will decrease brooder run times and gas consumption, increase maximum radiant fluxes at the litter, and decrease total heated area. The likelihood of creating hotspots is diminished due to the shorter run times.
Conclusions
Brooding commercial broilers is not a one-size-fits-all situation. Brooder elevation house arrangement and temperature sensor location all vary between farms and even between houses on the same farm. House size, integrator specifications, and quality of construction all play a major role in shaping the brooding environment, as well. However, steps can be taken on a case-by-case basis to optimize the brooding environment for chick comfort. House temperatures during brooding can always be easily changed at the controller, but the thermal environment created by brooders can be a dynamic system that is capable of changing with a grower’s specific needs.
References
Czarick, M. & P.M. Lacy. 1995. Radiant Brooder Installation and Management. Poultry Housing Tips, 7(2). Athens, GA: University of Georgia Cooperative Extension Service.
Czarick, M. & B. Fairchild. 2005. Understanding Radiant Brooders. Poultry Housing Tips, 7. Athens, GA: University of Georgia Cooperative Extension Service.
Linhoss, J.E., Purswell, J.L, Davis, J.D., & Z. Fan. (2017). Comparing radiant heater performance using spatial modeling. Appl. Eng. Agric. 33(3): 395–405.
Linhoss, J.E., Purswell, J.L., & G.D. Chesser (2017). Modern Broiler House Heating Systems. Publication 3034. Mississippi State, MS: Mississippi State University Extension Service.
Publication 3183 (POD-06-23)
Reviewed by Jessica Drewry, PhD, Assistant Professor, Agricultural and Biological Engineering. Written by John Linhoss, PhD, former Extension Associate, Agricultural and Biological Engineering.
The Mississippi State University Extension Service is working to ensure all web content is accessible to all users. If you need assistance accessing any of our content, please email the webteam or call 662-325-2262.


