Boxwood Topiary Design
As the holiday season approaches, many people begin to think of their seasonal traditions, including the displaying of Christmas decorations. The conical topiary Christmas tree made from boxwood (Buxus sp.) is one such decoration that has wide appeal. Commercial nursery professionals and gardening enthusiasts train live plants to grow in geometric shapes (globes, spirals) and novelty forms (animals, characters). Floral designers use a variety of methods to create these topiaries: cut plant materials, floral design mechanics, and trimmings.
Boxwood topiary trees are good projects for floral enthusiasts, and finished designs are well suited for home use and church decoration. Professional florists who offer this design as a featured item from their studios will find them profitable and their production easily manageable.
Construction Considerations
Topiaries such as this can be made well ahead of the holidays. In commercial operations, it is best to produce them as soon as holiday greens can be procured, usually just before or just after Thanksgiving. They can be made assembly-line style in fresh floral foam and then refrigerated. By stocking this way, these miniature trees can be marketed and sold for weeks. Their appeal makes them suitable for table centerpieces, mantel and coffee table designs, children’s rooms, nursing care rooms, hospitals, or anywhere a touch of Christmas is desired. With proper care and display, these miniature Christmas trees will last well into the New Year.
The design proposed in this publication uses cut boxwood (Buxus sp.) branches. The key is to select plant materials that are bunchy and will cover a significant amount of surface. Other plant materials can be used individually or in combinations. Here are some good choices:
- Eastern red cedar Juniperus virginiana
- Arizona cypress Hesperocyparis arizonica
- Holly Ilex sp.
- Israeli Ruscus Ruscus hypophyllum
- Pittosporum Pittosporum tobira
Flat-leaved foliage such as Leyland cypress (Hesperotropsis leylandii), Port Orford cedar (Chamaecyparis lawsoniana), and similar materials can be used, but the construction time and amount of material will increase.
In the following example, 16½ ounces of boxwood were used to create a 16-inch-tall tree. In order to estimate the material needed to construct many trees, it is important to keep in mind certain variables. Commercial growers generally harvest boxwood in 6- to 24-inch-long branches. In floral design, smaller cuttings are made from large branches in order to make properly scaled trees, so the weight of large, woody stems is not a part of this measure. Further, boxwood that is harvested and stored in refrigeration for many weeks may have a lower weight than that of freshly harvested foliage. Typically, a 20-pound case of commercially grown and harvested boxwood will yield enough material for 13 to 14 trees. Both foliage lushness and design form will be variable factors in estimating the number of cone topiary trees that can be made from a 20-pound case of boxwood.
Commercial florists should standardize boxwood topiary trees to one or two specific sizes in order to control material and labor costs. Retail pricing variations can be achieved with the type of decorations added to the basic design; thus, a 16-inch-tall topiary could be retailed at three different price points. For example: a tree with ribbons and miniature pinecones could be at the lower end; a tree with ribbons, pinecones, and ornaments could be in the mid-range; and a tree with ribbons, pinecones, ornaments, and miniature lights could be at the higher end.
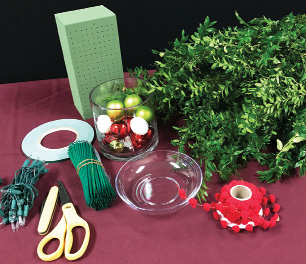
Materials
- 1–2 lb fresh-cut boxwood
- Fresh flower foam
- Waterproof tape
- Wired wood picks
- Floral shears
- Knife
- Floral container
- Holiday trimmings (pinecones, ribbon, garland, electric or battery-operated lights, ornaments, etc.)
Steps
If shopping for floral foam, take note to purchase water-absorbing, fresh flower foam. It’s best to use phenolic fresh flower foam (Oasis brand, for example) for this project. If the bricks of fresh flower foam have turned brown, they have oxidized. Avoid purchasing these because their water uptake capacity is compromised.
Hydrophobic trimer foam (for silk and dried floral designs) or styrene (Styrofoam) can be used, but they do not absorb and give back water to the fresh foliage. If these foams are used, the foliage arranged in them will dry within a few days.
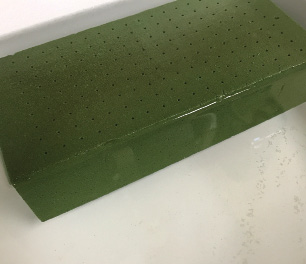
Fill a basin with water to a depth of about 4 inches. Lightly drop the foam brick on the surface. The brick will fully hydrate in 30 seconds to 1 minute.
Never force a brick of fresh flower foam under the water line in order to speed up hydration! This action may create a “dry core” in the brick’s center. Although the outer inch or so of foam may appear to be saturated, the core will be dry and the foliage will have no water source.
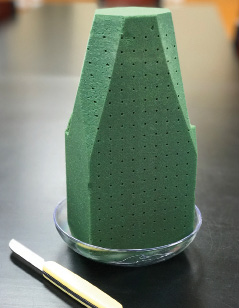
Note that it is not recommended to purchase a cone-shaped piece of foam, nor is it necessary to cut foam into a perfect cone. Simply chamfer (cut) the foam into a shape suggesting a cone.
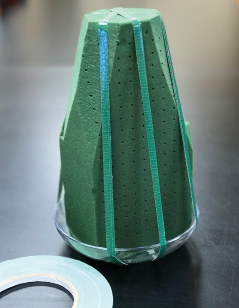
The foam brick is held in place using waterproof tape. It is possible to use clear adhesive tape as an alternative. To tape the foam brick to the container, create vertical bands that extend underneath the container and around the brick in a continuous belt. An additional layer of chicken wire could be added for more support, but this extra step is not necessary.
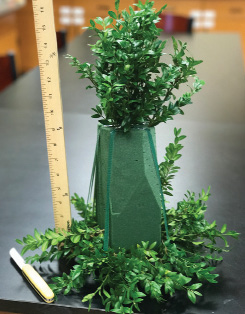
The first insertions in this design should establish height and width. The length of these stems is critical to keeping good form and conserving materials. Note that an established, visible point is made with several boxwood placements at the top.
Importantly, the bottom 1 inch of each stem should be cleaned of foliage and inserted into the foam. This keeps placements from falling out easily. A secondary effect is that the foam brick dries from the outside in and from top to bottom. If the recipient does not add water to the design, which is often the case, stems placed deeper into the foam will be in a water source longer than those in dry areas.
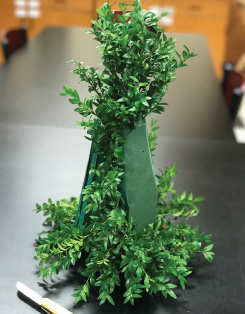
The key to keeping this design in a tall, triangular shape (rather than becoming too bushy) is to add a line of foliage connecting the top of the design to the base. An imaginary line connecting the uppermost point of the cone to the stems extending outward from the base helps to establish width.
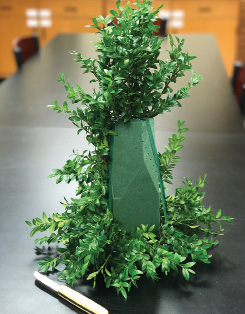
Continue to keep an eye on the design’s silhouette or outline to make sure the form remains conical. Repeat building additional lines of foliage from top to bottom on the opposite side; then make additional lines to build structure.
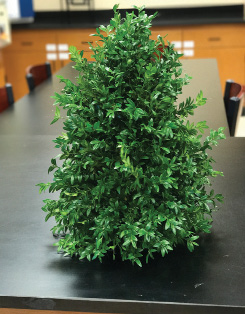
At this stage, it is important to cover the foam and tape to make the design appear to be a growing plant. Continually turn the tree to check for gaps. With a little practice, it will not be necessary to shear the topiary. Once the form is complete, spray the tree with an anti-transpirant if available. This spray coats the foliage surface and slows water loss.
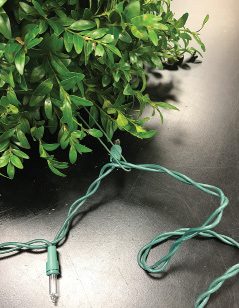
An 18-gauge wire was bent in half and worked through the double-spun wires of electric lights where the first bulb is attached to the string. Inserting this wire into the foam helps the lighted portion of the string to stay attached to the tree and gives it a more professional appearance.
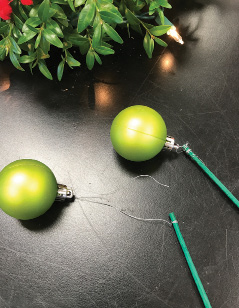
Wired wood picks are a good investment in order to attach miniature ornaments and many other types of trimmings within topiary trees. The dry wooden pick will absorb some moisture from the floral foam, “locking” it in place and keeping ornaments from dislodging.
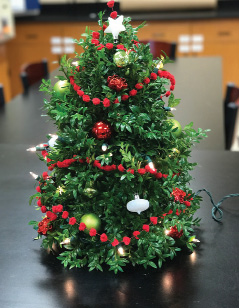
This example combines a miniature garland with assorted ornaments and lights.
Care and Handling
Here are some tips to keep your topiary green and fresh well into the New Year:
- Keep the topiary cool. Avoid direct sunlight and sources of heat such as vents.
- Two to three times per week, take the tree to the sink and allow water to lightly stream on the top of the tree, particularly on the top of the brick. This action rehydrates the brick and, in turn, the boxwood.
- Keep the tree in a cool place during the night, such as on the porch or in the garage.
Commercial producers or florists can attach a care tag to finished trees when marketing to consumers. Gift recipients will appreciate instructions to lengthen the life span of the design. Use this template for your tag.

References
American Institute of Floral Designers (AIFD). (2005). The AIFD guide to floral design: Terms, techniques, and traditions. Intelvid, Flourtown, PA.
Dirr, M. (2009). Manual of woody landscape plants. Stipes, Champaign, IL.
Odenwald, N. (2010). Identification, selection, and use of southern plants for landscape design. Claitor’s, Baton Rouge, LA.
Packer, J. (1989). Flowers for all seasons: Winter. Ballantine, New York, NY.
Tharp, L. (1986). An American style of flower arrangement. Taylor, Dallas, TX.
Wood, M. (2007). The seasonal home. Winward, Union City, CA.
The information given here is for educational purposes only. References to commercial products, trade names, or suppliers are made with the understanding that no endorsement is implied and that no discrimination against other products or suppliers is intended.
Publication 3047 (POD-07-23)
By James M. DelPrince, PhD, AIFD, PFCI, Horticulture Specialist and Associate Extension Professor, Coastal Research and Extension Center.
The Mississippi State University Extension Service is working to ensure all web content is accessible to all users. If you need assistance accessing any of our content, please email the webteam or call 662-325-2262.


