Home Landscape Design
A well-designed and functional home landscape can add to your family’s joy and increase the value of your property. Modern landscapes are meant to be beautiful and useful. A well-planned landscape provides your family with recreation, privacy, and pleasure. Conscientious homeowners know that the landscape should also have a positive environmental impact. Figures 1 and 2 depict the front and back yards of a Southern home. Throughout this publication, each step of landscape design is illustrated using this sample landscape. If you want to jump ahead, Figure 33 shows the completed landscape plan.
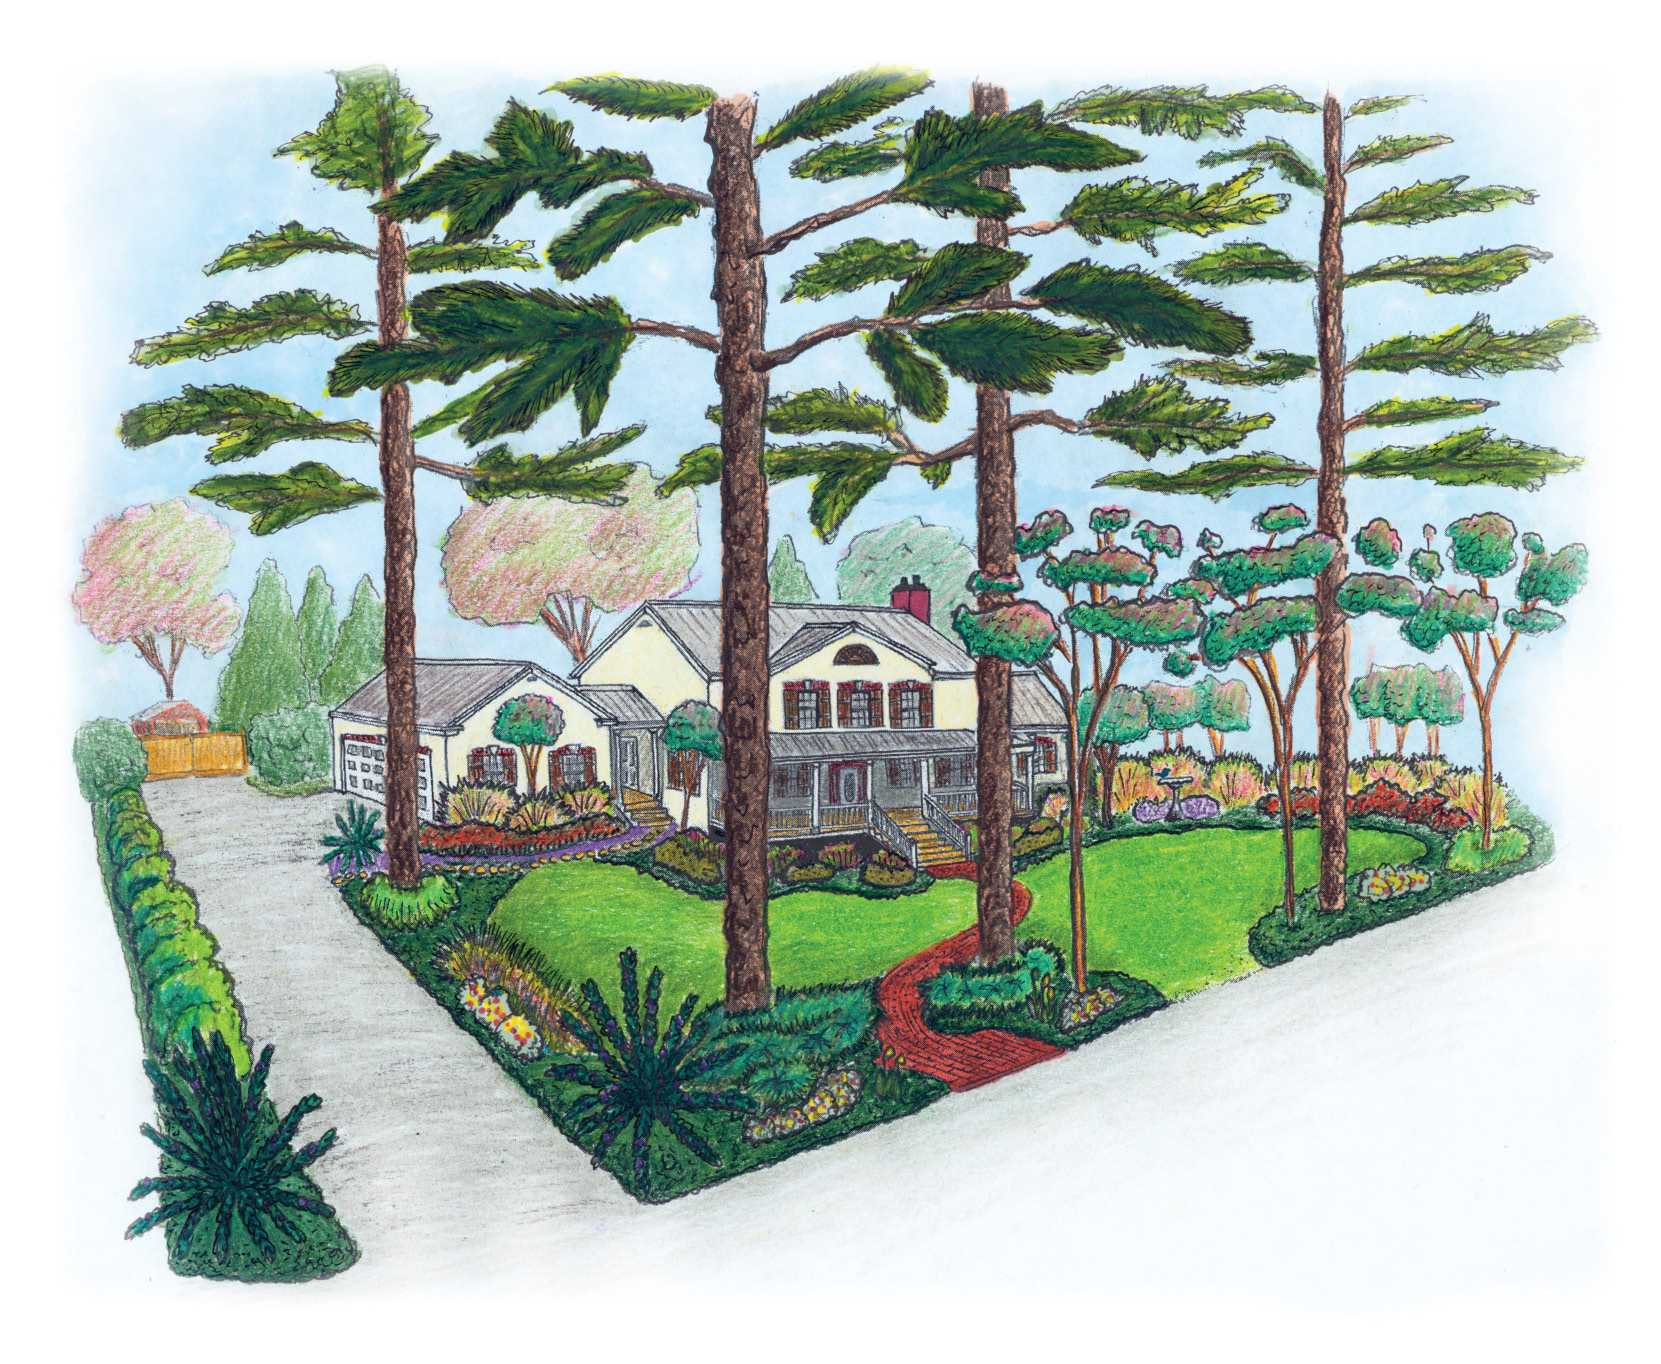
Figure 1. Front landscape. Drawing by Richard Martin III.
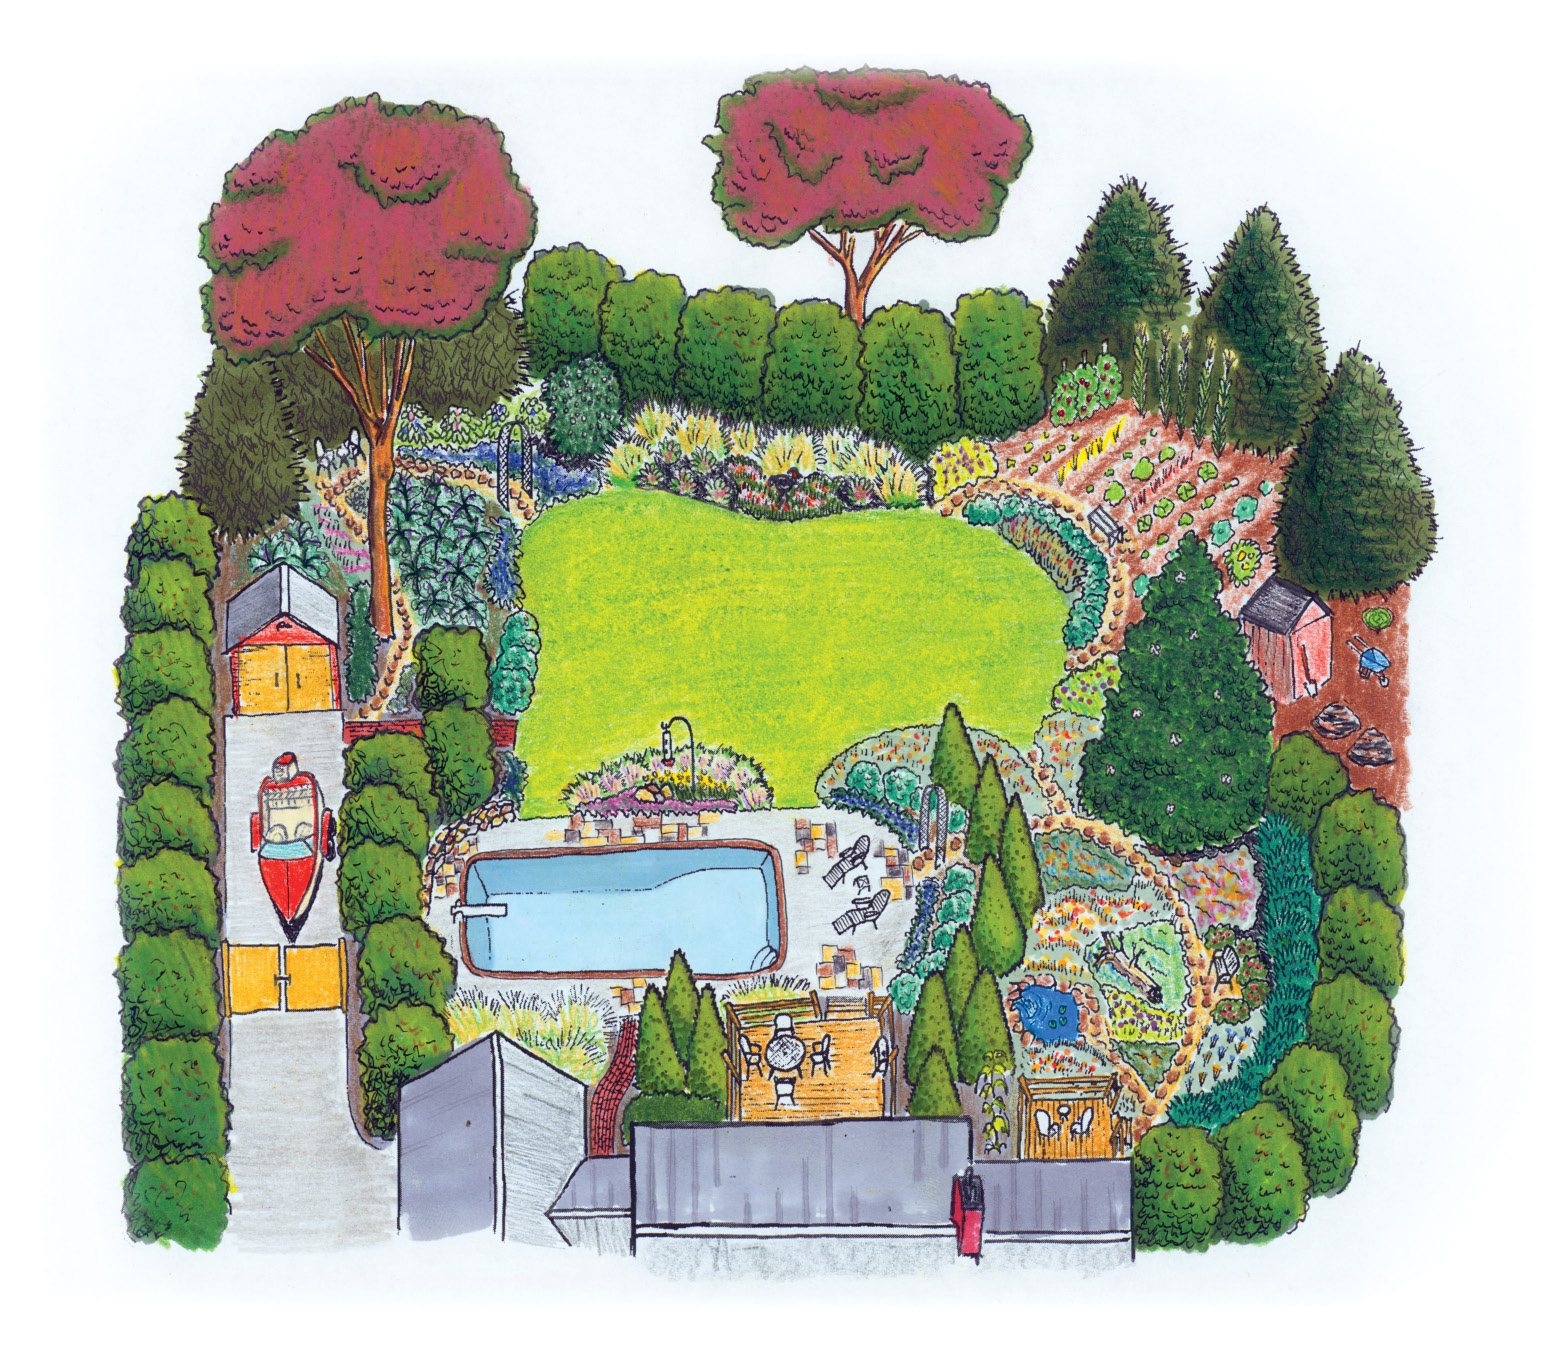
Figure 2. Back landscape. Drawing by Richard Martin III.
This publication is designed for avid gardeners and gives simple, basic approaches to creating a visually appealing, practical home landscape. If you are computer savvy, you may find it helpful to use a landscape design software program to help you through the process.
By following the step-by-step process of landscape design, you can beautify your property, add to its value, and bring it to life with your own personality and style. The best landscapes reflect the uniqueness of the family and the region. Whether you want to do it yourself or leave it to a professional, this publication will help you understand the process of designing a landscape. Understanding the process will help you to ask the right questions when and if you consult a professional.
Professional Help
The idea of designing a home landscape can intimidate even serious gardeners. Wise people know their limitations. Consulting a professional when necessary can prevent costly mistakes. For this reason, don’t let the cost of a designer keep you from asking one for help at any time during the design process.
Keep in mind that you can hire a professional to help you during a particular step without hiring one to do the entire design. For example, you might need help developing your base plan and site analysis, or you might ask for a consultation when you have the first draft of your landscape design to get a professional’s opinion and input. Safety is always a consideration for constructed items, such as retaining walls, arbors, and steps. A licensed landscape architect can help you create a design to ensure these items are safe (see Working with a Landscape Architect at http://extension.msstate.edu/working-landscape-architect). Landscape contractors can help you build and install your ideas (see Working with a Landscape Contractor at http://extension.msstate.edu/working-landscape-contractor).
Develop a relationship with the staff of your favorite garden center, and involve them in your plan. They can certainly tell you about the plants they grow and sell.
Sources of Inspiration
Don’t be afraid to scour landscape design books, the internet, other residential landscapes, or other sources of information. Use them to spark your imagination and help you formulate design ideas that will work for your landscape. You can find a list of regional books and references at http://extension.msstate.edu/books-and-references-for-deep-south-gardens. Attend garden and patio shows in your area. You’ll find everything you need, from professional services and building materials to plants and scores of adaptable ideas.
But, by far, the best source of landscaping ideas is your memories of gardens, landscapes, and natural places. You may want to recreate that corner herb garden that you remember so vividly from your grandmother’s yard. Or it may be that secluded garden bench tucked away under a bower of sweetheart roses that holds nice memories for you. It could even be those wild muscadine grape vines you climbed as a child to reach the plump, juicy fruit—all these memories could be recreated and mixed with the desires of other family members to create a landscape that you and your family will treasure for years to come.
You may do most of your initial landscape planning in your head. But to capture those ideas most effectively, write down these observations, ideas, and expectations as they come to you. Take pictures of plant combinations, landscapes, or gardens that are particularly appealing. You can even take pictures of magazine or book pages that show plants or landscape ideas you like. Then you could create a home landscape idea file on your computer to reference later when you start the actual design process.
Value of Landscaping
An ideal home landscape design should have value in four ways: aesthetically, economically, functionally, and environmentally.
Aesthetic
Aesthetic value can be achieved in many ways: by enhancing beautiful areas, creating new ones, or screening unattractive parts of the property. Using features in a landscape that impact all five senses can add to your pleasure and enjoyment of the landscape.
Economic
A well-designed landscape can increase the value of your home and property by as much as 15 percent. Landscaping can also reduce energy costs by buffering seasonal temperatures. Research indicates that heating or cooling bills could be reduced by as much as 30 percent with proper placement of plants around the home. For example, proper placement of shade trees could provide cooling in summer, while evergreen trees could block cold winds in winter.
Function
Landscaping offers a special functional value, too. Well-placed trees, shrubs, turf, and construction features increase the amount of the property you use. A little shade in the right place, a little sun in another, a place for the kids to play, a private patio, pool, or deck—all these add to the enjoyment of being outside.
Landscaping helps you solve problems and cut down on maintenance. For example, groundcover used on a steep hill in the yard can help you avoid lawn maintenance headaches, and groundcover on a very steep slope may be essential to prevent erosion.
Environment
Environmental benefits of a good landscape design include climate control and many other energy-saving measures. For example, trees and shrubs can influence wind, water, light, noise, and temperature around the home landscape. Water can be conserved and used more efficiently. Plants can provide erosion control and a habitat for wildlife. In addition, plants in the landscape help clean the air of dust and some pollutants. Proper plant selection and placement can deter fire and criminal activity.
Developing a Landscape Plan
All good ideas begin with a plan. Homeowners who begin installation without a developed plan may end up unhappy with the results. An unplanned home landscape built in separate steps sometimes does not coordinate well together when completed. Form a detailed overall plan before beginning installation. A good landscape design can provide a plan for phased installation, allowing a large or expensive landscape to be completed in stages as money and time allow. A plan is a logical series of decisions.
There are seven basic steps to creating a landscape plan:
- Develop a base plan.
- Conduct a site analysis.
- Assess family needs and desires.
- Locate use areas.
- Design outdoor use areas.
- Select and place plant symbols on the plan.
- Establish priorities for implementation.
Step 1. Develop a base plan.
Purpose
Begin by developing a simple, scaled drawing of your existing landscape from a bird’s-eye view. This map, or base plan, should accurately locate the property lines, house, drives, walks, fences, utility lines, existing trees, and other features that can affect your landscape development. There are many ways to measure and record the features of your landscape onto paper. Try one or more of the following techniques.
Identifying Your Property Lines
This step can be much easier if you have a map that shows the property lines and the house’s location on the property. This may be a plat, a deed map, the architect’s or builder’s plans, or a topographical plan with contour lines showing the site’s elevation or graduation. The map may include the fixed structures and hardscape—house, driveway, sidewalks, fences, walls, etc.
Depending on where you live, a plat may have been included in the papers you received when you purchased your home. If not, you may be able to get it from the city or county assessor’s office. While you’re there, you can request a copy of all local ordinances regarding easements, height restrictions, building codes, and any other regulations that could impact your landscaping project.
If you have difficulty verifying your property lines, you may need to call a registered land surveyor to locate and verify your property boundaries. You may use this survey plan as the basis for your scaled drawing.
Getting Started
Develop your base plan by using a piece of tracing paper to make a rough sketch of your property. If you have a large property, you may want to break the base plan into several drawings (front, side, or backyard areas of the landscape) or use large paper. Regardless, your sketch should show your property’s general shape. Be sure to label the street and property lines. A directional arrow to indicate north is useful.
Gathering Equipment
Gather the equipment needed to take and record accurate measurements: a 50- or 100-foot tape measure, pencils, erasers, and a large clipboard to hold your tracing paper. You may find that a measuring wheel works better for you than a tape measure. You will also need graph paper or a drawing scale to transform your rough sketch into a scaled drawing. It is better to have a partner to help you take measurements using a tape measure. If you don’t have help, use a long screwdriver to go through the loop on the end of the tape and into the ground to hold it in place as you measure.
Taking Measurements
Now, take the rough sketch of your property and begin to take measurements using the techniques described in the following sections. After taking all the measurements, you can bring the rough sketch back indoors to draw the final base plan to scale. For properties smaller than an acre, use a drawing scale of 1 inch = 10 feet (measure with an engineer’s scale) or 1/8 inch = 1 foot (measure with an architect’s scale). For planting beds having a large variety of species, you may choose the architectural scale of 1/4 inch = 1 foot. This larger scale can be a good choice for showing greater detail, such as in beds located adjacent to buildings or hardscape areas. Construction drawings for a building (also called floor plans) are frequently drawn in 1/4–inch scale, and these can be used as a base map for your planting plan. Use an architectural ruler or an engineer’s scale to measure. These supplies are available at most drafting or art shops. Figure 3 shows a sample base plan.
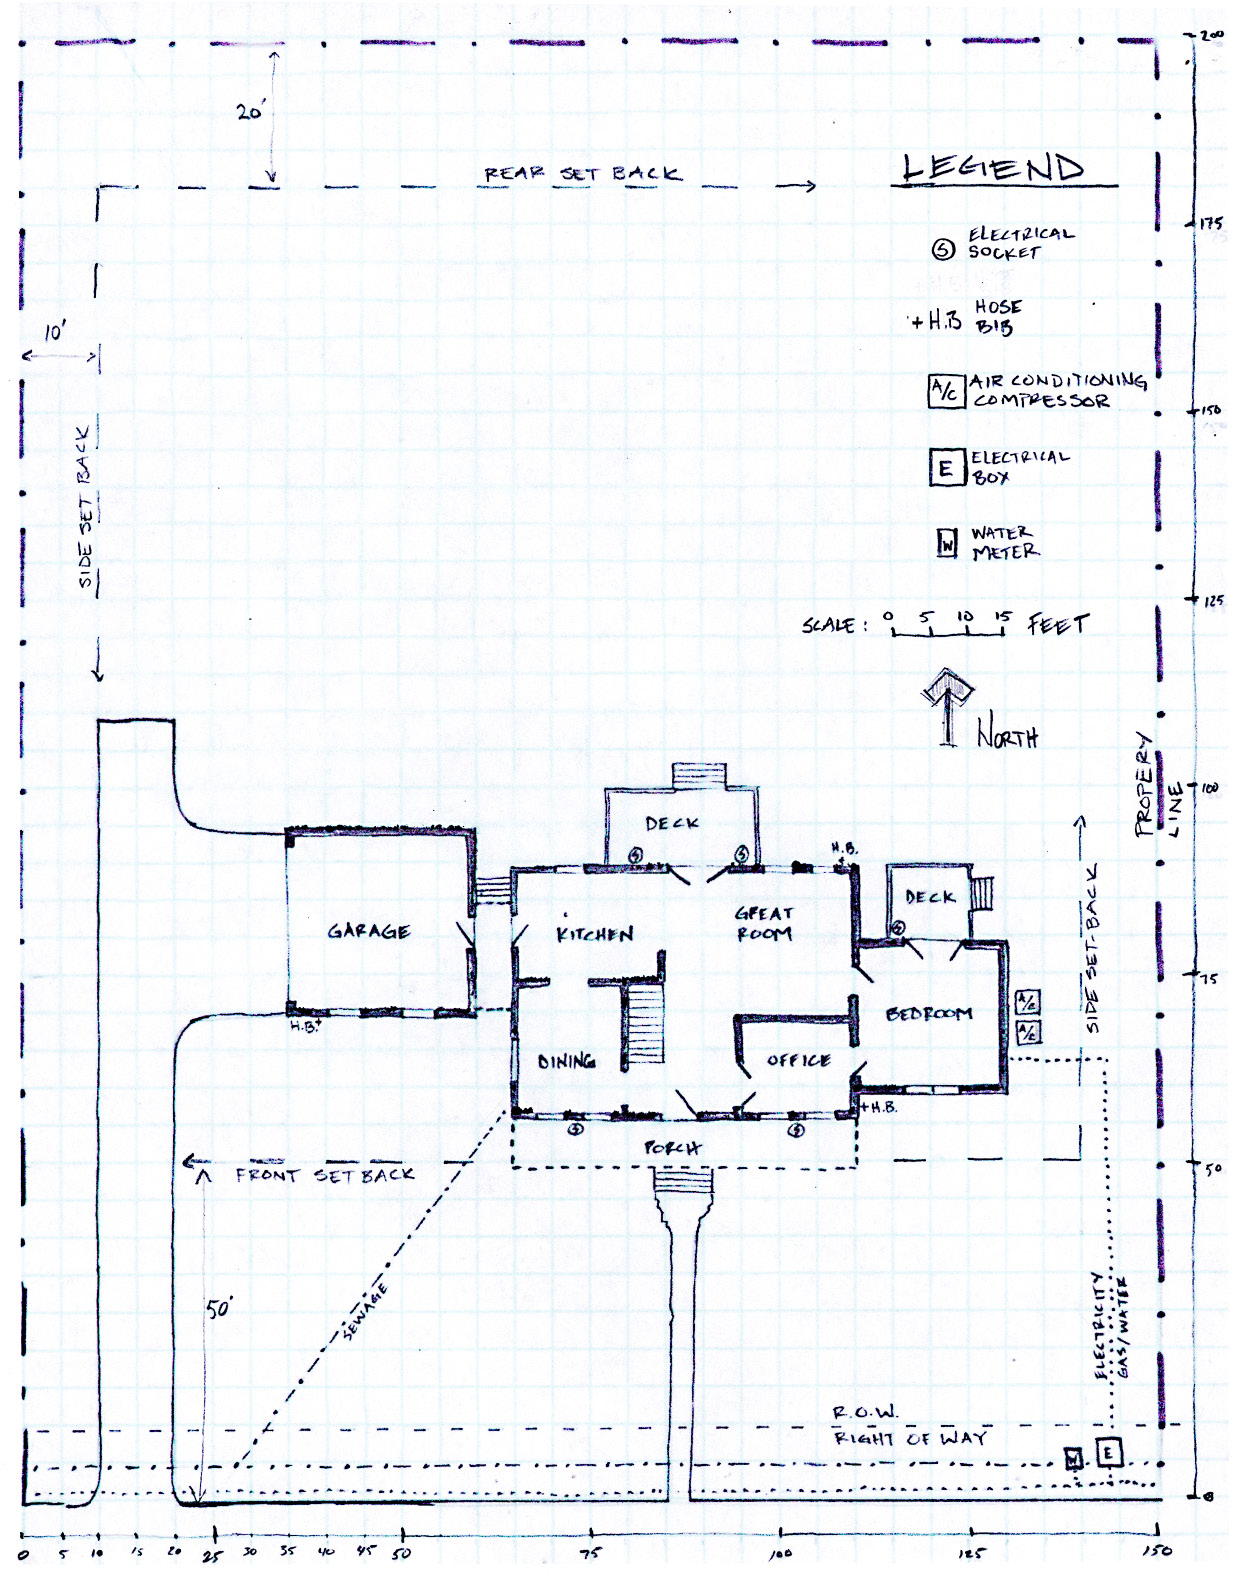
Figure 3. Base plan. Drawing by Richard Martin III.
The base plan should show the following information:
- All property lines
- Bodies of water (streams, lakes, ponds, low areas)
- Buildings, including
- floor plan with doors and windows
- downspouts
- outside water spigots
- outside electrical outlets
- decks and overhangs
- air conditioner units
- utility connections and meters
- driplines
- All walls, fences, utility boxes and poles, fire hydrants, etc.
- Roads, drives, parking areas, walks and paths, patios, swimming pools
- On- and off-site utilities, above- and belowground, including electric, telephone, gas, water, sewer, septic tanks, and field drains. Notify Mississippi 811 (dial 811 or 1-800-227-6477) to have underground utilities located.
- Existing vegetation, especially large trees
- Off-site elements including adjoining roads and drives, bodies of water, and structures
- Compass directions showing north, east, south, and west
- The scale size of the base plan
Identifying Property Lines
Find your property lines by using the plat, survey records, or other records. Measure each property line with a tape measure and record it on your rough sketch. If your property has side boundaries that are not parallel or if your home is not parallel to at least one boundary, you must make an additional measurement to draw the correct corner angles in your final drawing. Ask another person to help you by standing on the property line while you sight along the house wall toward them. Ask them to move to the left or to the right, as needed, to be in line with your sight line down the wall. Then measure the distance from your helper along the boundary line to the nearest corner (reference points D to H in Figure 4).
In a similar manner, ask your helper to stand on the front property line. Align your helper on your sight line as you look down the side wall of the house toward them. Again, record the distance from your helper to each property line (reference points A to E and A to D in Figure 4).
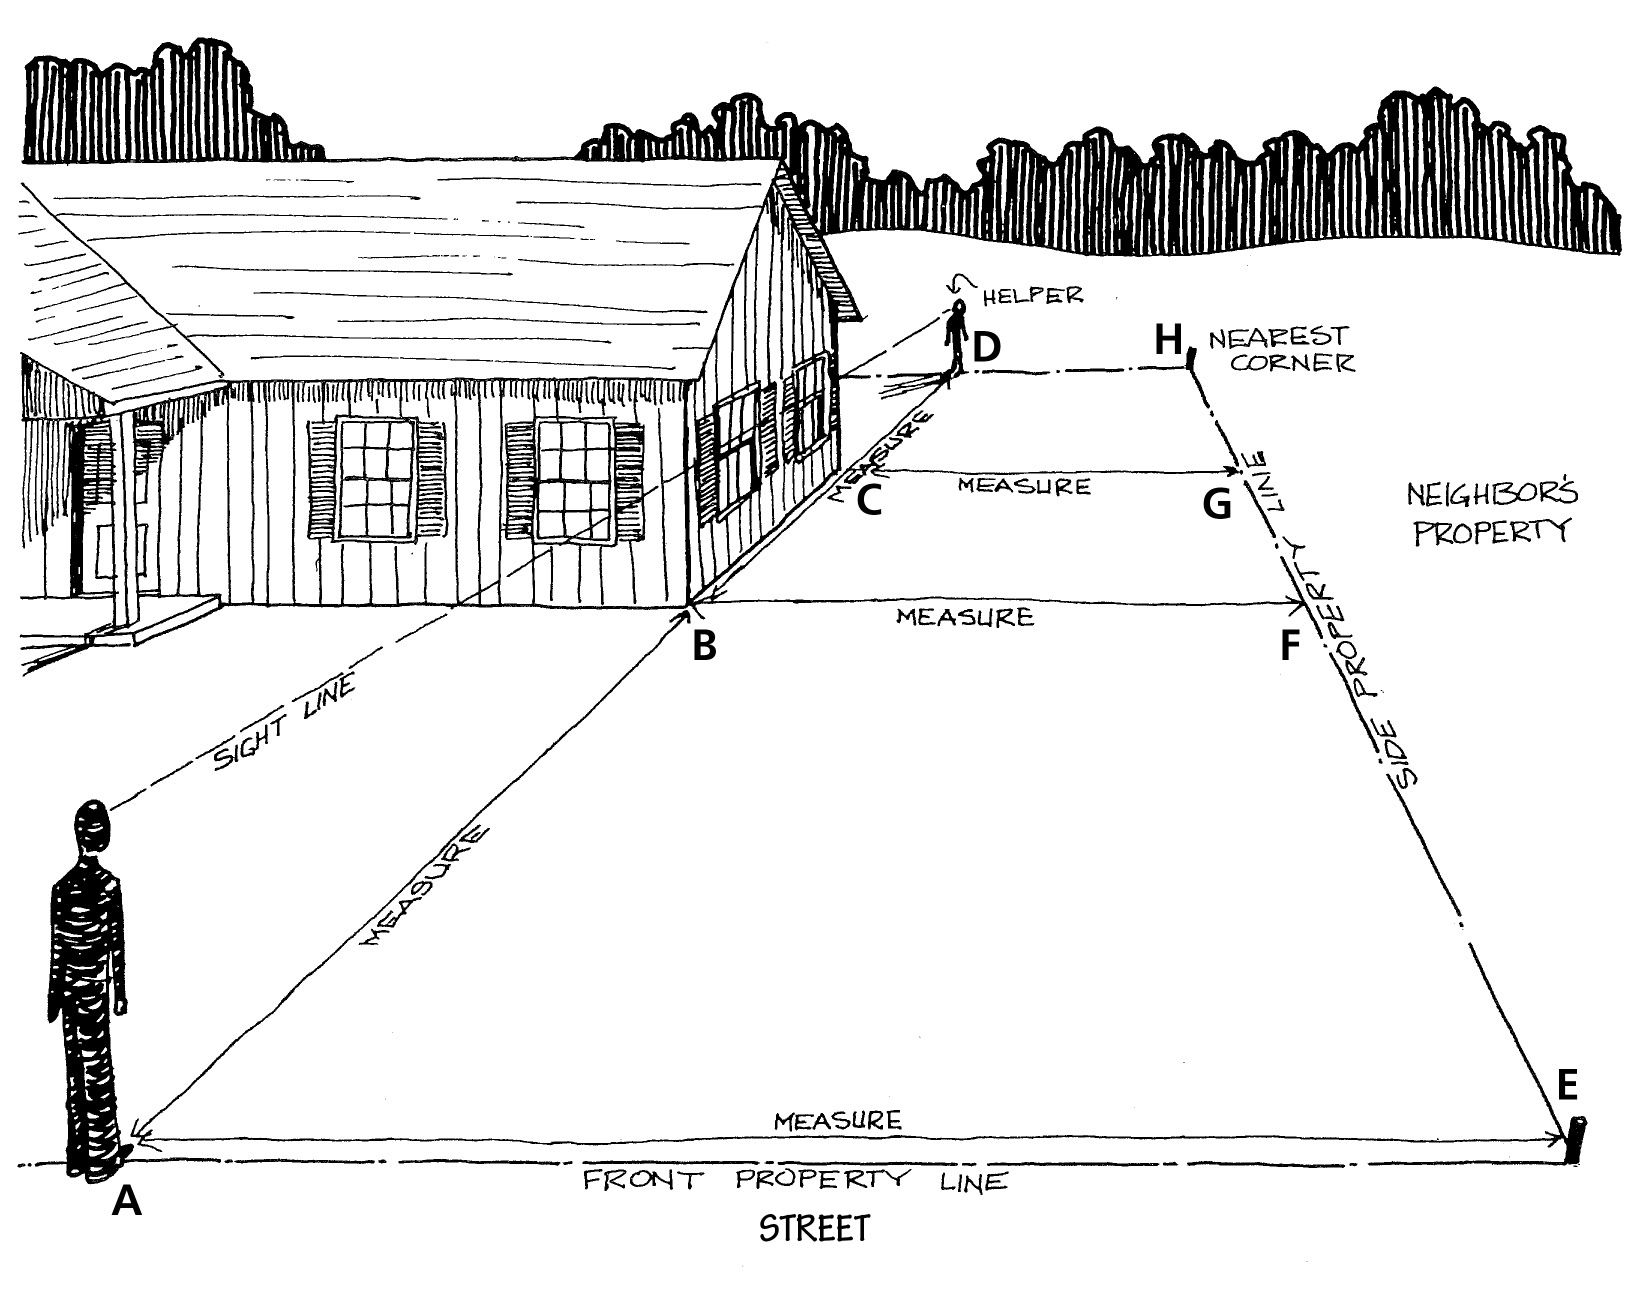
Figure 4. Measuring property lines.
Locating House on Property
Accurately locate the front corner of the house by first measuring the distance from the street to the corner of the house (A to B as shown in Figure 4). Then, measure the distance from the side property line to the front corner (B to F). Locate a back corner of the house by measuring from the street to the back corner (A to C), and then measure from the back corner to the side property line (C to G).
You can record the measurements of each side of the house by using a set of blueprints of your home, by using the survey record, or by making measurements of each side. Be sure to indicate location of doors, width of windows, and height above ground level. Don’t forget to measure heights from ground level of porches and decks. See Figure 5 for the method of measuring windows and doors.
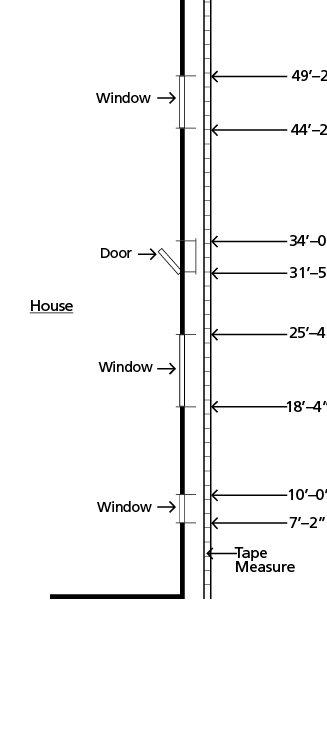
Figure 5. Baseline measuring is used to locate doors and windows.
Locating Outlying Landscape Features
You are now ready to locate the other features of the property. These features include above- and belowground utilities such as gas, water, electric, telephone, and sewer lines. Also included are TV cable, septic tank, field lines, utility meters, water faucets, roof overhangs, retaining walls, and fences. Don’t forget to include existing trees and other plants you want to keep in the new landscape design. Depending on the quantity and locations of existing plants you plan to remove, you may also want to include them, especially if you will not be performing the removal yourself. If all of these features will not fit easily onto one base plan, you can create other plans to include features such as existing plant material and physical structures. See Figure 6.
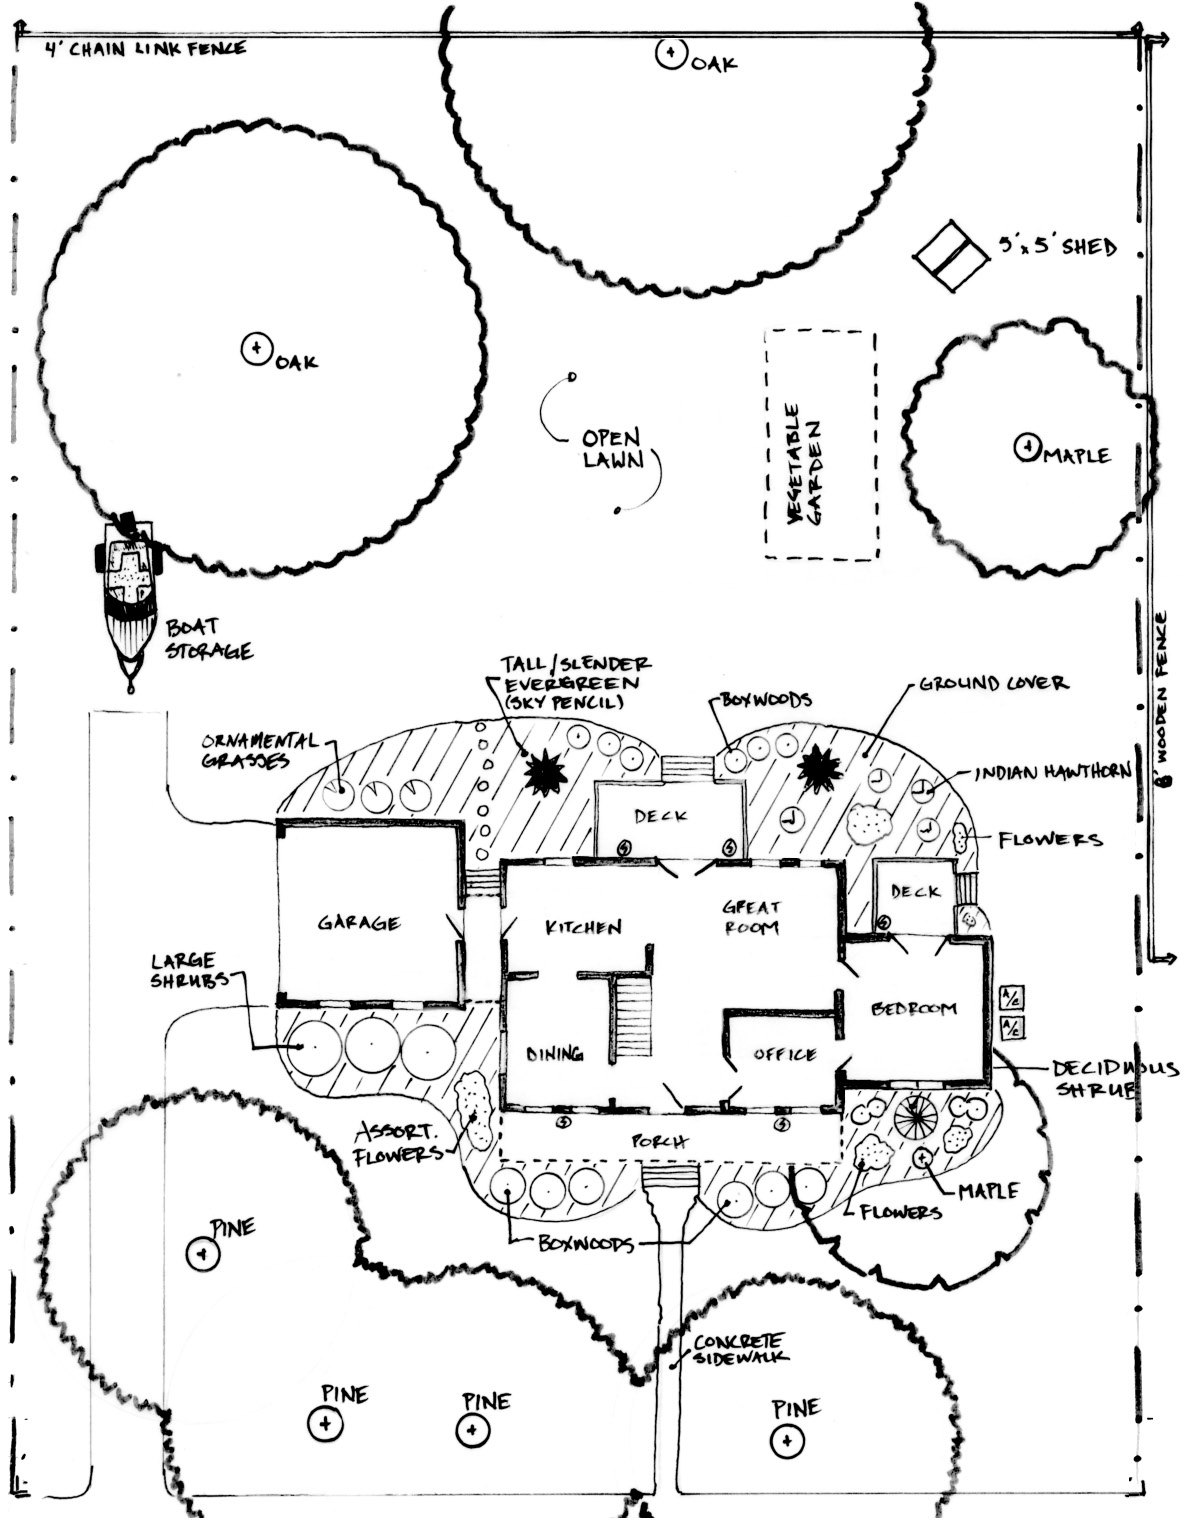
Figure 6. Inventory of existing plant material and physical structures. Drawing by Richard Martin III.
Include natural features such as ditches, ravines, and steep slopes. Also include neighboring buildings and existing vegetation, especially large trees, that will impact your landscape. You can locate these outlying features on your rough sketch by measuring in two directions from a known reference point, such as the house, street, or property line. See Figure 7 for a method of using the sight line of the house to locate an existing tree in the landscape. Trees or other feature points can also be located by a triangulation measurement (Figure 8). Measure the distance from two known points (A and B), marking on the base plan where these two distances meet along radii drawn by a compass.
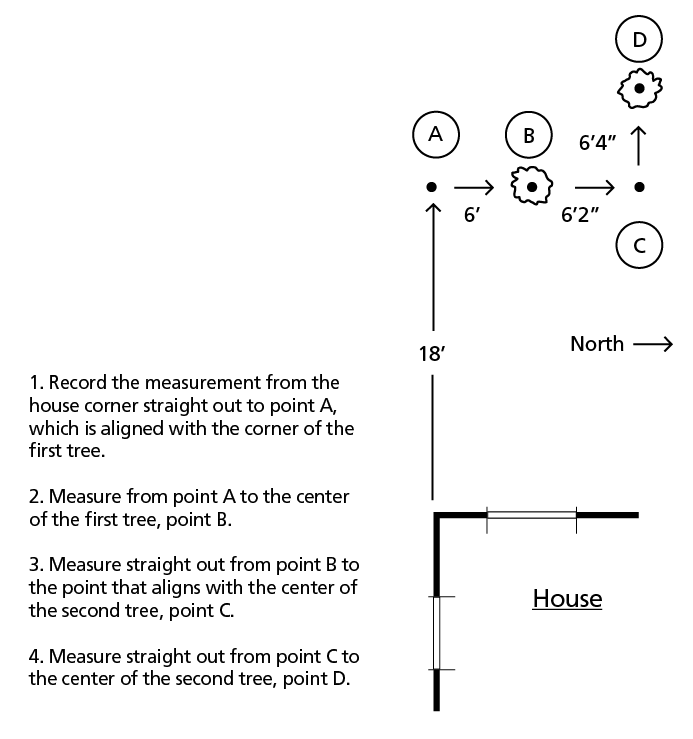
Figure 7. Measuring to outlying objects.

Figure 8. Triangulation measurement.
Measuring Curved Areas
You may have a curved bed, driveway, or other area. To measure the curve, you need a straight line from which to measure. If the area does not have a wall or fence backing it, create a line with string and stakes, a hose, or another measuring tape. Start at one end of the curved area. Lay out the tape from the beginning point of the line to the outside edge of the curve to measure the distance. Repeat this process every 3 feet until you have measured the entire area. This will result in a series of dots on your base map that reflects the curving edge of the area. Connect the dots to determine the general shape of the area. See Figure 9.
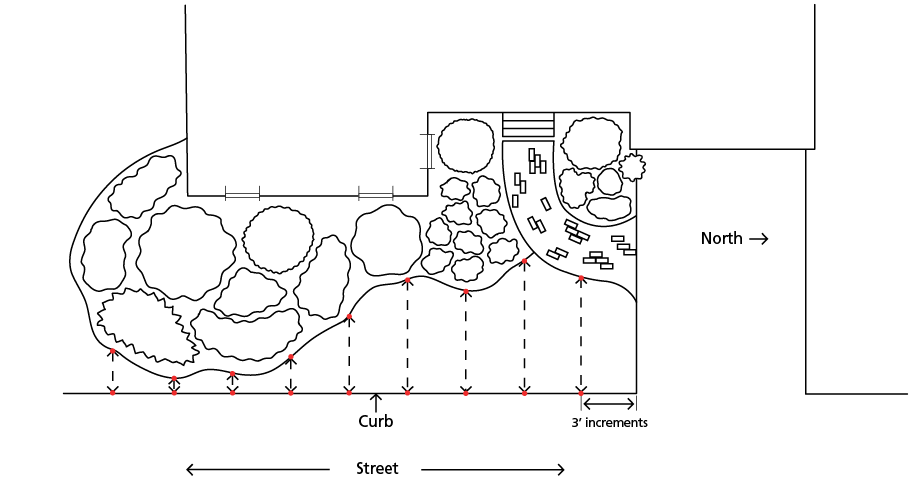
Figure 9. Measuring curved areas.
Measuring Angled Features
Be careful with angled surfaces that are created by bay windows, decks, patios, and other irregularly shaped protrusions. These can be tricky to measure. Figure 10 shows a simple technique to measure an angled feature.
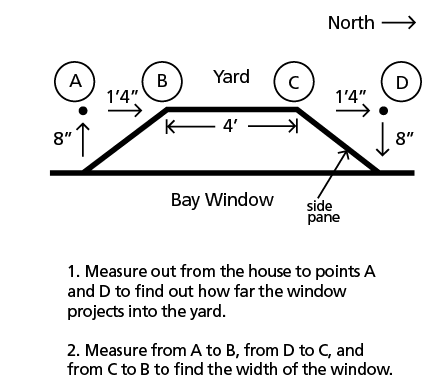
Figure 10. Measuring angled features.
Transferring Measurements to the Final Base Plan
Draw the final base plan on graph paper using the largest scale that will fit your property area. For example, a property area measuring 100 feet by 70 feet would easily fit on one 81/2-by-11 piece of graph paper with 10 squares per inch if using a scale of 1 inch = 10 feet. Graph paper is sold at bookstores and the office supply sections of large discount stores.
Review your rough sketch and measurements of your property and landscape features. Start the final base plan by drawing a line across the bottom of the grid to represent the edge of the street or road in front of your house. If you have a corner lot, draw a second line to indicate the side street. Now, mark the compass directions on your base plan by indicating north with an arrow. Place east, south, and west in the appropriate areas.
Find out all of the restrictions, easements, and rights-of-way associated with your property. In most cities, the sidewalks are on city property, with the homeowner’s property line beginning somewhere inside the sidewalk. Avoid permanent plantings or construction in the easement areas, which are commonly used for widening streets and accommodating utilities.
After determining the distance of the easement, locate your front property line on your paper and draw it lightly. Then, measure and draw the side and back boundaries of your property. If your side boundaries are not parallel, you should draw the front boundary line and then use the sight line to draw the back boundary line. The side boundary line can then be located by using the measurements from reference points A to E and D to H as explained earlier in Figure 4. By establishing these four boundary lines, you have an accurate outline of your property.
Now, you can draw your house by locating the corner that you measured for your rough sketch. It will be a certain distance from the street and a certain distance from the nearest property line. Count the squares on your graph paper and locate the corner of the house. Then draw the measurements and shape of your home. Be sure to indicate doors, window heights and widths, and windowsill height from ground level.
Next, transfer all the other features from your rough sketch, including all features that will affect your landscape design.
To draw a curved feature on your final plan, transfer from your tracing paper the series of dot measurements along the curved edge of the area onto your scaled drawing. Then use a French curve to approximate the curved line. (French curves are available from office supply stores.) Rotate the French curve until some part of the inner or outer edge touches at least three points you have located. This curved line will accurately represent your feature.
When you have added all the features, you have a very accurate base plan of your property. Again, if it is not possible to accurately include all features on one base plan, you can create another base plan or inventory sheet that shows, for example, plant and physical structure inventory as shown in Figure 6. It might be helpful to create this plan on tracing paper so it could be placed over the base plan (Figure 3) to create a complete “picture” of the property. The completed base plan is your reference map while developing your landscape plan.
Before proceeding to Step 2, carefully review the following list and make any needed additions to your base plan.
Step 1 Checklist
- Accurate property lines
- Proper location of house, drives, walks, fences, patios, porches, decks, etc.
- Location, kind, and condition of all trees and plants
- Electrical poles, lines, exterior outlets, and meters
- Gas, water, and sewer lines, including cleanout locations, and meters
- Telephone and TV cables (above- or belowground)
- Storm sewer manholes and fire hydrants
- Compass directions showing north, east, south, and west
- Roof overhang, downspouts, water spigots, windows, and doors
- Locations of steep slopes, drainage swales, and where site water is draining
- Soil types and their characteristics
- Existing building and neighborhood architectural styles
- Locations of storage and functional use areas
Step 2. Conduct a site analysis.
Purpose
Analyzing the site’s environmental conditions and taking inventory of other conditions of the site, including soil, is an important step. Accurate analysis of the site will help you understand existing conditions. You can then modify areas that need improvement and make the most of natural areas. Note wind, sun, and shade patterns, as well as water movement and terrain levels that impact where you locate play, cooking, gardening, entertaining, pool, and other activity areas of the landscape.
Observing Over Time
For the most accurate site analysis, record observations of the site for a year before you start to change any of it. For example, if you purchased your home and property during the winter months, it would be a good idea to go through one growing season to determine the best areas for spring bulbs, perennials, or other plants.
A year of observing your landscape may sound excessive, but taking your time has an advantage. If you move too fast, you could destroy one of your landscape’s assets before you are even aware of it. Observing how the sun moves across your property during the year, where shade occurs, where water collects, which views are concealed or revealed by deciduous vegetation, and where privacy or lighting is needed is essential to creating an effective landscape.
Take time to determine where the favored pathways run. Where is the best spot to store gardening tools or equipment? It takes time to see the best views to enhance or the less attractive views to conceal. Remember to conduct part of your site analysis from inside your house, observing the views from windows and doors through the season. The view of your landscape as seen from inside your house is very important. Unattractive features should be hidden from view and attractive features emphasized.
Getting Started
Start the site analysis by taping your base map onto a rigid piece of cardboard or other material for stability. Take a clean sheet of tracing paper and place it over the base plan. Trace all existing features from the base plan—property lines, outline of the house, existing structures, paving, and plants. This duplicate will become your site analysis.
Recording the Landscape
Refer to Figure 11 and the Step 2 Checklist to guide you through the site analysis items. The following paragraphs will help you accurately record features and patterns of sun, shade, wind, noise, soils, landforms, surface drainage, and views. Put labels on the approximate location of each item or condition. Use arrows to indicate patterns of access, views, and slopes, labeling each one. Now take a look at what you have created. You should have an emerging picture of what your property looks like.
Look at the relationship between spaces. Is your parking space near the door you use most often? You may realize that you have incompatible zones of use side by side. Can you see and smell the dog pen while sitting on your patio? You may need to move or screen the pet area. What is the view from your family room picture window? Hopefully, it isn’t the neighbor’s woodpile or messy tool shed. Add notes, circles, and arrows as needed to show how existing zones of the house and yard work together or clash. The more detailed you make your site analysis, the better tool you will have when you go through the other steps in the design process.
Understanding Environmental Features or Patterns
Sun and Shade
The angle of the sun as it moves across the property in different seasons of the year is very important in determining how to plan for shaded and open areas. In Mississippi, the summer sun rises slightly to the northeast, is straight overhead at 12 noon, and sets slightly to the northwest. Look at your property and make notes on the summer sun’s effects on your house. Indicate shady and open areas. See Figures 11 and 12.
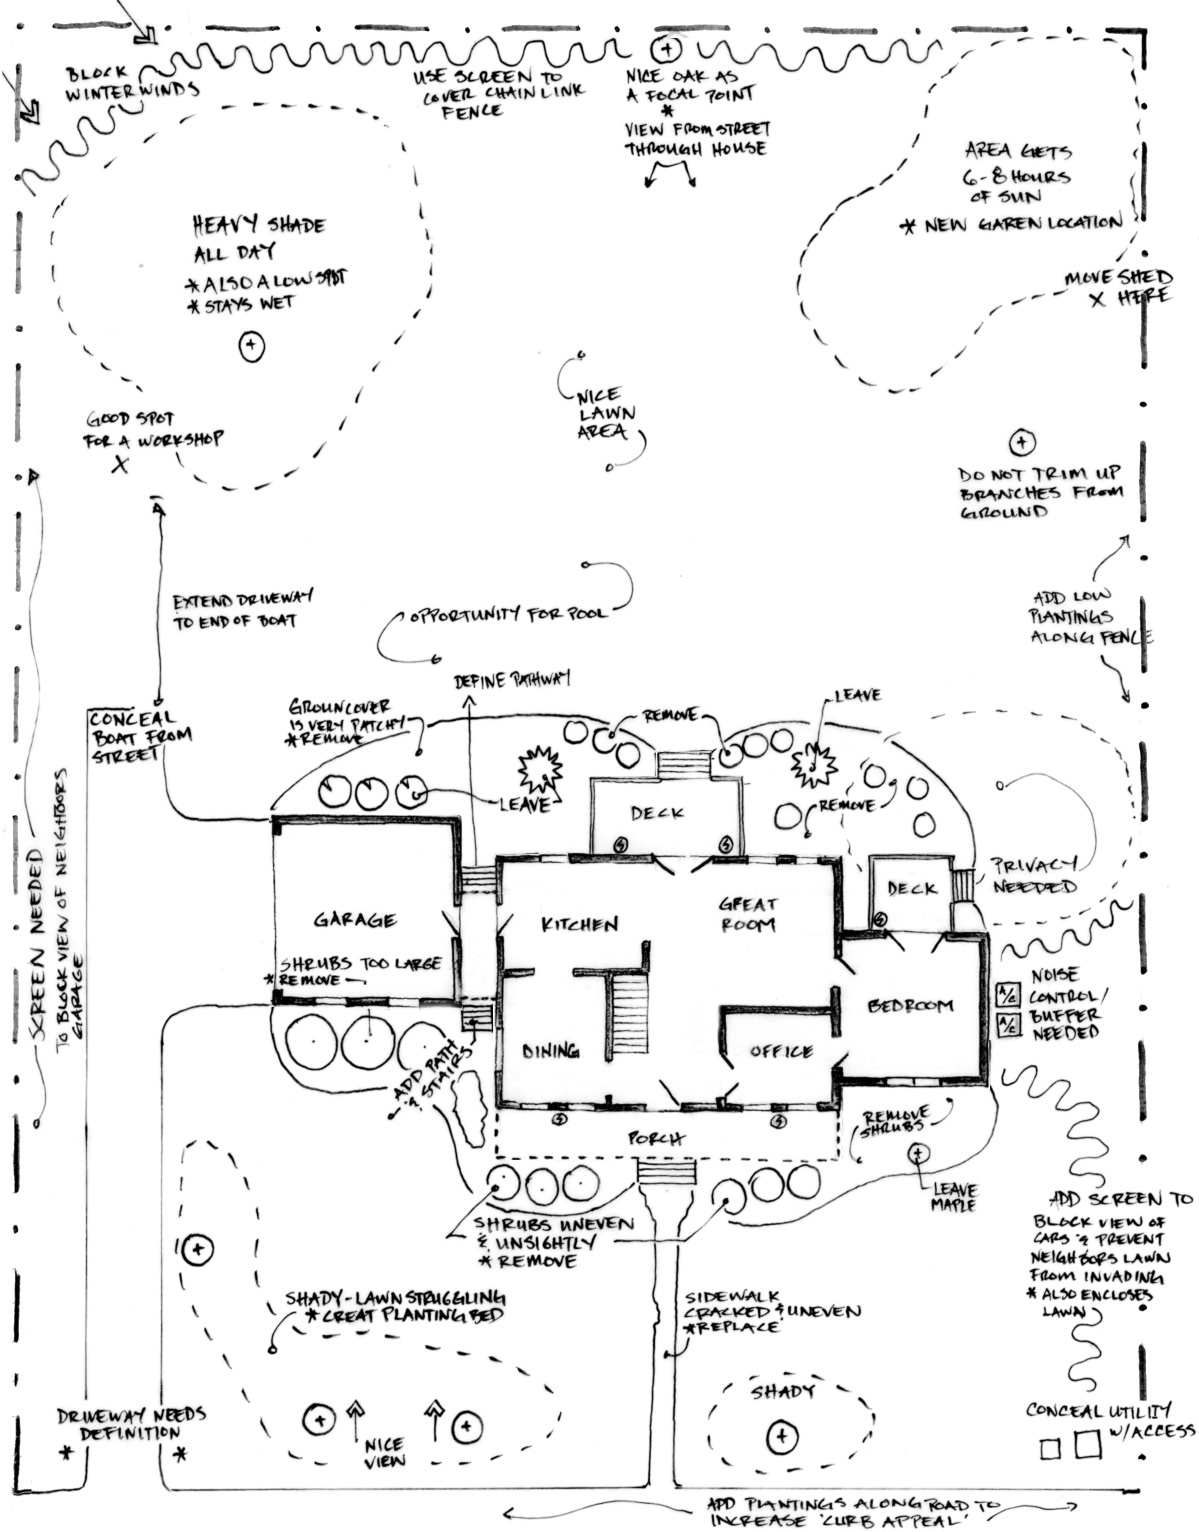
Figure 11. Site analysis. Drawing by Richard Martin III.
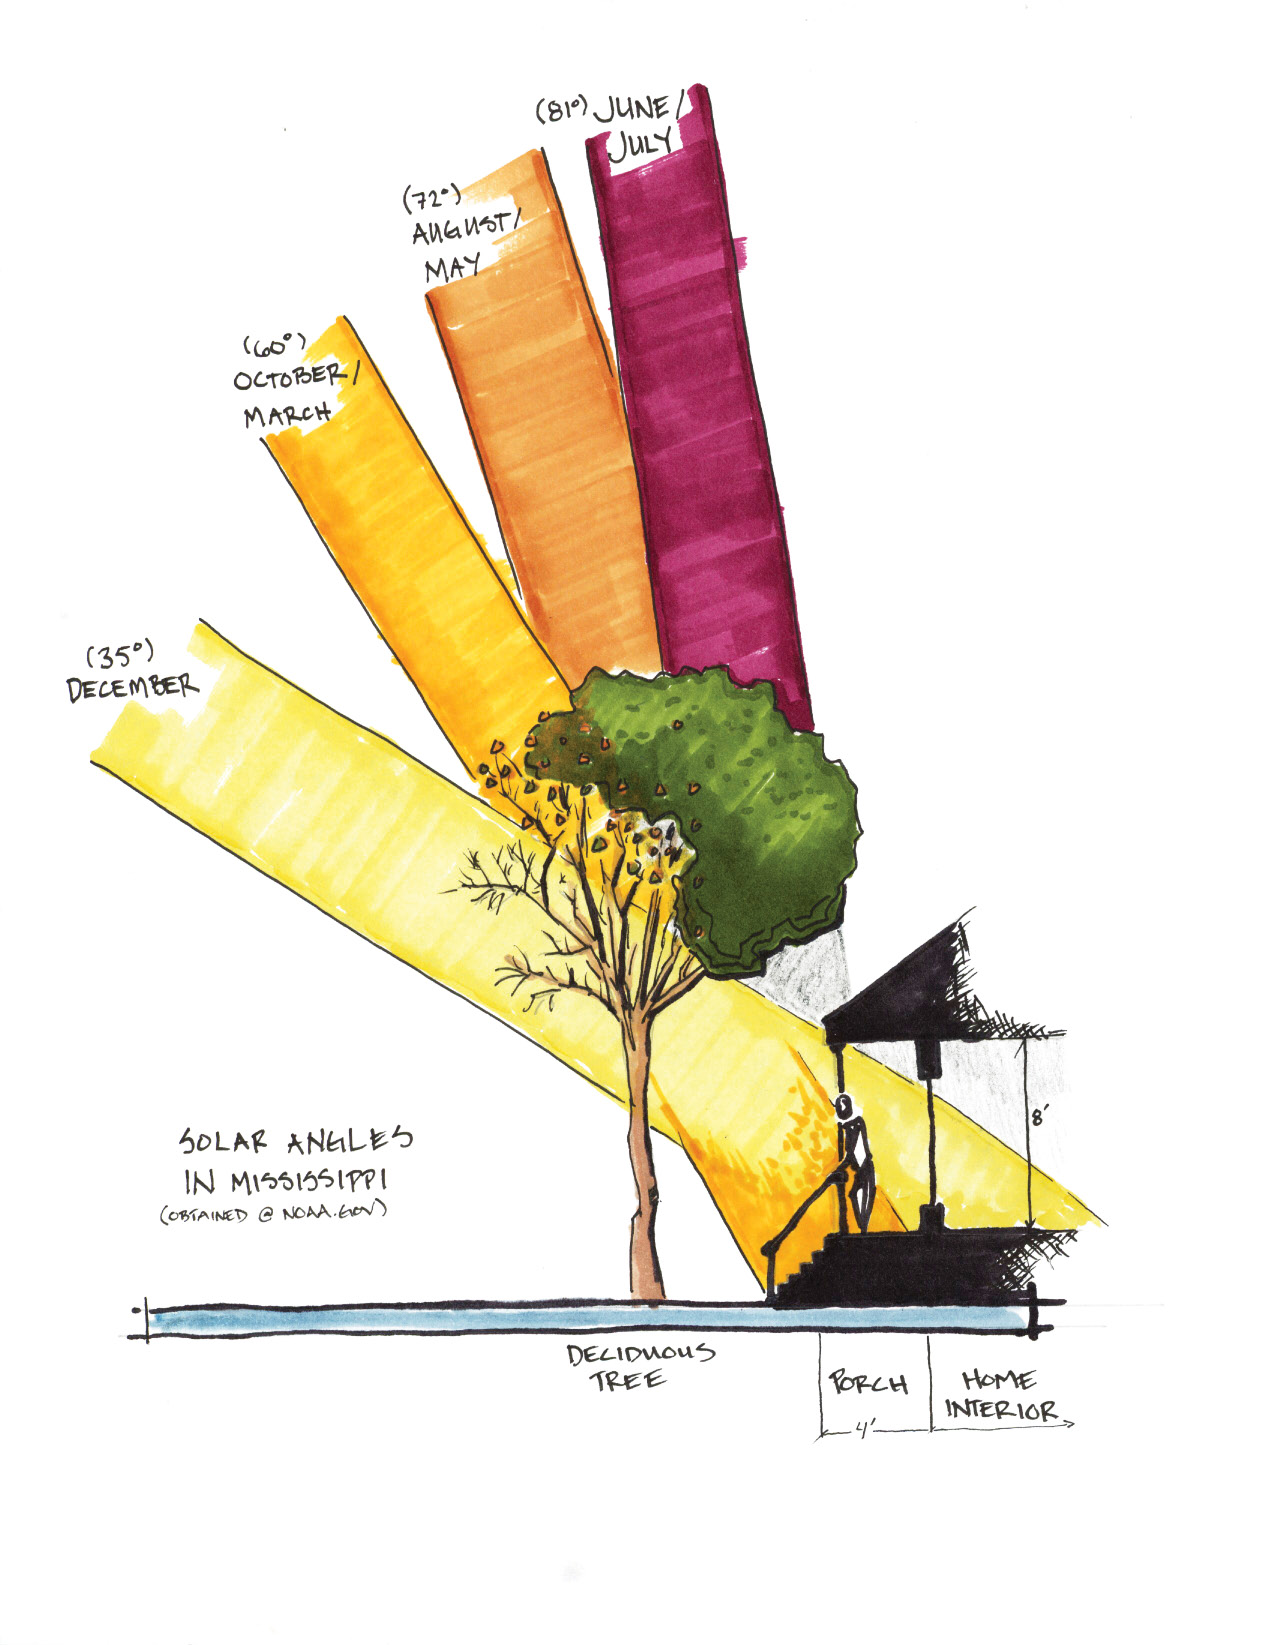
Figure 12. Solar angles in Mississippi. Drawing by Richard Martin III.
Also consider the winter sun’s effects. The winter sun rises in the southeast, remains low in the southern sky, and sets in the southwest. Use arrows to indicate how the winter sun affects your house. By knowing the sun’s movements in summer and winter, you can decide where to locate summer shade and where to provide open areas to allow the winter sun to warm your home and outdoor living area.
Wind
Wind can be harsh and cruel during the winter but bring a cool breath of relief during the summer. In most areas of Mississippi, the winter winds are from the north and northwest. Summer winds are from the south and southwest. The three coastal counties of Mississippi enjoy a southerly Gulf breeze during most of the year. Look at your property and determine the orientation of the prevailing winds. This information will help you determine the natural placement of screens to protect you from harsh winds.
Noise
Everyone will not be fortunate enough to enjoy the quiet of country living. Homes in cities and suburbs can be constantly bombarded with noise from vehicles, neighbors, and businesses. Many noises can be buffered by planting trees and shrubs with dense foliage. Note any noise issues on your analysis sheet.
Soils and Landform
Soils greatly affect the choices of trees, shrubs, and lawn grass. It is especially important to look at the soil around the house’s foundation. Modern construction techniques usually turn up subsoil that is spread near the foundation. These subsoils are often tight clays that do not have the structure or texture necessary for good plant growth. If you plan to use foundation plants, you must consider these soils.
Take a soil test every 20 feet along the sides of the house and 2 feet out from the walls. Take the soil samples carefully, and do not allow mortar mix or concrete chips to be included. These materials could ruin the test results and your plants. Make sure to remove those undesirable materials before soil preparation. For information on how to take and submit a soil sample, contact your local Extension office. Extension workers can give you soil sample boxes and the instruction sheet. You can also watch a “Taking a Soil Sample” video here: https://extension.msstate.edu/extension-stories/video/2017/how-take-soil-sample.
Surface Drainage
Next, determine the direction of surface water drainage. Use arrows to indicate how water runs off the property. Also indicate any areas where water runs onto your property from neighboring lots and vice versa. Take special note of any areas that are eroding (washing away). In addition, indicate areas where water stands for long periods of time. It is best to observe during multiple rain events of varying duration and intensity.
Views
Your site analysis should determine the desirability of views from all sides of your property as well as from inside the house. Indicate these on your analysis notes.
Review the checklist below before proceeding to Step 3.
Step 2 Checklist
- Sun patterns and movements by season across the property
- Hot areas, shady areas, and cool areas
- Areas that need shade
- Windy areas
- Noise screens
- Existing soil conditions, especially around home foundation
- Soil test results
- Poorly drained, wet, soggy, or low areas
- Surface water drainage routes, including downspouts, drainage swales, and areas water drains
- Areas where erosion is occurring
- Slope of property, including banks, gullies, ditches, hills, knolls, etc.
- Condition of all trees and shrubs
- Good views and poor views (both on and off property)
- Items that need to be replaced or repaired, including fences, driveways, walls, walkways, patios, etc.
- Health and condition of lawn
- Valuable wildlife plants and areas
- Invasive, exotic plants to be removed
- Any other features that need to be improved
Step 3. Assess family needs and desires.
Assessing Your Family’s Needs
With a complete base plan and a thorough understanding of the site, you are ready to list your proposed use areas. Each family’s needs vary with their outdoor activities. These are the types of areas you may consider when developing your landscape plan:
- Pet areas, such as open lawn and pens
- Cooking areas
- Sunbathing, lounging, or reading areas
- Entertaining areas
- Recreation areas
- Outdoor storage for equipment, firewood, vehicles, or boats
- Gardens, water features, pathways
- Attractions for birds, butterflies, and other wildlife
As you consider the areas you will include, be realistic. How much time are you willing to spend maintaining gardens and use areas? Be sure to budget how much you are willing to spend for various improvements.
Step 4. Locate use areas.
The outdoor areas of your property should tie into the areas and activities within your home. For example, locate outdoor cooking areas near your kitchen or dining room. Locate service and storage areas away from your main use areas and views from the home. Patios and decks should connect directly into main entrances of the home.
Take another sheet of tracing paper and overlay onto the base plan. Draw zones where these different use areas could best occur and their approximate sizes. Try several different schemes until you find the best layout. Figure 13 shows an example of a general layout plan.
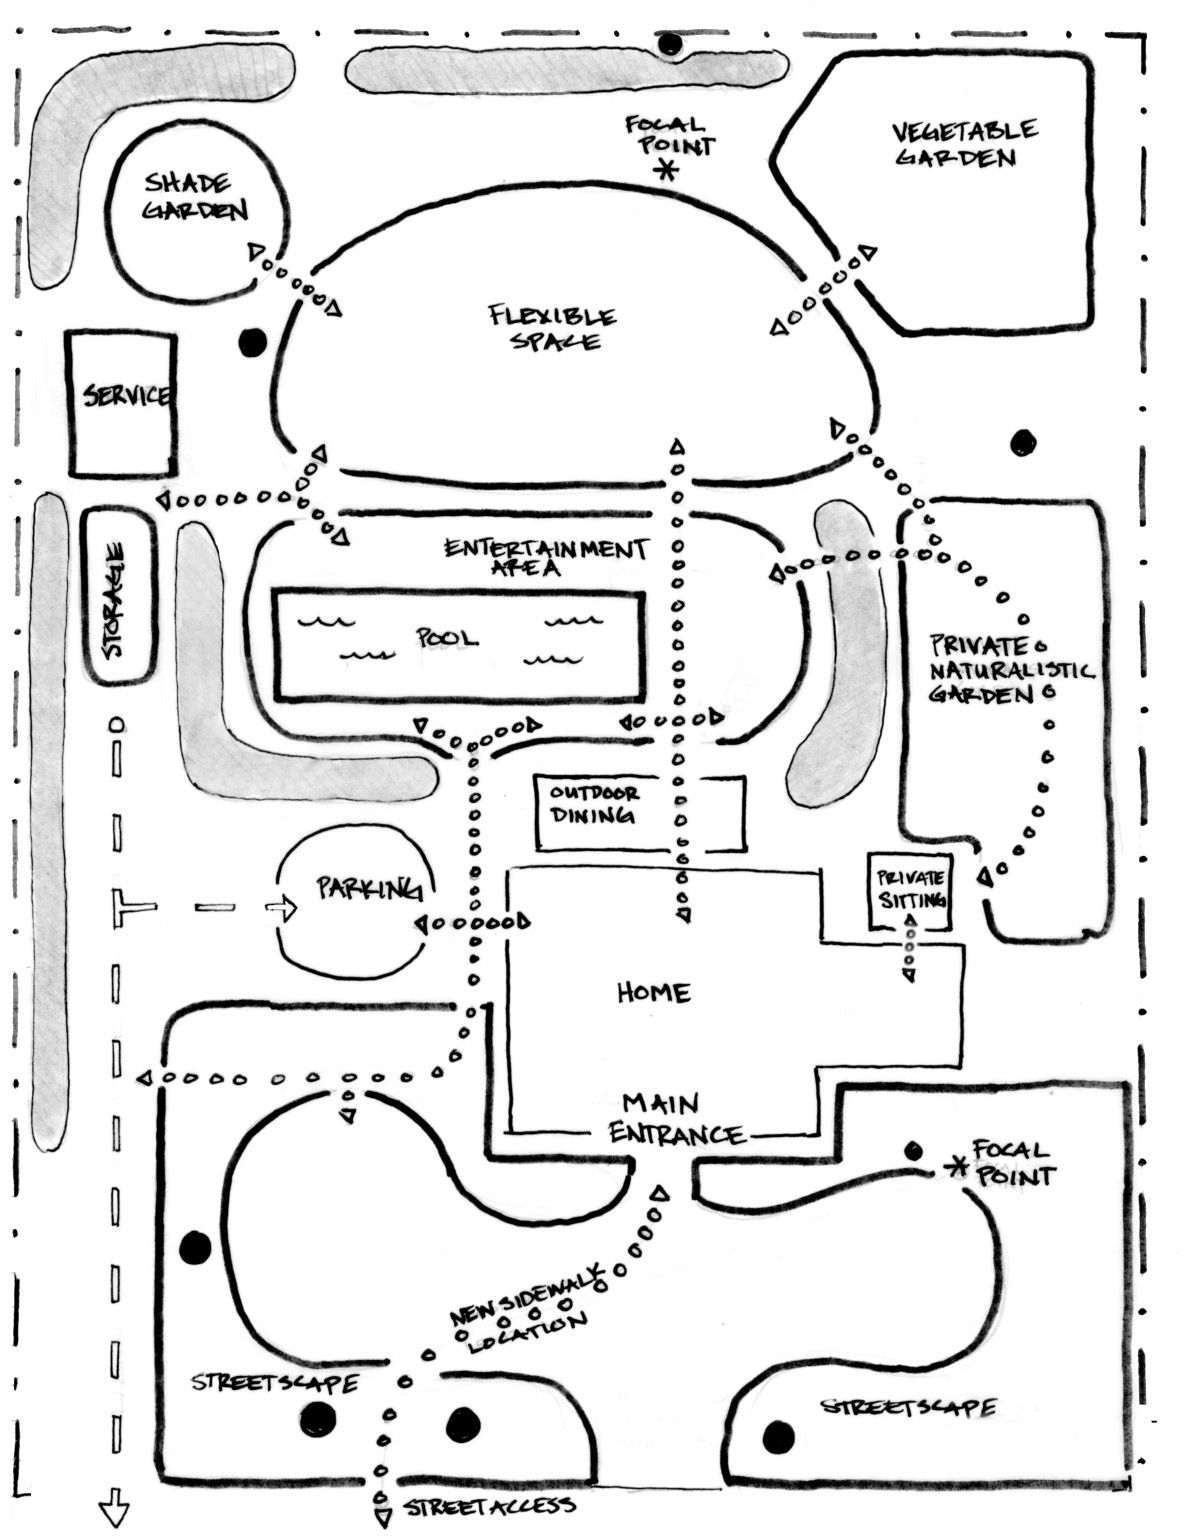
Figure 13. Locating use areas. Drawing by Richard Martin III.
Step 5. Design outdoor use areas.
It is easier to develop each of the outdoor use areas separately and later combine them into the overall plan. Imagine yourself sitting within or using each area as you develop the design ideas. For example, to design a patio space, first decide on the elements that would make a successful seating area. You may include seats, tables, overhead shade structures, a sense of enclosure, views, water features, or other elements. Reviewing your home landscape idea file, looking at garden magazines and books, and visiting other successful spaces may provide visual ideas to help you. Remember to keep in mind the important principles from your site analysis so that your proposed use areas do not conflict with other elements, such as utility lines, water drainage, and other existing conditions.
To get an idea of the size of a space, use a garden hose to approximate the outline for the area. Move the garden hose to adjust the size of the space until it is the appropriate scale and form. After you have chosen the size that seems best in the landscape, transfer this general outline to the landscape plan at its proper scale.
Considerations for Outdoor Living Spaces
Just as a room in a house has walls, ceilings, and floors, so does a landscape space. As each room is designed for a specific function—kitchen for preparing food, living room for leisure, bedroom for sleeping—so are outdoor use areas. Outdoor spaces should accommodate their functions: eating, relaxing and talking, playing, or gardening. See Figures 14, 15, and 16 for examples of these outdoor use areas.

Figure 14. This outdoor living space consists of two separate areas. The chairs, buffet table, and food cart in the foreground form a seating area. The dining table and chairs to the back create a dining area. These areas are defined and enclosed with a brick wall, shrubs, trees, and container plants. Photo by Lelia Kelly.
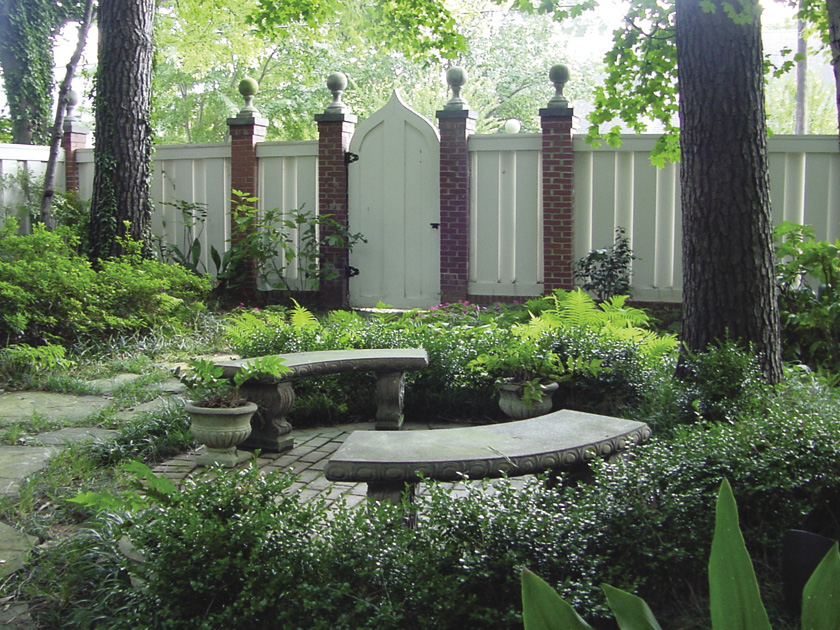
Figure 15. Providing convenient spaces for sitting throughout the garden makes the landscape more enjoyable and usable. The low hedge encloses the space and adds texture. Photo by Lelia Kelly.
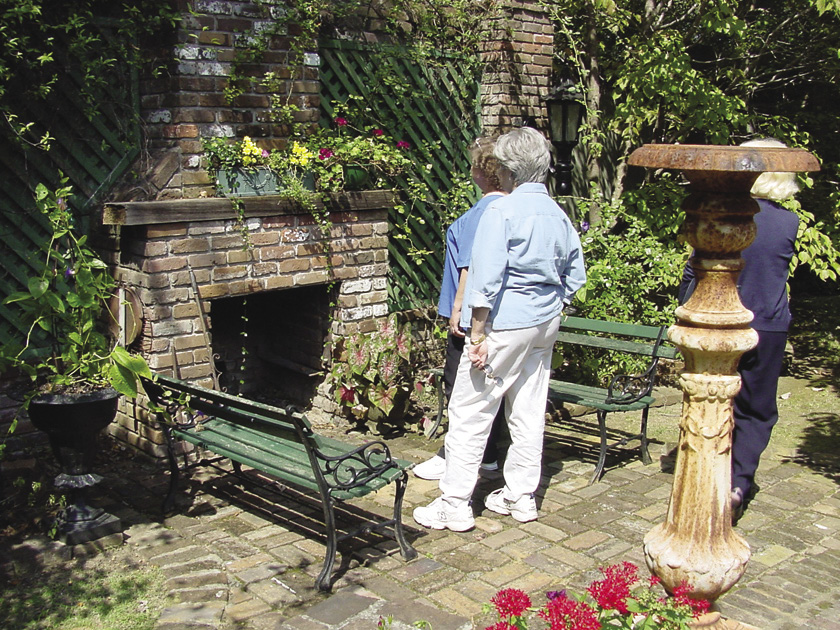
Figure 16. Outdoor fireplaces make wonderful places to gather in the cooler times of the year. Seating and other accents, such as potted plants and sculpture, make this area attractive year-round. Photo by Lelia Kelly.
It is best to select building material types and forms that will match and fit the character of the home and the surrounding area. Outdoor “ceilings” may be composed of constructed materials such as building overhangs, arbors, fabrics, or other materials (see Figure 17). They may even include the open sky or the branches of large canopy trees overhanging the space.
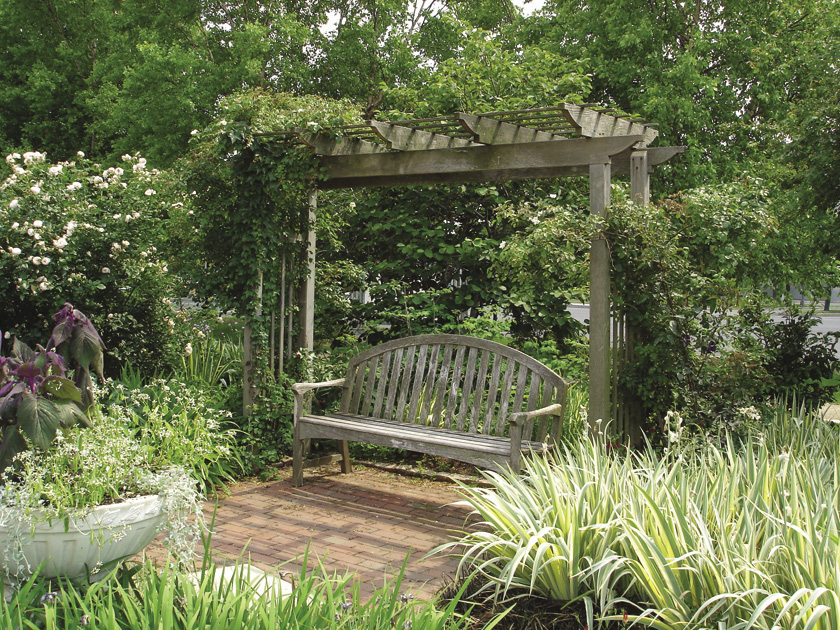
Figure 17. A swing covered with an arbor provides shade and a “ceiling” for this quiet corner of the garden. Photo by Lelia Kelly.
Many different floor materials may be used in an outdoor space. Detailed flooring materials such as pebbles or brick may provide a rich ground texture. There are many good paving materials that provide a wealth of colors and patterns. A solid pavement allows for permanent heavy use and provides direction for traffic (Figure 18). Turf and groundcovers are suitable for areas that are infrequently walked on and may provide a strong contrast to nearby hardscape materials (Figure 19).
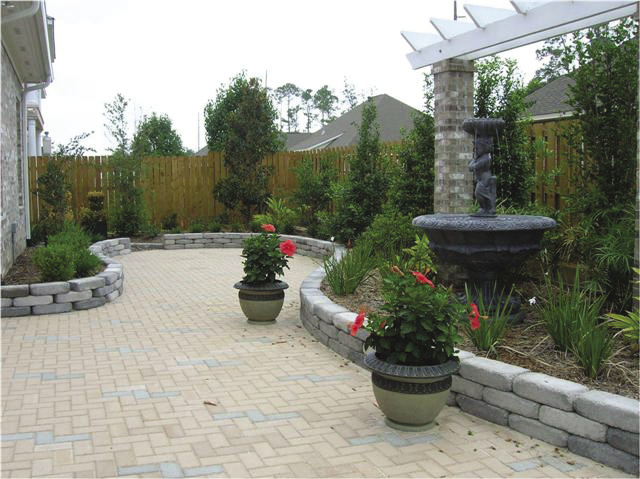
Figure 18. If an outdoor “room” will receive heavy traffic, consider installing a hard floor surface. A wide variety of paving materials is available, offering a wealth of colors and patterns. Photo and design by Pat Drackett. Landscape contractor: GroundScape Inc., Biloxi.
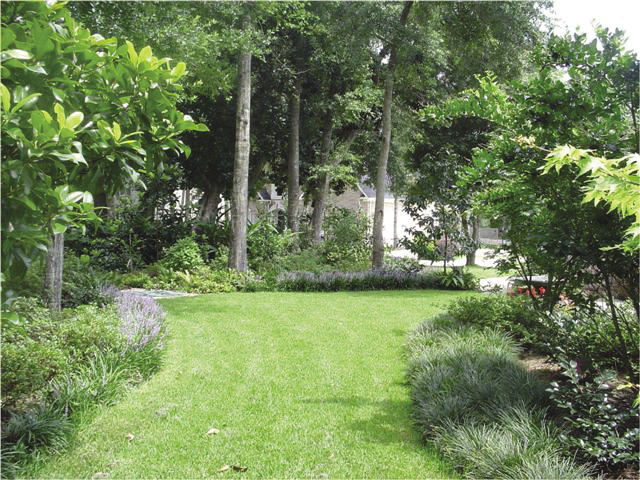
Figure 19. For infrequently trodden areas, consider grass or low groundcovers. When selecting turf, research the maintenance needs and durability of the varieties you consider. Photo and design by Pat Drackett.
Fences or building sides can provide a sense of enclosure. “Walls” may be constructed of stone, brick, concrete, wood, or metal (Figures 20 and 21).
To hide adjacent views, these walls work best when more than 6 feet tall. Wood slat fences or open masonry block may provide a sense of enclosure yet still allow breezes into the area. Evergreen plants can be dense enough to provide privacy while still allowing some air to pass through.
Just as a room in a house has hallways and doors, courtyards and other landscape spaces also have pathways and entry areas. These should be designed to make you feel that you are transitioning to or entering a special place. Gates are a wonderful way to separate different outdoor spaces (Figures 20, 21, and 22).

Figure 20. This courtyard garden is enclosed with a high brick wall softened by lush vines. The door can either allow a view into another area of the garden or add mystery to what lies beyond. Photo by Lelia Kelly.
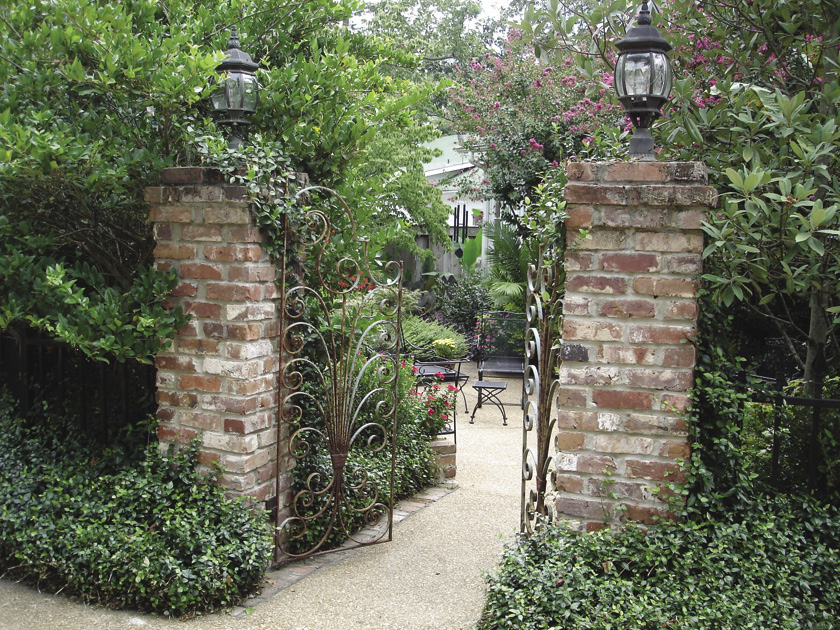
Figure 21. This beautiful wrought-iron gate serves as both an architectural feature and a security feature by limiting access to this backyard from a sidewalk along a city street. Passersby can still enjoy the view into the garden room beyond. Photo by Lelia Kelly.
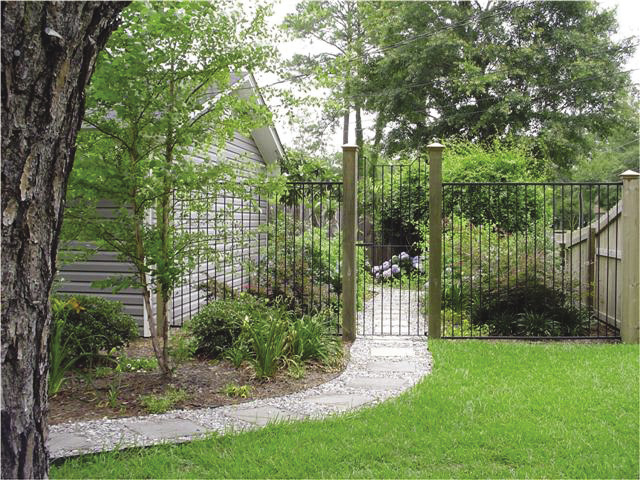
Figure 22. Gates can define the entry of your landscape or separate different spaces. This side yard has been transformed into an interesting garden room accented by a simple but elegant metal gate. Photo by Pat Drackett. Landscape contractor: GroundScape Inc., Biloxi.
You can frame an entry into a courtyard space by using a pergola or trellis, creating an inviting entrance. These separate the patio space from the lawn or front entry.
Garden rooms are designed for the activities and functions that will take place there—such as sitting and relaxing. Make sure the areas are comfortable. For example, in the South, it is especially important to provide shade from the hot sun (Figure 23).
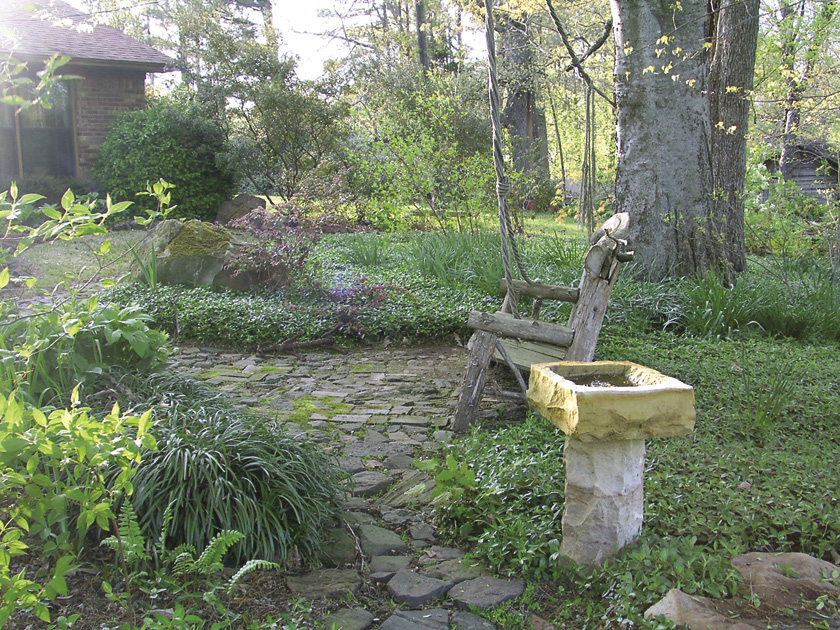
Figure 23. This rustic bench is surrounded by green foliage and groundcovers and shaded by huge deciduous hackberry and oak trees. Adding to the cool atmosphere is the birdbath. Every Southern garden should offer a cool place to sit on hot summer days. Photo by Lelia Kelly.
For social spaces, include seats and tables, a place to serve food, and lighting for night functions. Organize seating in nooks or crannies away from the main walkways (Figure 24). This keeps seating out of the main traffic path and offers more privacy.
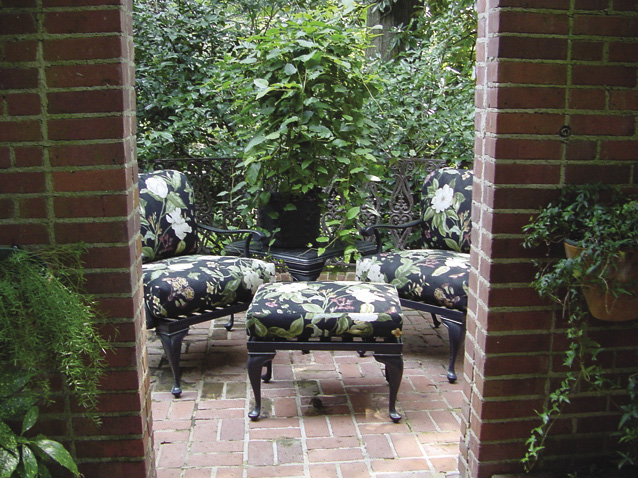
Figure 24. A cozy, comfortable place to sit and visit away from the main walkways of the garden makes a nice addition to the landscape. Photo by Lelia Kelly.
Small, personal spaces create opportunities to provide detailed features. Adding lush plants, urns and planters, and just the right bench in just the right spot can create a rich environment.
A key for creating personal spaces is to keep all things sized for the number of people that will typically use them. For example, a small wall ornament would get lost in a large garden, but a small area is the perfect place to put detailed features such as art objects and garden ornaments. Water is a wonderful element to add to gardens, whether it is a still, shallow pool with a few lilies or a feature with a spray head that provides more activity. Small courtyards and garden spaces are appropriate places for sculptures and interesting features. Any area for night gatherings is a great place to add fire for cooking, warmth, light, or character. Small spaces can also showcase strong plant textures (Figure 25).
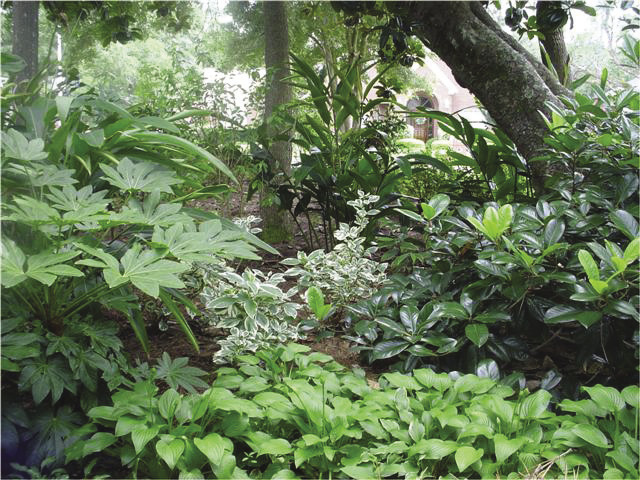
Figure 25. This shady understory garden contains a mixture of plants with strong, coarse textures such as fatsia, hosta, and shell ginger. Any of these plants can be used alone to draw the eye or in combination for a lush effect. Photo and design by Pat Drackett.
Richly textured plants, such as palms and bamboos, do not take much room because they are tall and grow out of a narrow bed area. This is also the perfect place for fragrant plants, such as roses, gardenias, and jasmine. The walls actually contain the aromas somewhat, so you can really appreciate the subtle scents of plants.
Here are a few use areas to consider:
Vehicle Access and Parking
Most likely your driveway and walk already exist, but they can be changed if there is a more functional and practical solution. Think about the arrival of your guests or yourself and how you would like to be welcomed to your home. Would you like to see flowers at your driveway entrance, to park in a shaded spot, to have enough pavement at the edges as you step from your car? Should there be a separation from the drive and parking to the entry walk of the home? These are all personal considerations that add to the quality of your life and guests’ experience.
Walkways
Add walks where they are needed, including along the street or to connect from the street to your home. Before adding any permanent paving types, always check the location of property and setback lines. There are many different types of paving materials for walks and drives, and installation costs vary widely.
An important consideration is whether to use a permeable or impermeable paving material (Figure 26). Permeable means that rainwater can filter through or around the paving, and impermeable means that rainwater cannot filter through the paving material. Loose gravel, unmortared brick on sand, or permeable concrete or asphalt are examples of permeable paving. Urban areas with expansive amounts of impermeable paving are experiencing severe water quality problems in local streams and are having concerns with dropping water aquifers. Because of these water problems, some communities are limiting the amount of impermeable paving allowed in site development.
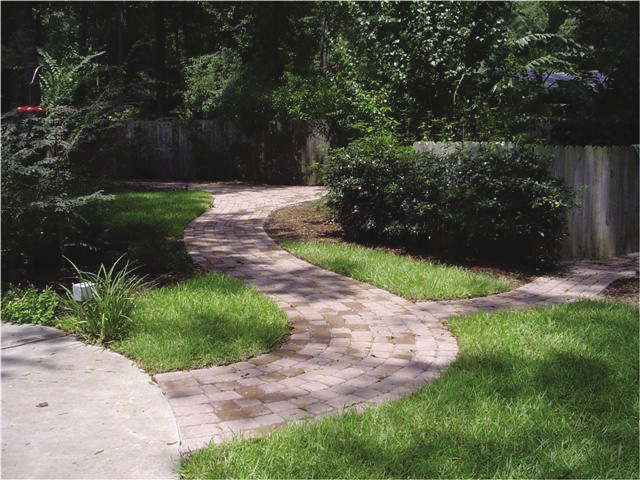
Figure 26. Permeable walks, such as this paver brick path installed on compacted base material, will allow rainwater to filter through or around the paved surface. These pathways can also make previously unreachable areas accessible to wheelchairs or strollers. Photo by Pat Drackett. Landscape contractor: GroundScape Inc., Biloxi.
The front walk should connect your front entrance to where your guests park or to the street. You may consider providing a walkway from the outdoor public area to the private area, so that guests will not have to go through your house or garage to get to the backyard party area. The walkway form should reflect the main type of form used throughout the design. For example, if you are using curved planting beds, the walkway may curve, as well, to provide an organized approach. Walks should be wide enough for comfortable use. A minimum of 41/2 feet is typically wide enough for two people to walk side-by-side together. To add interest to a walkway, consider varying its width. Walks should always be designed for safety and comfort, and public walks must be accessible for people with disabilities or elderly people. Consult with a professional for any walkways that require retaining walls, ramps, or steps.
Accenting the Main Entrance
For small front lots, the most important focal point from the street is the front door. The main public entry should be easily identifiable and attractive. Typically, all other elements in the front yard should accent and highlight the front entry rather than compete for its attention. The front entry location on the home determines the visual balance of the front composition. Study the appearance of your house. Imagine the entrance as a pivot point for balancing. The house may appear heavier on one side. The “light” side may need more mass (larger plants, for example) to balance the visual weight of the “heavy” side.
Putting It All Together
The form of outdoor use areas should complement the architecture of the home and surrounding structures. For example, if the home has rectangular forms, then rectangular patios, planting beds, fences, walls, and water features are appropriate. Clear and simple designs are always best, as combining various forms can be difficult to achieve successfully.
Label another sheet of tracing paper “preliminary plan.” Draw your ideal vision of each space to scale on this paper. Keep imagining and refining each space until it is fully resolved.
Step 6. Select and place plant symbols on the plan.
Selecting Plants
Deciding which plants to use in your landscape plan may seem overwhelming in the beginning, particularly if you have limited experience with plants. Use your site analysis to help you select plants that fit the conditions of your property. For example, if the front beds are in full sun, choose plants suited to full sun. It is helpful to first make a list of the microclimates found in your yard, such as sunny and well-drained, shady and moist, and so forth. Then, research the plants you are interested in and learn about their site requirements. List each plant under its appropriate microclimate. Find out the following information about potential plants to figure out whether they can be used in your plan:
- Light requirements
- Soil moisture and pH requirements
- Mature size
- Rate of growth
- Maintenance requirements
- Susceptibility to pests and diseases
- USDA hardiness zone
- Heat tolerance
Several MSU Extension publications are available to help you select plants to fit your landscape needs. These can be found at http://extension.msstate.edu/publications. Here are some to look for:
- Selecting Landscape Trees with Special Comments on Invasive and Native Plants (P2679)
- Selecting Landscape Shrubs with Special Comments on Invasive and Native Plants (P2651)
- Palms and Cycads for the Midsouth Landscape (P2948)
- Various pubs on annuals and bulbs
- Various pubs on home orchard plants
Plant Palette
After you have determined the plants that are appropriate for your planting site, group the plants into categories, such as groundcovers; annuals and perennials; low, medium, and tall shrubs; accent plants; and specimen and canopy trees. This will be the “plant palette” that you will select from as you lay out your planting plan. It is helpful to include a photo of each plant and a symbol or note that depicts its light, moisture, and other preferences. After you have divided the plants into groups, you will be able to see what microclimate they prefer. This is a good way to experiment with various combinations of plants and to see how certain textures and flower colors will work with each other.
Plant Uses
Consider the specific purpose you have in mind when choosing plants to include in your plant palette. If you need to screen an undesirable view, it may be best to select shrubs or trees that are evergreen. These are other examples of specific uses:
- canopy trees for shade
- specimen trees
- foundation plantings
- accent plants
- hedges and screens
Ask yourself what function a plant will serve before you add it to your plan. Plants can serve more than one purpose. Trees and shrubs that screen your property may also provide you with food, such as figs, blueberries, pears, or mayhaws for jelly. Plants can also act as shelter for wildlife or provide cut flowers or fragrance.
Landscape Themes
Landscape beds can be composed of a collection of plants with a specific theme, such as an herb garden, a wildflower garden, a rose bed, or a perennial bed. Those who enjoy flower arranging may wish to create a “cutting bed” to grow perennials and annuals solely for their blooms. If you like to observe birds, butterflies, and other wildlife, see MSU Extension Publication 2402 Establishing a Backyard Wildlife Habitat, which lists suitable plants and explains how to arrange them to attract wildlife to your yard. Theme gardens are often better suited for private areas of the yard, such as a back yard, rather than in a public area.
Consider before Beginning Your Planting Design
Foundation Plantings
Resist crowding your landscape with too many plants. Closely spaced plants may be attractive right after planting, but poor air circulation will lead to disease and pest problems. You want a long lifespan for your landscaping, not to have to replace it every few years! Know the mature sizes of plants to be used in your foundation plantings. The beds surrounding your home are visually critical because they provide visitors with a first impression.
Place accent trees with broad crowns, such as crape myrtles, far enough away from buildings that the canopy has ample room to grow. Determine the mature width you can expect for a tree you would like to use, and divide that width in half. Measure this distance out from the building and mark it. This is the minimum distance for the center of the tree on your plan. You may need to go out a bit farther if you have deep eaves on your house.
Accent plants can be used on the corners and in front of blank walls of your residence. Do not overcrowd plants near your front entrance, as they will grow out of proportion and may require intensive maintenance. Color and texture can be used near your front door to lead the eye to your entrance. However, it is not necessary to use large areas of color and texture to have an impact. Even a small amount of color will draw attention to an area. Layer the shrubs in the planting beds by their height, from highest to lowest. A border of low shrubs or groundcovers may be used along the bed edge, if desired.
Siding, Eaves, and Roof Drip Lines
Locate plants away from house siding, eaves, and drip lines. Siding can rot or mildew when crowded by plants. Never dig in or spread organic mulch over termite treatment bands. Soil erosion under house eaves is a problem when there are no gutters. The force of water falling from the roof can be quite strong, damaging plants, splashing soil against the base of the house, and eroding the soil below. River rock or limestone gravel added below the drip line aids drainage and reduces water damage. Space plants to avoid downspouts connected to underground drainage pipe.
Screening Air Conditioning Units
Dense evergreen hedges are not a wise choice to use for screening air conditioning units, as they can restrict access and air flow to the unit and require frequent pruning. Instead, use plants with an informal, open structure, located away from the unit. Consider screening units from only one side if they are visible from only one angle, such as a street view. Lattice screens are effective and can be one, two, or three-sided. Use vines on the lattice, a well-situated plant, or nothing at all.
Sun and Shade Exposure
Some homes have a contrast in sun exposure along the front, which presents a challenge if you want landscape beds that “match” on both sides. A large tree may provide shade on one side, while the other side is in full sun. If you want to have a unified, formal balance, use “chameleon” species that grow well in either sun or shade.
Formal or Informal
Beds that are symmetrical or have angles are perceived as formal, while asymmetrical or curving beds have an informal appearance. Even numbers of plants generally have a formal appearance, and odd numbers of plants tend to be informal. However, the same number of plants can appear either informal or formal, depending on their arrangement (see Figure 27).

Figure 27. In general, even quantities of plants create a formal appearance, while odd numbers of plants produce an informal effect. However, the same number of plants can be arranged to provide either a formal (top row) or informal (bottom row) appearance. Image and planting symbols by Pat Drackett.
Outlining the Planting Beds
The geometry of some beds will be dictated by the shape of your residence and adjacent hard surfaces, such as walks, drives, and retaining walls, as well as by the style of your landscape theme. Formal plans composed of architectural shapes and straight lines will require more frequent maintenance to maintain than informal plans composed of naturalistic landscaping and curving beds.
Clean bed lines give your property a fresh, finished appearance (Figure 28). Bed edging, such as paver stone or brick, coordinated to your home or other paved surfaces, adds structure to your landscape. Leave enough room along the edge of beds for plants to grow to the width of the beds.
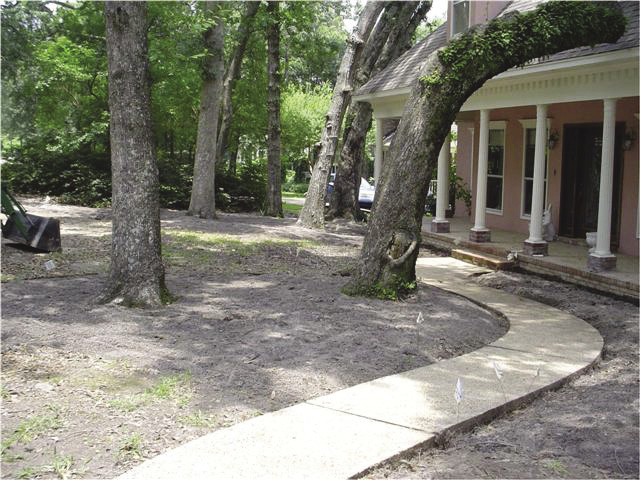
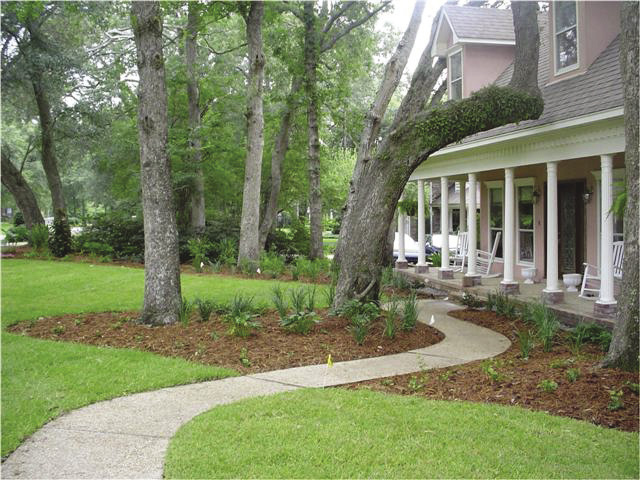
Figure 28. These before and after photos show the importance of having a clear definition between planting beds and turf areas. Note that beds do not need to be stuffed full of plants to have an impact. Rather, the clean beds and strong bedlines give this property a pleasant, finished appearance. Photo by Pat Drackett. Landscape contractor: GroundScape Inc., Biloxi.
Planning for Lawn Maintenance
Design bed edges next to lawn areas with gentle, gradual curves that are easy for lawnmowers to navigate (Figure 29). Lawns should be accessible and wide enough to allow your mower to pass or turn.
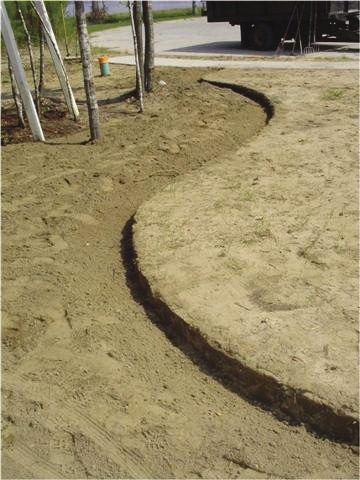
Figure 29. The shape of planting beds is important. Create curved bed lines with a mechanical edger or shovel, and develop smooth, gradual curves that will allow for easy mowing. You may wish to lay a garden hose on the ground to get an idea of the desired shape before cutting the final edge. Photo by Pat Drackett. Landscape contractor: GroundScape Inc., Biloxi.
Bed Width
Wide planting beds are not easy to access. You can design a pathway that passes through the bed to provide an attractive and practical landscape feature. Garden ornaments, such as sculptures, environmental art, fountains, or birdbaths can be added along the path. Pathways can be paved brick, natural flagstones, or simply a linear gap in the plantings, allowing for ease of passage and maintenance.
Locating the Plants on the Plan
Preparing to Draw the Planting Plan
You can create your planting plan on a sheet of tracing paper taped over the base map. Corrections are easier to make on tracing paper than on graph paper. Draw plant symbols lightly in pencil. Once you complete your planting plan, darken the edges of plant groupings, major trees, and accent plants to give them more visual definition.
Drawing Planting Symbols
Draw symbols on your plan using a circle template, which contains a variety of sizes of circles. You can find these templates in the drafting section of most office supply stores. To determine the size of circle to use, for example, if your base map has been drawn at a scale of 1 inch = 10 feet (using an engineer’s scale), and the mature size of your plant is about 5 feet, select a circle that measures half an inch (five-tenths, or 0.5 inch, according to the scale) in diameter. Correspondingly, you would use a circle measuring one-fifth of an inch (two-tenths, or 0.2 inch) for groundcover that measures 2 feet across. A small accent tree may measure 10 to 15 feet or more in width, depending on the species, so you would choose a corresponding symbol width to represent the mature tree. Keep in mind that the thickness of your pencil lead can affect the width of your drawn symbol. Therefore, while you are creating your planting plan, it is a good idea to check symbol widths from time to time on a scrap piece of paper.
Planting symbols can be simple circles, or you may choose to modify them to depict certain characteristics of the plants they represent (Figure 30). Deciduous plants may be shown as having a branched appearance. Evergreens with needles can be drawn with sharp edges, while symbols for broadleaf evergreens may have rounded edges. Symbols for accent plants can be drawn to reflect their specific textures. You may wish to practice drawing planting symbols before you place them on your plan. Think about how you can depict each plant through a symbol that will be recognizable when you refer to the plan.
Spacing Plants
The mature size of a plant is very important to consider when creating your plan. If plants mature at 5 feet wide, you should not locate them 3 feet apart (also called 3 feet “center to center” or “on center”) just so they will look nice and full after planting! When locating several groupings of different plant species within a bed, avoid placing the masses of plants too close to each other. Instead, leave some room for a transition between plant species. Draw your planting symbol to represent each plant’s mature size and resist placing them too closely. As you place plant symbols, remember to leave enough space for maintenance and access to utilities, such as water spigots and utility meters.
Locating Plants on the Plan
Deciding the first plant to locate on your plan may seem like a challenge. You may feel like an artist pondering a blank canvas, wondering where to begin. However, think of the landscape plan as a series of logical steps, and locate the most important elements first. First, place on your plan the plants with the greatest impact or importance. These may be focal points, trees, or accent plants. You can think of them as the stars of your show, with all the other plants becoming their supporting cast.
Focal Points
Focal points are plants with dramatic qualities that command attention and draw the eye, such as a specimen tree. They can also be landscape features, such as a bench or fountain. They can be informal or formal, depending on where they are and their relationship to other elements. The effect of your focal point may be dictated by its relationship with surrounding trees, especially where there are many trees.
Because the eye is drawn to focal points, you will need to consider the views that surround it. You don’t want to draw attention to an unattractive view that is near or beyond the focal point. Consider the angles from which the focal point will be viewed. Will it be the first thing you see when approaching the house? Is it a main view from a window? Perhaps it will be a surprise feature when turning the corner of a pathway. A focal point can be an individual plant, or it can be part of a triangle, with the viewer on one corner, providing balance to other elements in the landscape. For example, a focal point may be located to provide balance for the mass of a large, mature tree that is a dominant element in the landscape.
Trees
When locating trees, consider the function they will serve. You may have a brand-new lot with no trees at all and need canopy trees for shade. Or, if you need to block an undesirable view, you may need to use trees that are evergreen, to provide screening in all seasons. Large trees, especially evergreen trees, will visually and physically dominate your residence if they are located too close to the structure, making it appear crowded and small. Choose trees that will not grow too large for your property or interfere with utilities. Choose trees that will remain in proportion and scale to your house. When locating large trees, leave ample space for their sizeable root zones. Be careful when planting under existing trees, as too much disturbance can cause root loss and harm or kill the tree.
Trees can contribute to your home’s energy efficiency (Figure 31). Evergreen trees located to the north and west of your house will block winter winds. Deciduous trees provide shade in summer and allow cooling summer breezes from the south. Because the summer sun travels in a southerly arc from the east to the west, its rays are more intense in these directions; therefore, plant shade trees to block these exposures. These shade trees will reduce energy demands by shading windows and walls during the hottest part of summer days. In the winter, when the leaves have fallen, deciduous trees allow the sun to warm your home.
Accent Plants
Accent plants serve as secondary focal points, with one or more providing a strong color, form, or texture (Figure 32). A focal point or specimen tree is a dominant element in the landscape, while accent plants can be repeated in several places and provide unity to the landscape.
Filler Plants
Once you have located your trees, focal points, and accent plants, and provided plants of various heights to frame them, fill in the areas around them. The placement of future plants will go more quickly after you have developed a portion of your landscape. Repeating certain combinations of shrubs and groundcovers in several areas within the design will unify the landscape.
Labeling the Plants on the Plan
If you have room on your plan, you may want to draw a line to each plant that indicates its common name, quantity, and container size or height. This saves time spent searching for symbols in a plant key. You may also want to include the Latin name of the plant. However, there is not always space available to include all of this information. A shorthand method of using the quantity and first letter or two of the plant’s common name (or Latin name) can work if space is limited. For example, if the plant is an azalea, it could appear as “12 – A” or “12 – Az.” The important part is that your method of labeling is clear to you or the people who will install the plants.
Creating a Plant Key
A plant key is a list of the symbols used in your design, along with the plants they represent. You can list both the Latin name and the common name for each plant, along with the size of each plant to be purchased. Also include a total quantity for each plant used in the plan. You may prefer to label each plant with a letter or letters that represent the plant name. However, it is important that your labeling system is clear to you or the people who will be installing the design, particularly if the plan is to be set aside for a period of time. See Figure 33 for the complete landscape plan for the home and property depicted throughout this publication.
Copying Your Planting Plan
Make copies of your plan to use outdoors, and store the original plan in a safe place. You can make a copy of your planting plan overlay and base map together on a copying machine because light will pass through tracing paper. Place a book or magazine on top of the plan to flatten and hold it against the glass while copying. Adjust the darkness setting on the copier so that the base map is clear on the copy. Adding color to a copy of the plan helps identify masses of plants, bloom colors, or a plant’s prominence in the design.
You can create base maps for large properties by taping two 81/2-by-11 sheets of graph paper together and printing on a copier that accommodates 11-by-17 sheets of paper. If your property will fit on an 81/2-by-11 sheet of paper and you would like space to write notes about your plan or add a plant key or plant list, then place your original plan in the center of the copier glass and copy onto an 11-by-17 sheet of paper.
You can also tape letter-sized sheets of tracing paper together. Rolls of tracing paper are available in various widths in the drafting section of office supply stores or from websites specializing in drafting equipment. You can choose not to use graph paper at all and, instead, create the entire plan on a large piece of tracing paper if you are comfortable using a scale.
Step 6 Checklist
Does your landscape plan include the following?
- Trees that allow summer shade and winter sun
- Evergreen trees that provide protection from winter winds (locate these trees on the north and west sides of the house)
- Dense evergreen trees or shrubs to screen undesirable views
- Tree placement that allows a clear view of the front entrance of your home
- Color or accent plants that provide interest and lead your eye to your front entrance
- Evergreen, low-maintenance shrubs as the basis of your foundation plantings
- Plants with an appropriate mature size for their locations in your landscape
- Seasonal interest with plants chosen for their blooms, bark, fruit, and foliage
- The right number of plants, appropriately spaced, to prevent overcrowding
Step 7. Establish priorities for implementation.
After you have completed your use areas and planting areas to your satisfaction, it is wise to make a list of priorities to accomplish the plan. Decide on the areas that need to be developed first, and tackle them one at a time as your budget and time allow. Here are a few suggestions to help you accomplish your goals:
- Finish all land leveling and grade changes first.
- Correct all drainage problems before beginning installations.
- Complete all permanent hard surfaces, such as patios, walkways, driveways, and structures, first.
- Because trees take time to mature, consider planting them first.
The Low-Maintenance Landscape
With today’s busy lifestyles, homeowners are seeking ways to reduce maintenance in the home landscape. Creating a low-maintenance landscape requires proper planning and wise choices. This includes identifying areas that require a more manicured look and those that can be less heavily maintained. There are a number of landscape building materials, plant types, and design strategies that can reduce your effort and expense. The best place to begin the low-maintenance landscape is developing a plan for your property.
Eight Simple Tips to Create an Easy-Care Yard
Although there is no such thing as a no-maintenance landscape, here are a few suggestions to minimize excessive landscape care.
1. Reduce the total amount of unused lawn area.
Beautiful lawns are expensive and high maintenance. In addition to mowing, rolling, watering, fertilizing, liming, thatching, and applying pesticide, fungicide, and herbicide to maintain a healthy lawn, lawn edging and raking can consume an extraordinary amount of time and money. Maintaining proper play and open-lawn space are important for many homeowners, but reducing unused lawn portions can save time. Easy-to-care-for trees, shrubs, and groundcovers are excellent alternatives to excessive open lawn space. You can achieve this by applying herbicide to the unwanted existing lawn area, planting low-care woody plant species, and planting a thick groundcover or layer of mulch. The first few years may require extra weeding and care, but as the trees and shrubs establish themselves, an annual cleanup will be all you need to do.
2. Use quality, long-lasting landscape materials.
As you select or replace structural features for your landscape, choose materials that do not require frequent replacement. Sidewalks, patios, decks, fences, steps, driveways, seating structures, trellises and gazebos, and furniture items should be durable. A concrete or brick patio will last 20 to 30 years, whereas a wooden deck or brick-on-sand patio may need replacing every 5 to 8 years. Recycled plastic lumber has a much longer life span and reduced painting or staining needs than traditional treated wood for fences, decks, and steps. Bed edgings made of concrete, brick, or stone edging blocks will last much longer than landscape timbers or railroad ties. Also, mowing strips (concrete or brick pavers placed at the ground level) can be used for bed edges next to turf areas to reduce the need for edging treatments. Consider the initial cost, maintenance costs, long-term costs, and durability when selecting landscape materials.
3. Select perennial plants over annuals for landscape color.
To reduce replacement costs for annual plants (plants that last one season), consider using perennial plants (plants that come back every year). Depending upon your plant hardiness zone, impatiens, begonias, petunias, and marigolds may require replanting every year. Choose daylilies, stokes aster, lantana, black-eyed Susan, coneflowers, evening primrose, or perennial phlox for long-lasting color.
4. Avoid problem or high-maintenance plants.
Hybrid tea roses, gardenias, and fruit trees are examples of high-maintenance plants. These require regular applications of pesticides, water, or fungicides in order to grow well in Mississippi. Select plants that are resistant to insect, disease, and fungal problems; tolerant of wet or dry periods and extreme temperatures; and adaptable to poor soil conditions.
5. Use geotextiles for weed control.
Geotextiles, commonly known as landscape or weed fabrics, can reduce weeds in sunny planting beds. Placing the fabric on the ground around existing shrubs and covering it with a thick layer of mulch will reduce the growth of many weed species. Control pre-existing problem weeds with an herbicide before covering. Geotextiles allow water and fertilizers through the cloth and allow plant roots to breathe. Do not use plastic sheeting, which is not permeable. Groundcovers may also be planted in open bed space to compete against weeds.
6. Put the right size plant in the right place.
Avoid constant pruning by selecting plants that will not exceed the desired height or width for their area. Problem places occur under windows, utility lines, roof eaves, and near doorways. You can avoid these problems by asking the nursery owner to recommend plants that do not grow larger than the maximum height or width for the area. Fast-growing plants require little or no pruning if they are located where they have room to grow to their mature size, such as in site perimeters or the rear of beds.
7. Place plants in masses, not individually.
Plant combinations are often more effective when planted in masses rather than as individuals. A dense shrub border in large island beds allows room for a mower around the outside edge, reducing the need for edging and weeding in scattered plantings.
8. Keep the landscape simple.
A complicated design with a wealth of landscape plants and garden areas often requires specialized care. Don’t overdo focal points, accents, color, texture, or types of plants. Aim for balance. Landscaping should frame your home, not dominate it. A simple, effective design and palette of easy-to-manage plants can create a beautiful, carefree landscape.
Sustainable Sites Initiative
The Sustainable Sites Initiative (SITES) is a national effort to create voluntary guidelines and benchmarks that promote sustainable land design and construction practices. Jointly sponsored by the American Society of Landscape Architects, the Lady Bird Johnson Wildflower Center, and the U.S. Botanic Garden, SITES provides a ranking system that awards points for comprehensive sustainable land practices for built projects. The program is now part of the LEED (Leadership in Energy and Environmental Design) Green Building Rating System.
SITES has nine areas of focus—hydrology, soils and vegetation, materials, monitoring, operations and maintenance, construction, pre-design assessment, site selection, and human health and well-being. For more information on sustainable sites and to see examples of how these can be incorporated into residential landscapes, visit http://www.sustainablesites.org/.
Publication 2698 (POD-05-21)
By Robert Brzuszek, Professor, Landscape Architecture; Patricia Drackett, Director, The Crosby Arboretum, Coastal Research and Extension Center; and Lelia Kelly, PhD, former Extension Professor, North Mississippi Research and Extension Center.
Portions of this publication were taken from an earlier MSU Extension publication, P479 Planning the Home Landscape, by James H. Perry.
Copyright 2021 by Mississippi State University. All rights reserved. This publication may be copied and distributed without alteration for nonprofit educational purposes provided that credit is given to the Mississippi State University Extension Service.
Produced by Agricultural Communications.
Mississippi State University is an equal opportunity institution. Discrimination in university employment, programs, or activities based on race, color, ethnicity, sex, pregnancy, religion, national origin, disability, age, sexual orientation, gender identity, genetic information, status as a U.S. veteran, or any other status protected by applicable law is prohibited.
Extension Service of Mississippi State University, cooperating with U.S. Department of Agriculture. Published in furtherance of Acts of Congress, May 8 and June 30, 1914. GARY B. JACKSON, Director
The Mississippi State University Extension Service is working to ensure all web content is accessible to all users. If you need assistance accessing any of our content, please email the webteam or call 662-325-2262.


