Barbecuing Mississippi Broilers
Grilled broilers make a delicious, nutritious, and low cost main dish. It is surprising, though, that only a few people know how to do a good job grilling broilers. This publication addresses many topics that are important for successful grilling of broilers.
Topics include:
- Common Grilling Mistakes
- Preparing Broilers for the Grill
- Grilling, Turning and Basting
- Flame Control
- When are broilers done?
- Helpful Suggestions
- Barbecue Sauces
Common Grilling Mistakes
-
Fire too hot -- Broilers must be cooked on a low to medium heat to prevent burning. Normally, when cooking fewer than 6 halves, allow one pound of charcoal to cook one chicken half. Allow 1/2 to 3/4 pound when cooking more than 6 halves. Use only one layer of coals. The coals should touch each other and should cover an area a little larger than the area covered by the broilers being grilled. Occasionally, in covered grills, a few coals need to be added as a partial second layer. The heat is controlled in a covered grill by adjusting the air vents in the bottom and top of the grill. Keep these vents about three-fourths to fully open during the latter part of the grilling. Gas grills usually have to be set on low to grill broilers, and electric grills should be set on about 300o to 350o Fahrenheit.
-
Trying to cook too quickly -- Unlike steak and pork chops that can be grilled in 10 to 20 minutes, broilers require a grilling time of at least 1.5 hours under near ideal conditions. If you have trouble keeping a good fire, the cooking time can require 2 hours.
-
Using a tomato basting sauce -- Nearly all commercially prepared barbecue sauces have a tomato or ketchup-like base. Using such products while grilling broilers almost always results in burning and a poorly finished product. If you insist on using the tomato-based barbecue sauce, baste the broilers with only cooking oil during the first three-fourths of the cooking period, while the coals are hottest. Then mix a little oil with the barbecue sauce for the last 30 minutes of cooking, after the heat has subsided. This helps prevent burning.
-
Not using enough salt -- Broilers readily take up seasoning, and salt is one of the main seasonings. Salt the broiler halves thoroughly before cooking by opening the spout on the salt box and sprinkling salt over the moist broiler half. Use approximately one tablespoon of salt per half. Salt the broiler halves until you are sure you have used too much, and you may have enough. Most of the salt washes off during cooking.
If you elect not to salt the broilers before grilling, add 2 to 4 tablespoons of salt, depending on the salt content of the ingredients, to the recipes shown later. Heat and stir the mixture until the salt is dissolved. -
Having the grill rack too near the fire -- With open top grills, the greater the distance the chicken is from the fire, up to 18-inches, the better. A distance of only 6 to 10-inches may be possible with small grills. Unless the fire decreases considerably, keep the grill rack at the highest setting throughout the cooking period. With closed top grills, 5 to 10-inches between the fire and grill rack is adequate, because the heat is easier to control.
Preparing Broilers for the Grill
Market age broilers are only 6 to 7 weeks old. The skeleton has not hardened at that age and allows easy splitting of the whole bird into halves. Here are the steps to follow in splitting a broiler:
-
Place whole broiler on a cutting board with the wishbone against the board, back side up and breast side down. Put thumb through the rear body cavity opening and two or three fingers over the wing to allow for a firm hold. Use a sharp knife to cut from the tail down the center of the back bone so the back is opened completely.
-
Spread the split back apart about 5-inches. Inside the broiler at the front end of the breast bone is a white cartilage area which cuts easily. Cut the cartilage straight back to the breast bone. with thumbs in the back opening and fingers under the breast bone, spread the back opening apart until the split cartilage gives way and exposes the breast bone.
-
Separate the breast bone from the broiler by running the thumb down one side of the bone and the index finger down the other side. Separate the rear cartilage portion of the breast bone and remove. Lift the rear portion of the remainder of the breast bone and twist to remove.
-
Hold the forward portion and wing of each half and pull them apart. The halves will split right where the breast bone was removed.
-
Rather than using a knife, a pair of kitchen shears may be used to make the initial back cut. Instead of cutting down the center of the back bone, make two cuts, one along each side of the back bone. Cutting with a good pair of kitchen shears is easier and neater than using a knife.
Grilling, Turning and Basting
Approximately 70 percent of the total grilling time should be with the cut side down and skin side up. Start grilling with the cut side down, cook 10 to 15-minutes, baste skin side, turn gently with tongs, baste cut side. Turn about every 10 to 15 minutes, basting before and after turning. A hot fire requires more frequent turning. Do not let the broilers get dry or burned, especially on the skin side. When cooking more than 20 halves at a time, turning is easier if you use racks designed for placing one over the other and turning all the broiler halves at once while sandwiched between the racks.
Basting sauce should be gently brushed or dripped on the broilers rather than rubbed on. A basting mop is best for transferring basting sauce from container to broiler if you are cooking more than 25 halves.
Since mops are hard to clean, two pieces of paper towel and one or two equal sized pieces of grocery bag twisted in the center to form a cone shape transfers basting material well and can be discarded when finished.
Flame Control
A thoroughly washed liquid dish washing detergent bottle makes a perfect water dispensing container to control flame-ups during cooking. You may also use water to help control a too-hot fire. Don't over use and completely douse the fire.
When Are My Broilers Done?
While lightly holding the broiler to the grill with tongs, grasp the drumstick with a folded paper towel and twist. The broiler is done when the bone easily breaks loose at the leg-thigh socket. The broiler is not done if the bone does not turn loose with minimum effort; keep cooking.
Other Suggestions
-
You can cook broilers and put them in an ice chest an hour or two before serving. Line the chest with foil, put the broilers in, and cover them until ready to serve. Many say they are better after holding this way. Cooking and storing ahead of time lets you tend to other matters before meal-time.
-
Even with a slight wind, heat and smoke tend to shift to the downwind side of open top grills, which often causes uneven and delayed cooking. To correct this, cut a large grocery bag down one side and around the bottom so that it flattens out. Attach one end of the bag to the grate portion of the grill with two or three wooden clothes pins on the side the wind in coming from. Laying the unattached end over the grill and broilers causes the heat and smoke to curl under the grill for a more even heat and smoke distribution. The paper will not burn as long as you keep the coals from flaming. Just flip the paper back to baste and turn the broilers. A strip or two of aluminum foil will serve the same purpose.
-
If you use a basting mop it is usually hard to clean, especially if oil is a part of the sauce. A good way to clean the mop is to put it in a large glass, put in an ample amount of liquid detergent and fill with hot water. Let the mop stay overnight, washing and rinsing the next day. This may have to be repeated two or three times to get the mop clean.
-
If some of the broilers are to be served as quarters, instead of halves, it is easier to cook first as halves and then separate after cooking. If too hot to handle, use two sets of tongs to separate.
-
Cook extra halves while grilling and freeze them. Frozen grilled halves, stored in plastic freezer wrap bags, store real well up to three months. When thawed and warmed, they taste like those just grilled. A microwave oven does a good job thawing and warming the halves quickly.
Barbecue Sauces
The following sauce recipes will be enough to grill 10 halves. Generally, one gallon will be enough to grill 50 to 75 halves. Salt is not included in any of the recipes, since salting the broiler halves before cooking is recommended. A favorite recipe is one developed by Ed Garrison, retired Extension Poultry Specialist with the Mississippi Cooperative Extension Service. Here is his recipe:
Garrison's Famous Broiler Barbeque Sauce:
| 2 c. cider vinegar | .5 t. red pepper |
| 1 c. vegetable oil | .5 t. garlic powder |
| 1 t. Tabasco |
Spicy and Sweet Barbeque Sauce:
| 1.5 c. water | .25 t. Tabasco |
| 1 c. vinegar | .25 t. paprika |
| .5 c. vegetable oil | .25 t. black or red pepper |
| 1 lemon or 1 oz. juice | .25 t. onion powder |
| 2 T. brown sugar | .25 t. garlic powder |
New England Sauce:
| 2 c. vinegar | 1 c. water |
| 1 c. vegetable oil | 2 t. black or red pepper |
Chicken Barbeque Sauce:
| 1 c. vinegar | 2 t. Tabasco sauce |
| 1 c. vegetable oil | 3 t. prepared mustard |
| 1 c. tomato catsup | 1 lemon or 1 oz. juice |
| 4 T. worcestershire sauce | .25 t. red or black pepper |
| 2 T. sugar |
Deviled Chicken:
| 2.5 c. vegetable oil | 1 t. black pepper |
| .75 c. prepared mustard | 1 t. red pepper |
| 4 t. dry mustard | .5 t. onion or garlic powder |
Commercial Sauce:
| 1.5 c. commercial barbecue sauce |
| 1.5 c. vegetable oil |
Fruit Barbeque Sauce:
| 1.5 c. frozen pineapple juice concentrate | .25 c. water |
| 1 c. vegetable oil | 1 T. sugar |
| .5 c. lemon juice | .5 t. ginger |
Spicy Chick-N-Que Sauce:
| 1 c. water | 2 T. chili or curry powder |
| 1 c. vegetable oil | 3 T. sugar |
| 1 c. vinegar | 2 t. red or black pepper |
| .5 t. garlic powder | 1 t. dry mustard |
| .5 t. onion powder | .25 t. cayenne pepper |
| 2 T. worcestershire sauce | 2 T. Tabasco sauce |
| 2 T. paprika |
Do-It-Yourself Sauce:
Use 1.5 to 2 cups vinegar and 1 to 1.5 cups oil as a basic mixture. Add other ingredients, listed or not listed in the above recipes, to season to your taste.

Publications
News
")
Farm supply stores are full of cute chicks in the spring, and the sight of the fluffy baby birds, combined with future dreams of fresh eggs, prompts many people to impulsively start a backyard flock.
")
STARKVILLE, Miss. -- Keeping buffalo wings on menus is a supply chain issue that goes all the way back to procedures farm workers follow to protect the health of commercially grown chickens.
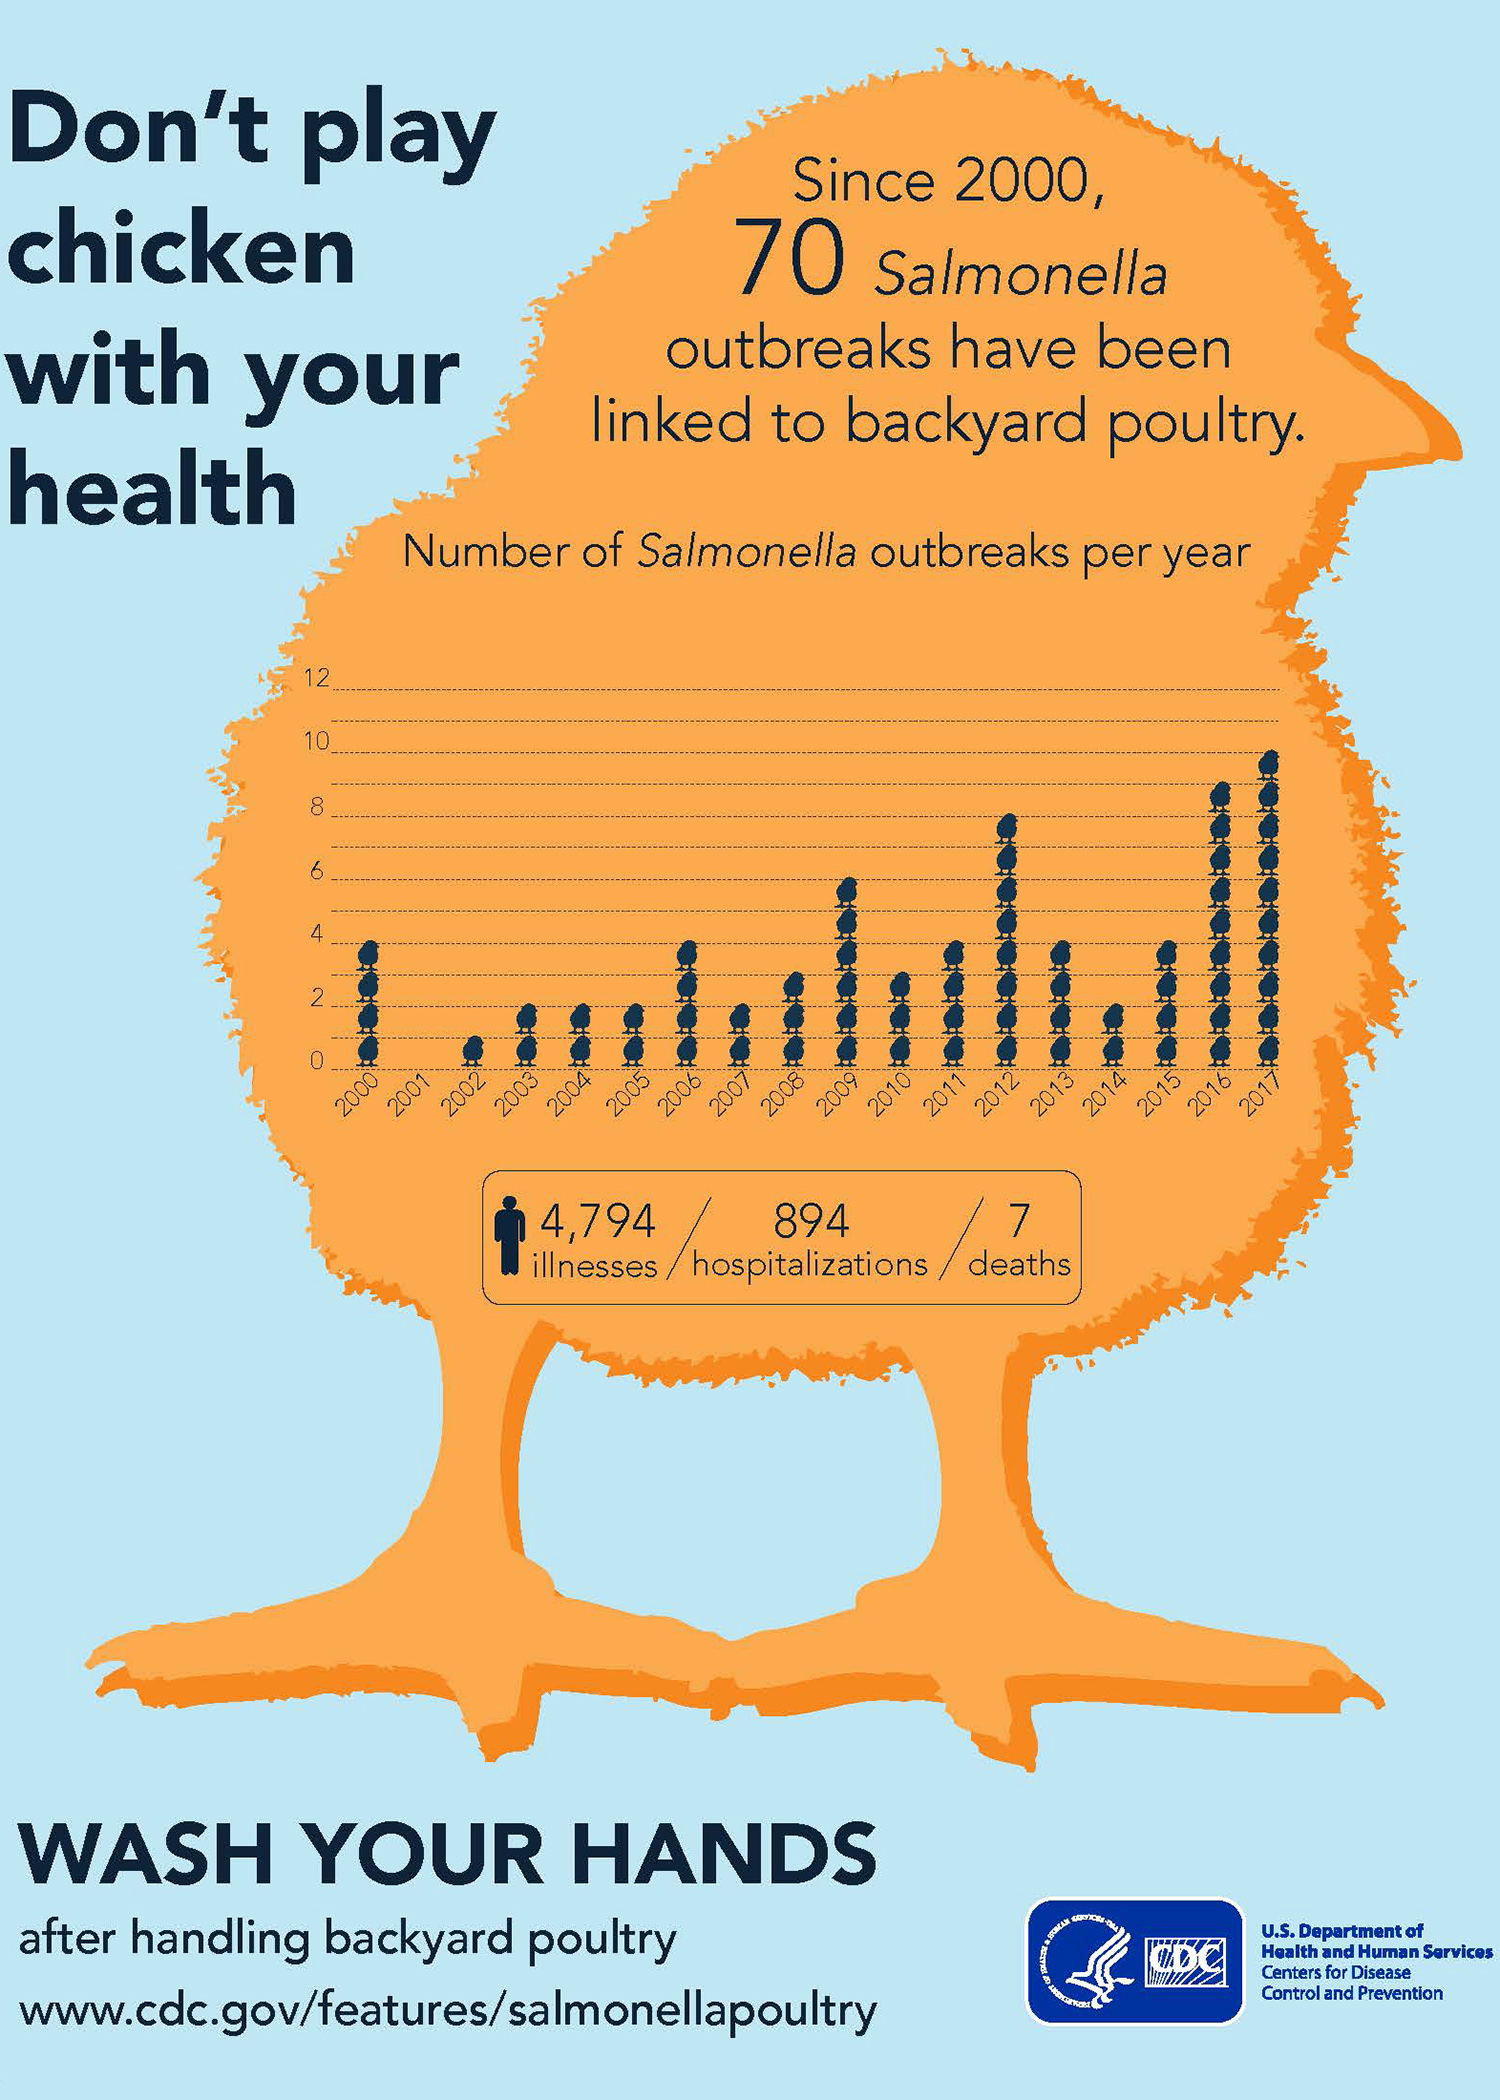
Baby chickens are so cute and cuddly that few people can resist holding them. Unfortunately, as public interest in raising backyard birds has grown so has the number of Salmonella outbreaks in the U.S. (Photo by Centers for Disease Control and Prevention)