
Water Science and Stewardship
Interactive Classroom Activities for Youth Educators
Contents
How to Use this Educational Tool
Module 1: The Importance of Water
Module 2: The Water Cycle
Module 3: Water Availability and Use
Module 4: Watersheds
Module 5: Water Quality in Watersheds
Module 6: Water Conservation and Stewardship
How to Use this Educational Tool
This manual will walk you step-by-step through educating young people about water science and stewardship. Each section is thoughtfully designed to help participants learn the basics of water science through exploration, activities, and hands-on problem solving.
The manual is organized so that you have all the information you need to teach confidently, inspire curiosity, and engage learners through each module. Plan your lessons according to the estimated amount of time for each module, and never hesitate to improvise.
Most modules use online, interactive tools to learn about water use and watersheds, but if you have the time and resources, you can take these activities outside to see how water moves through the earth and atmosphere and to investigate how water interacts with different landscapes as it travels over land and to local water bodies.
Target audience: This manual can be used for K-12 students. Vary the level of detail and scientific terms used depending on your desired learning outcomes.
Quick Tips
A great way to allow students to engage, think, and explore topics is to let them lead the learning. This takes the pressure off of you as a teacher and empowers students to explore subjects through what they already know. Use the question prompts before and after activities and make up more of your own questions to explore what water is, how it moves, where it resides, and how we determine the quality of water. Use your neighborhoods and backyards as living laboratories to do experiments and investigate water!
Be flexible with these modules and with your students. Take time to further explore topics they’re interested in and use the wealth of resources on the web to supplement—but be sure the websites you access are reliable! The best way to ensure reliability is to use information and web pages from government agencies (state, local, and federal), academic institutions like universities, and scientific sources using the Google Scholar search engine. YouTube videos can also help visualize complex concepts, but make sure the information is accurate before you share it!
Module 1: The Importance of Water
Summary: This module is designed to foster reflection and discussion about the importance of water. It is the introduction to the other modules as well as an icebreaker activity for the students to get comfortable talking to one another. The prompting questions are designed to be easily adaptable to learners ranging in age from upper elementary through adults.
Estimated prep time: 5 minutes
Estimated activity time: 10 to 30 minutes
Materials: Nothing! Small, sticky notepads or a white board and markers are optional.
Water Facts
- Water is a basic requirement for all living things, including people!
- There is no substitute for water.
- Water is a shared resource, meaning people share it for domestic, environmental, power-generation, manufacturing, industrial, transportation, and recreational activities.
- Water covers 70 percent of the earth’s surface, but most of that water (over 97 percent) is salt water.
- Water moves and connects people, communities, counties, states, and countries.
- Water does not care about geopolitical boundaries like city, county, and state lines.
- Water transports many particles within it. Some things are found naturally in the environment (for example, soil particles and organic compounds) and some are manmade (for example, industrial chemicals).
EXPLORE: Why Is Water Important?
Begin by asking students one question: Why is water important? Let students discuss this among themselves for as long as needed, and then integrate water facts listed above into the discussion as needed. To reinforce key concepts, students’ ideas can be listed on a white board or written on individual sticky notes that can be stuck onto a white board or wall near the heading “Why is water important?” Use the connecting questions below to help them dive deeper into humans’ connections to water. Let students know that it is okay to not know the answers to these questions; you will find the answers together through this and the following exercises!
REFLECT
- How do people use water?
- Is all water on the planet in liquid form?
- Is all water fit for drinking? For use in agriculture?
- How do things in nature use water?
- Why is water important to you?
CONNECT: Link to Bigger Ideas
- What is the source of water in your faucet?
- Where does water go once it goes down the drain?
- Do all people on Earth have access to water? For themselves? For their animals? For their food crops?
- Do you think the water is always clean enough to drink?
Module 2: The Water Cycle
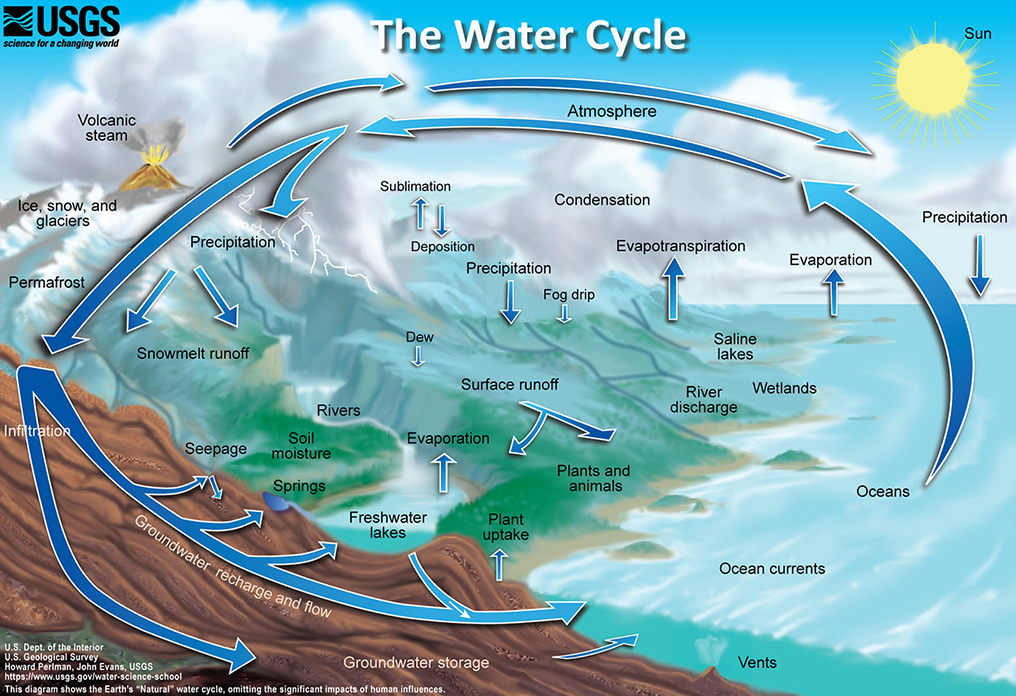
Summary: This module is designed to educate students on the water cycle, also called the hydrologic cycle. Water moves around Earth’s atmosphere as water vapor, falls to Earth as precipitation, moves around Earth in various water bodies such as lakes, rivers, streams, and oceans, and moves through soil and water bodies to connect with groundwater systems. During its journey around the planet, water can assume the form of a solid (ice), liquid (water), and gas (water vapor). Over time, human activities have influenced the water cycle. This lesson will teach students about these concepts and their importance.
Estimated prep time: 20 minutes to 1 hour
Estimated activity time: 1 to 2 hours
Materials and preparation:
- Instructions for The Incredible Journey (download PDF at link)
- A blue ball
- Paper or notecards for making water cycle stations
- Copies of the water cycle diagram (optional)
- Read through the game’s instructions in advance.
Insider’s Tip: The formal instructions for The Incredible Journey game require creating a number of stations related to different components of the water cycle and then creating customized dice (on cardboard boxes) for each station related to how water might move between compartments. Creating these dice takes some time. If you are in a time crunch, use note cards at each station and write how water might move from that station, numbering the items 1 to 6. Then, just get one regular die and a blue ball to play the game!
EXPLORE: The Water Cycle
Begin by asking students, “How does water move around the earth and the atmosphere?” This will help you gauge what they already know and get them thinking about how water moves around the planet and different transport processes. Let students discuss this among themselves for as long as needed. Integrate information from the water cycle diagram to explain how and where water moves. Once you explain the water cycle, play The Incredible Journey, which allows students to simulate movement through the water cycle as if they were a drop of water.
Further explore water cycle components and water cycle processes using resources from the U.S. Geological Survey.
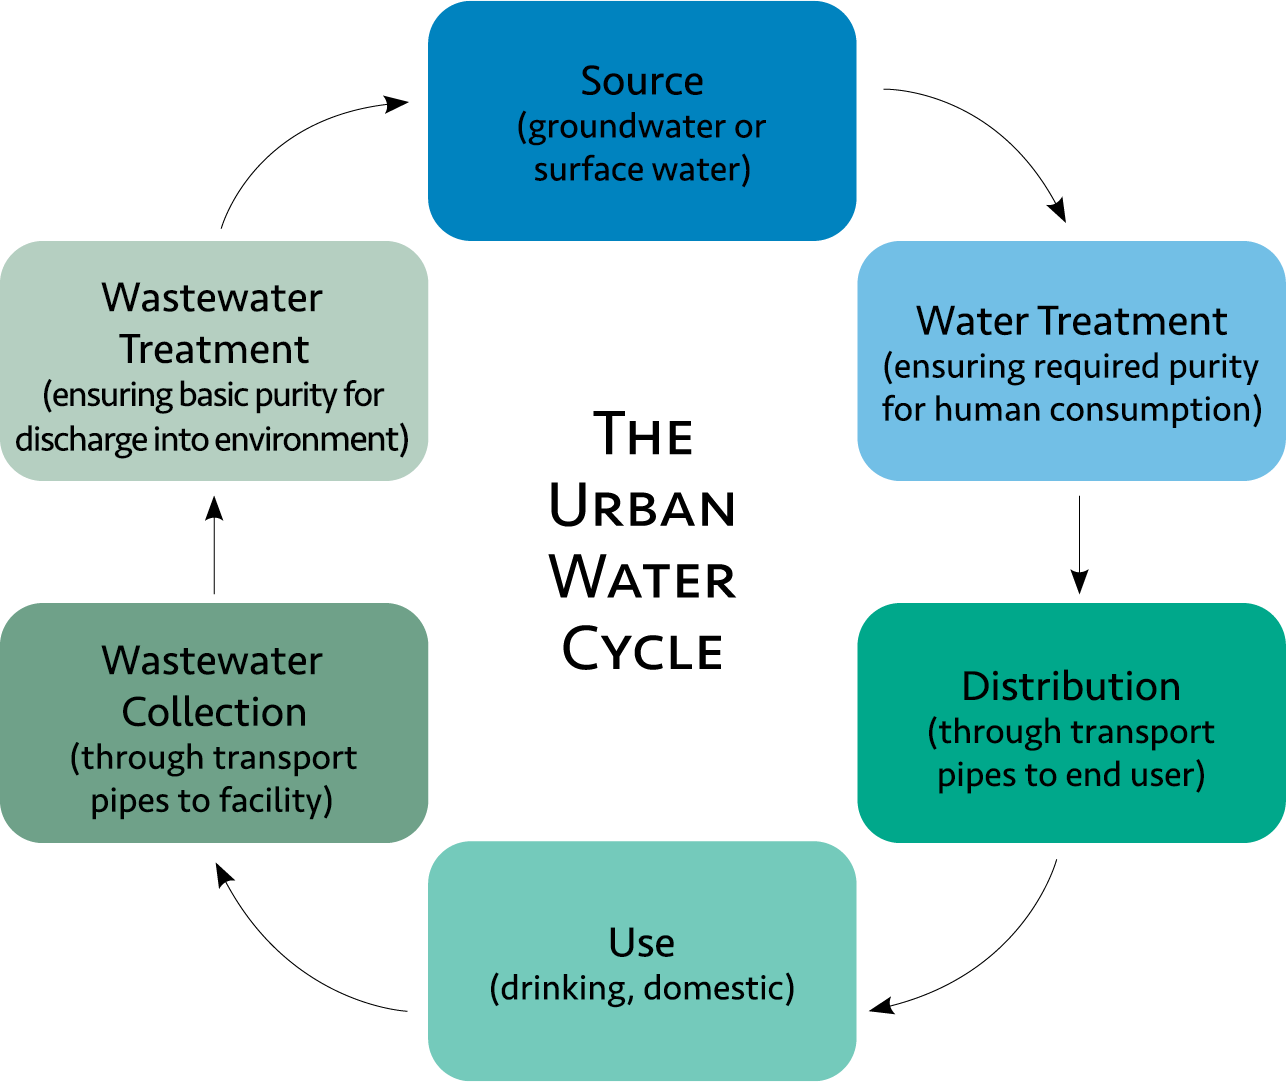
EXPLORE: The Urban Water Cycle
For a deeper dive into this topic, explore one way in which humans have affected the water cycle: follow the urban water cycle to learn how water makes it to our homes and where it goes once it leaves. Discuss the elements of the urban water cycle shown below.
REFLECT
- Is water being added to or taken from the water cycle?
- What happens if water spends too much time in one part of the cycle, such as in ice and snow in polar ice?
- What happens if water is not filtering into the ground?
CONNECT
- The next time it rains, look out your home or car window. Where do you see flowing water? Where is the water flowing from and where is the water flowing to? Can you guess which water body it will flow into?
- Use the internet and local resources to find out where your local water comes from (source) and where it travels before it reaches your home (where it’s treated to achieve drinking water standards). Investigate how it is treated (wastewater treatment facility) before it is released back into the environment, and where or in what body of water the wastewater is released.
Module 3: Water Availability and Use
Summary: Although Earth is almost 70 percent water, approximately 97 percent of that water is in the ocean. This leaves less than 3 percent of water that is freshwater and less than 1 percent that is directly available to humans. This module is designed to provide information about how much water is readily available for human use and to foster discussion and reflection about how we use water.
Estimated prep time: 5 minutes
Estimated activity time: 1 hour
Materials: This lesson will require a computer with internet connection and a projector/screen to display the water use tool to students. Computer stations or tablets with internet access are another alternative. The online water use calculator does most of the teaching for you, so prepare for this activity by using the tool yourself.
EXPLORE: How Much Water Is on Earth?
Use the diagram below to explain how much water is available for human use on Earth.
.png)
Now determine your group or class average water use or water footprint using the water footprint calculator online tool. As you move through the tool, consider how the questions about water use behaviors relate to choices made in and outside of households. How does the group directly and indirectly use water? Once you walk through all of the questions, the interactive website will summarize the class water use compared to average US water use, and provide ways to reduce water use that you can discuss with students.
REFLECT: Personal Water Use
Make a list with your students about how they think they use water. Encourage them to be creative and thoughtful about the way they use water directly, like for bathing, drinking, or cooking, and indirectly through products they buy, like food and clothing!
Direct Water Uses
- Recreation
- Growing food
- Mining
- Power generation
- Domestic uses
- Environment
- Transportation
- Industrial uses
Module 4: Watersheds
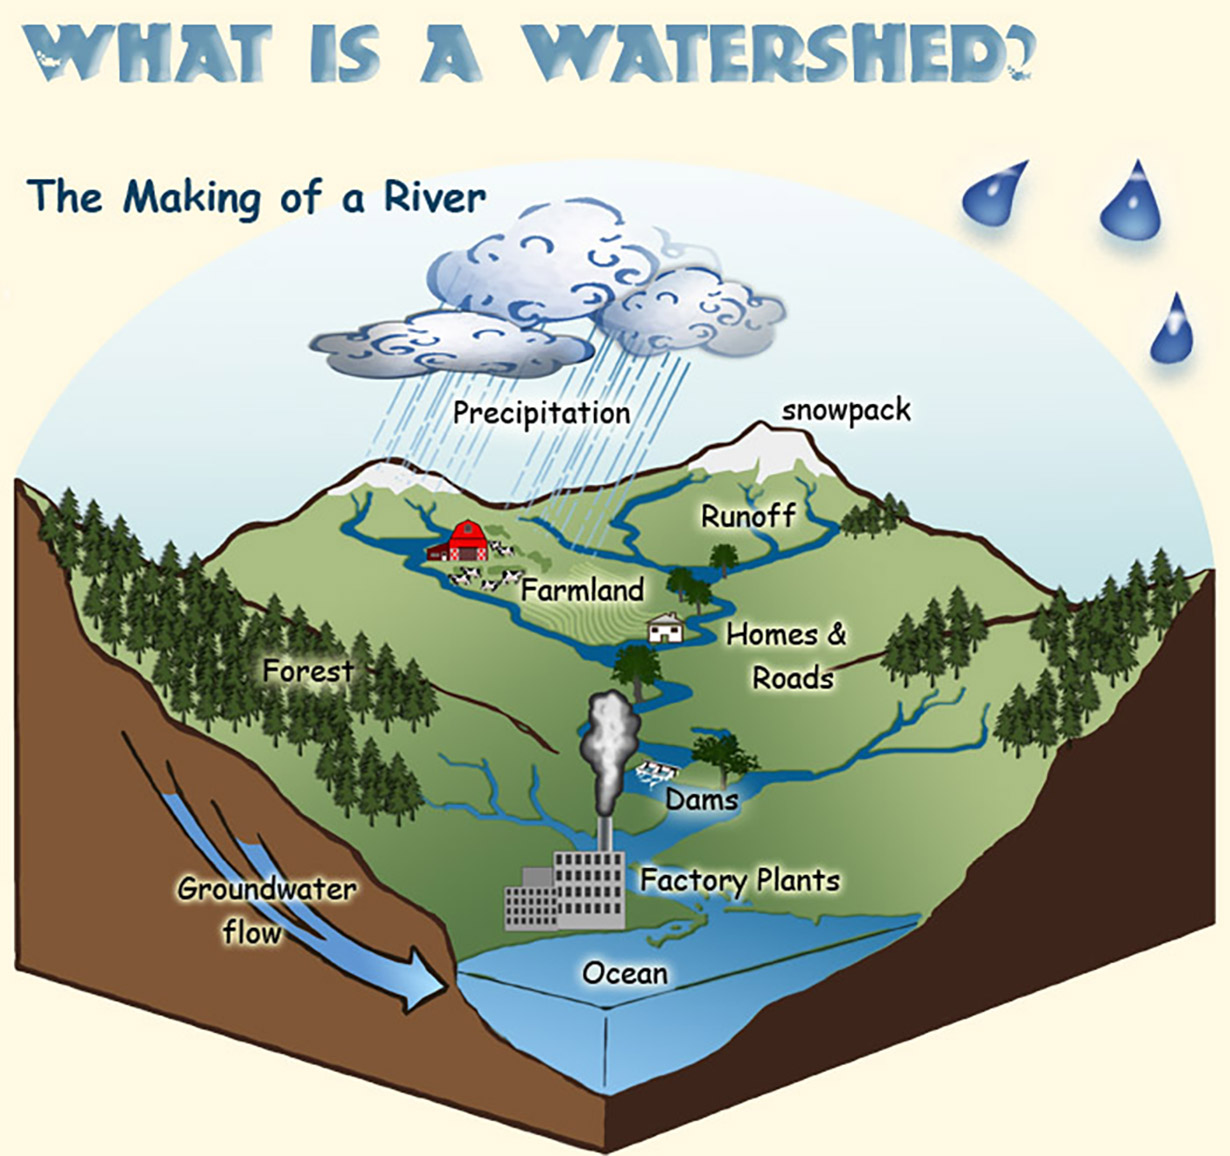
Summary: This module is designed to introduce students to the concept of watersheds. A watershed is an area of land over which all rainfall and other preciptiation drains to a common outlet such as a stream, lake, river, or wetland. This term may be new and hard for students to visualize. Use the text and figure below to give students an overview of watersheds, and reinforce the concept through the activities and recommended links.
Estimated prep time: 5 to 10 minutes
Estimated activity time: 1 hour
Materials:
Activity One
- white paper
- water-based markers
- spray bottle
- sheet pan (to catch water)
Activity Two
- computer with internet access and projector and projection screen, or smart board system for a teacher-guided
experience
OR
- enough computers for students to work in small groups with teacher oversight
What Is a Watershed?
A watershed is an area of land over which all rainfall and other preciptiation drains to a common outlet such as a stream, lake, river, or wetland. Small waterways called tributaries flow into larger streams. Streams join to form a river, and many rivers join together to form a river system. On a map or from the air, a watershed’s drainage patterns form a network like branches of a tree. Watersheds connect land to water, and they connect water from one place to water in another place farther downstream.
Healthy watersheds are necessary to protect living things that live in or use these aquatic systems, including people! Preventing pollution and maintaining a healthy watershed is almost always less expensive than cleaning up a polluted one.
EXPLORE: Watershed Activity 1
Simulate a watershed with basic classroom supplies. This creative and simple exercise allows students to use a crumpled piece of paper and water-based markers to trace lines that become watershed peaks and valleys.
Procedure
- Give each student a sheet of white paper and allow them to crumple it; then, partially smooth out the paper, allowing some ridges to remain.
- Instruct students to use water-based markers to color along the creases in the paper, using different colors to represent different landscape features (e.g., black for roads, red for buildings, yellow for farms, blue for water bodies, etc.). These will represent different sources of pollutants such as oil, fertilizers, pesticides, trash, farm animal waste, etc.
- Place the paper sheets in a shallow pan and shape them so it looks like a watershed landscape.
- Using a water bottle, spray the paper, and observe what happens.
Activity adapted from Protecting Our Water Resources: Student Activities for the Classroom (PDF).
REFLECT
- Discuss what students observed in this activity.
- Describe what happened when water from the spray bottle landed on the colored places on the paper.
- How does this relate to what happens when rain falls on the land?
- The colors in this activity represented different pollutants. What would happen if the activity were repeated and the different colors represented various land uses, such as cities, yards, farmland, parking lots, etc.? (Answers should reflect an understanding that rain and other precipitation will wash substances from the land into water bodies in the watershed. For example, oil or gasoline will come from city streets or parking lots, soil from agricultural fields, animal waste from pastures, herbicides from lawns, etc.)
EXPLORE: Watershed Activity 2
Students will learn the outcome of hypothetical land use decisions on water quality within watersheds in this fun, interactive web game called Rock Your Watershed. Students can do this activity in teams if there are enough computers, or the instructor can lead students as a group by using a projection system or similar equipment. This activity will reinforce the watershed lesson content and explore connections between water movement and water quality, which will be presented in more detail in the next module.
CONNECT: Know Your Watershed
The first step to protecting the water in your area is identifying the watershed in which you live. This will allow you to analyze human activity within your watershed and pinpoint what land use activities may be impacting it.
Learn more about watersheds here.
Module 5: Water Quality in Watersheds
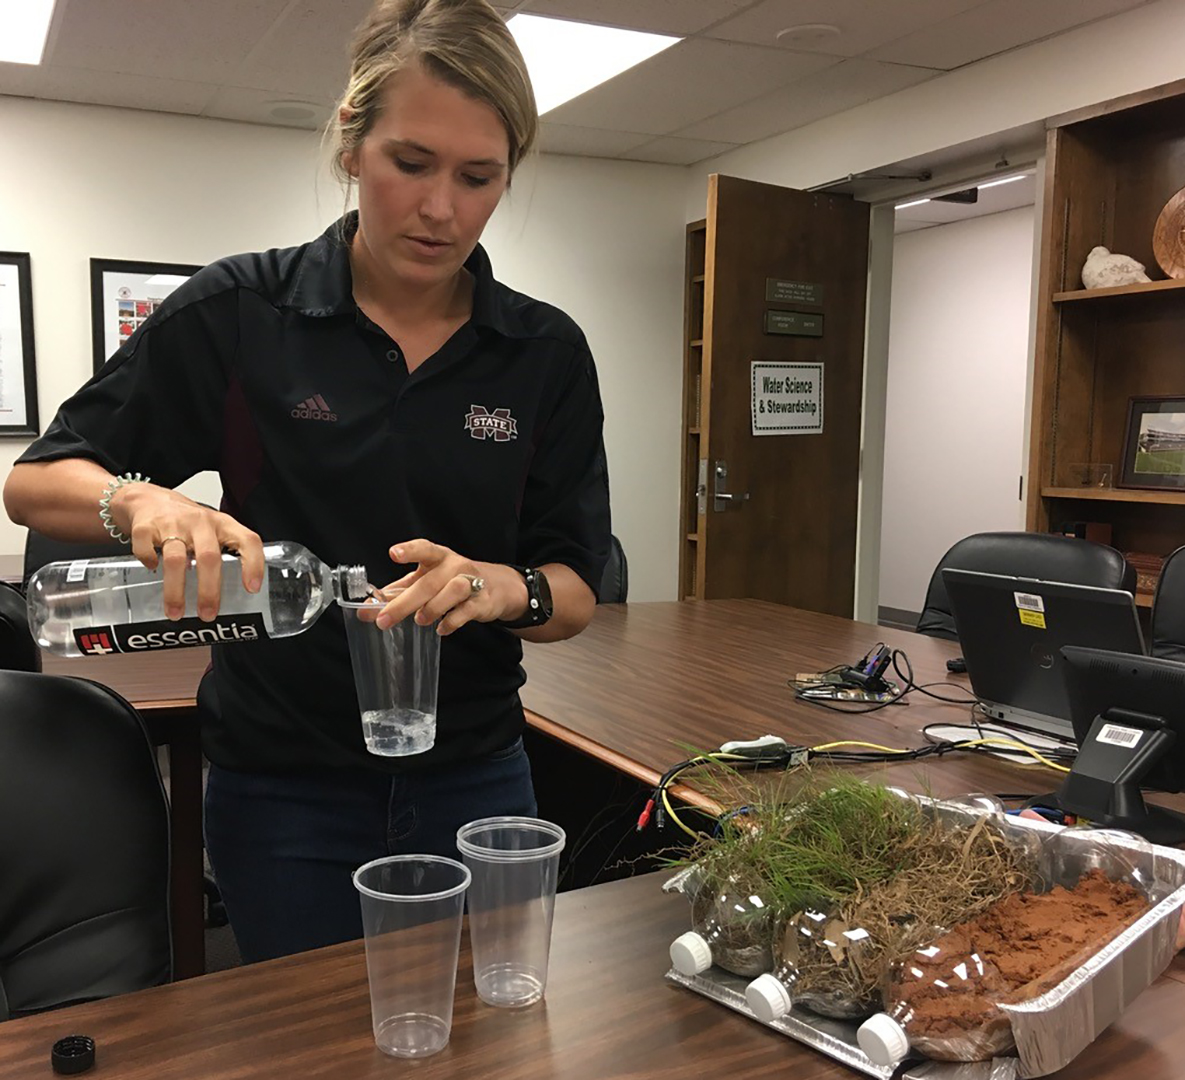
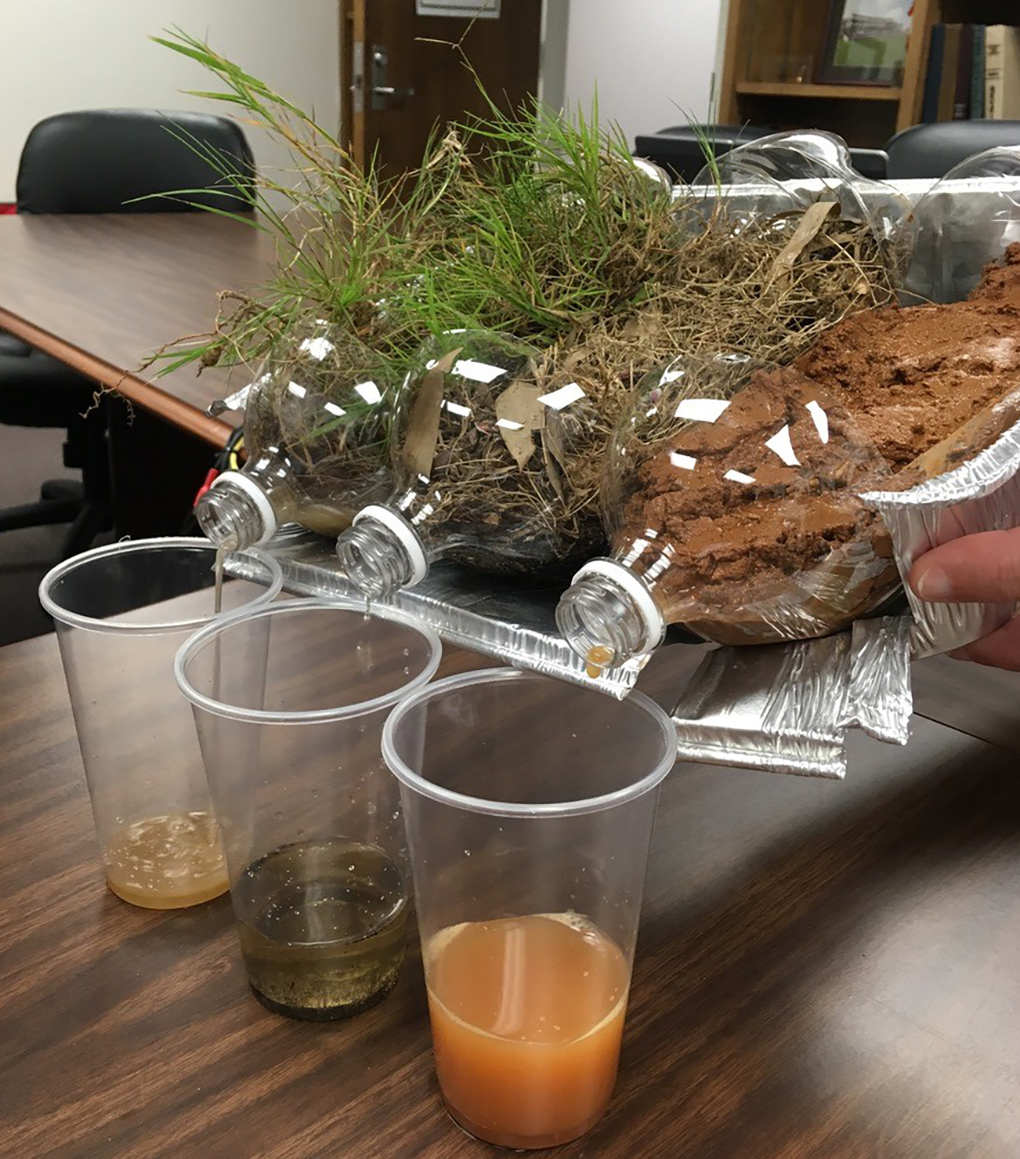
Summary: This module is designed to educate students about water quality, including those factors that affect it and how it is measured. After an initial discussion fueled by the prompting questions, use the rainfall simulator activity to illustrate the impact of water runoff on water quality. Consider allowing older learners to construct the simulator themselves to promote greater engagement; for younger learners, you may need to complete the activity as a demonstration. If time and resources allow, reinforce concepts in this lesson by using the suggested websites below, or test your local water with a water test kit.
Estimated prep time: 30 minutes to 1 hour
Estimated activity time: 1 to 2 hours
Materials:
- 3 clear 2-liter bottles
- scissors to cut the bottles
- aluminum tray large enough to hold bottles on their sides
- topsoil
- small sample of wood chips, hay, or pine straw (approximately 2 to 3 cups)
- one piece of sod with grass (a section about 4-by-8 inches)
- 3 clear plastic cups to catch runoff
- water to pour on soil
Preparation: Using scissors, cut a 2-liter plastic bottle lengthwise from just below the collar of the bottle to about 2 inches from the bottom. Make a second cut parallel to the first about 4 inches away. These cuts will form the long sides of a rectangular piece of plastic that will be removed from the bottle to make a trough. To complete the trough, cut from the start of one long incision across the curve of the bottle to the start of the other long incision. Repeat this process at the other end of the long incisions. Remove the curved, rectangular piece from the bottle (see image below). Repeat this process for the remaining two bottles. Number each bottle and its corresponding plastic cup. Cut small notches in the long side of the aluminum tray to accommodate the bottle tops. Place the three bottles on their sides in the tray with the open trough-side up, and fill each bottle about half full of soil. After the soil is in place, sprinkle the wood chips, hay, or pine straw on top of the soil of one bottle. Place the sod on top of the soil in the second bottle. The third bottle will contain only soil.
Note: If time is available and learners are about 12 years or older, the simulator can be constructed as part of the exercise. If time is limited or learners are young, construct the simulator in advance. Note that the plants in the sod will not be able to survive very long in open air; however, it is important for the experiment to make sure all three bottles are treated the same. So, if it becomes necessary to water the plants, apply the same amount of water in the same manner to all three bottles.
Source: REACH program.
Water Quality Discussion
Begin by asking students, “How do you know water is clean? Clean enough to irrigate crops? Clean enough for livestock to drink? Clean enough for people to drink?” Let students discuss this among themselves for as long as needed, and then lead the group to discuss their answers, integrating content from below into the discussion as needed.
What Is Water Quality?
All water has a certain quality, but you cannot always tell what that quality is just by looking at it. The quality of the water is relative to its intended purpose or use. For example, water that is full of dirt and grime might be fine for a tomato plant but not for people to drink. Scientists describe water quality as a measure of the suitability of water for a particular use based on selected physical, chemical, biological, and aesthetic (appearance and smell) characteristics. They use many tools to assess different water characteristics to determine if its quality is good or poor. Some of these characteristics include dissolved ions (sodium, chloride, calcium, etc.), dissolved gases (oxygen, carbon dioxide, etc.), biota (living organisms), dissolved nutrients, color, odor, clarity (turbidity), temperature, and trace metals.
Land use within a watershed can affect the quality of the water within that watershed. For example, exposed soil in construction areas or agricultural fields can wash away with rainwater and add sediment to waterways. Rainfall on grassy neighborhood yards may not erode the soil, but it may wash herbicides or pesticides into nearby drains or creeks.
EXPLORE
Procedure
- Explain to students that the three bottles represent three different land uses: a bare field, a crop field with litter, and a pasture or lawn with grass cover.
- Ask students to predict what might happen when rain falls on these land use types. Write down their predictions for each bottle.
- Have someone hold the tray containing the bottles of soil off the table or set it on a small stand. Place clear cups below the bottle spouts to catch “runoff.”
- Pour the same amount of water onto each “land use.” Explain that excess water that does not soak into the soil is called “runoff.” Ask the students to note the differences in the water among the three capture cups. Were predictions correct or inaccurate? Why?
- Remind the students that more runoff occurs in areas with concrete, paved roads, or other hard surfaces, and much less in areas covered with vegetation.
- Explain that animal waste from livestock and pets, as well as roadside litter, oil, pesticides, and other chemicals can be carried in runoff, leading to polluted waterbodies.
Photos: Andrea Bhatia
CONNECT: What is the Quality of Water in Your Watershed?
The Mississippi Department of Environmental Quality evaluates the health of watersheds in the state. Follow the link below to find out if your watershed is impaired!
Find your watershed in Mississippi here.
Assess or test your water quality:
If you have more time and available financial resources, consider purchasing a water test kit for your students to investigate the quality of water in your area.
EXTENSION
Love experiments with water? Check out this experiment related to water aesthetics!
Module 6: Water Conservation and Stewardship
What are ways to protect and preserve water resources? We can all help protect and conserve water. Try practicing some of the behaviors below! A great way to be mindful about water use is to ask yourself: Could I use less water? Will this impact the quality of water somewhere?
CONNECT: Water Conservation Opportunities at Home, School, and in Your Community
- Take a shower instead of a bath, and time yourself. Try to get it done in less than a minute!
- Reuse towels.
- Turn the water off while you are brushing your teeth.
- Don’t let kitchen faucets run unnecessarily.
- Tell an adult if you see or hear any leaks.
- Don’t run the dishwasher until it is full.
- Leave a bucket outside to catch rainwater for watering plants.
- Water plants in the morning or evening when it’s cooler to reduce evaporation.
- Use fewer single-use items, such as plastic straws, plastic bottles, etc.
- Recycle waste and dispose of trash appropriately.
- Plant grasses or trees around water bodies.
- Organize or take part in a stream and coastal clean-up.
- Eat more whole foods and less processed foods, which require more water for manufacturing.
Publication 3423 (POD-04-23)
By Beth Baker, PhD, Assistant Extension Professor; Leslie Burger, PhD, Assistant Extension Professor, Wildlife, Fisheries, and Aquaculture; Andrew Lucore, Research Associate; and Keaton Hamid, Undergraduate Student, Wildlife, Fisheries, and Aquaculture.

The Mississippi State University Extension Service is working to ensure all web content is accessible to all users. If you need assistance accessing any of our content, please email the webteam or call 662-325-2262.

