
Top-work Grafting of Pecan Trees
There are two main reasons for grafting a pecan tree. One is to install a better variety onto an old stock. A better variety may bear nuts earlier, produce more nuts, have nuts of better quality, and have natural resistance against insects and diseases. The second is to ensure clonal genetic identity. Having a clonally grafted variety can greatly assist with orchard management.
There are many good pecan varieties, but make sure to choose those that perform well in Mississippi. Consult Publication 966 Fruit and Nut Recommendations for Mississippi for suitable varieties.
Definitions
Grafting: The process of making a part of one plant unite with, and grow upon, the part(s) of another plant.
Scion: The part of the plant, usually a stem, that is inserted in the stock. Also called graftwood.
Rootstock: Any part of the plant in or on which a scion is inserted. Also called understock or stock.
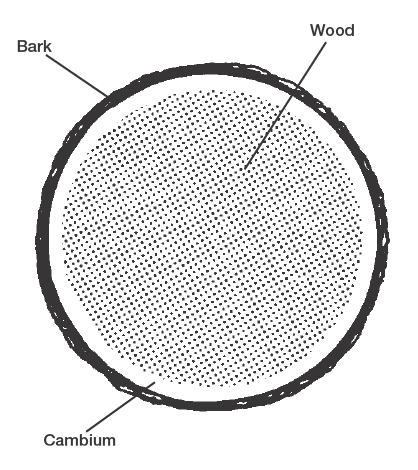
Cambium layer: The portion of plant tissue that is of primary concern when grafting (Figure 1). It is a very thin layer of tissue, only a few cells thick, located between the bark and the wood, which gives rise to new bark (phloem) and wood (xylem). For grafting to be successful, the cambium of the rootstock must be in contact with the cambium of the graftwood and the two held securely until they knit or heal. The more cambium area that touches together, the greater the chance of having a successful graft union.
Callus: A mass of developing cells around wounded plant tissue.
Equipment
To graft correctly, it is necessary to have the proper equipment for the job. Tools may include:
- hand-pruning shears
- sharp knife
- sharpening stone
- tying materials, such as twine or grafting tape
- grafting wax, amber shellac, or wood glue
- aluminum foil
- polyethylene bags
- 5/8-inch nails, gauge No. 18
- hammer
- saw
Collecting and Storing Scion Wood
One of the more common causes of failure in grafting is improperly collected and stored graftwood. Collect the desired variety while the wood is dormant (February or early March in this region), and follow the suggestions below:
- Collect scion wood from trees that are free of disease.s
- Choose young trees because they produce vigorous growth and are generally excellent sources of scion wood.
- Cut the scion wood into 6-inch sticks.
- Tie the sticks into bundles of 25.
- Wax both ends (wax or paraffin is suitable) to prevent dehydration.
- Store in moist peat moss or moist newspaper in the refrigerator until time for use. The scion wood and peat moss may be placed in plastic bags.
- Identify each bundle with a tag or other method. Do not mix varieties in the same bag.
Graftwood should be taken directly from cold storage and used in the field while it is dormant. The rootstock must be actively growing at the time of grafting. Mid- to late April is generally a good time to graft pecans. Once hot weather starts, grafting success will be diminished.
Size of Tree to Top-work
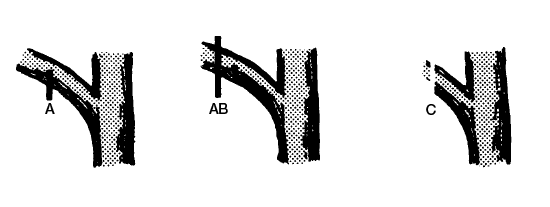
Trees from 3 to 12 inches in diameter at breast height (4.5 feet above the ground) are top-worked. Trees 3 to 5 inches in diameter are usually cut off about 5 to 6 feet above the ground line. Only two or three grafts may be made. Where possible, leave one limb below the graft (pointing southward) to produce food and to shade the trunk. In working the larger trees, cut 60 to 70 percent of the limbs about 1 foot from the trunk. Select these limbs in such a manner that a well-balanced crown develops. Saw these limbs from the underside of the limb until the saw begins to bind (Figure 2). Then make the final cut from the top side. This prevents splitting. In case the cut is not smooth, saw it off again a few inches below the first cut.
Rootstock Preparation
Cut and graft the main leader, or top, since it is the most important single graft. Leave the remaining 30 to 40 percent of the limbs uncut for 1 or 2 years, and then remove as close to the trunk as possible. Prune all suckers or new growth from any place except the grafts, thus forcing all new growth from the graftwood or scion.
Making the Graft
The most common graft used in top-working pecan trees is the inlay bark graft.
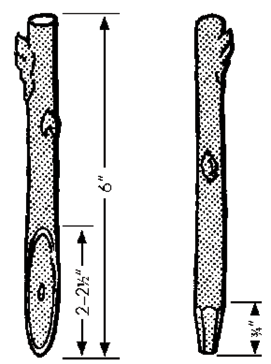
You can prepare a 6-inch scion in one of two ways. One method is to cut one side of the basal end to a long straight bevel (this bevel should be around 2–2.5 inches long) and make a second cut on the bark side, around three-fourths of an inch long, exposing additional cambium (Figure 3).
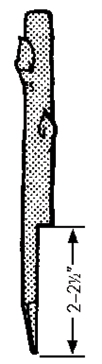
Another method is to prepare the scion similar to the straight bevel method. However, instead of slicing at an angle, cut halfway into the basal end (around 2–2.5 inches from the end) at a straight 180 degree angle and then cut downward to the point of the basal, exposing the cambium and leaving a 90 degree angle cut into the scion (Figure 4). More cambium may be exposed by using this technique.
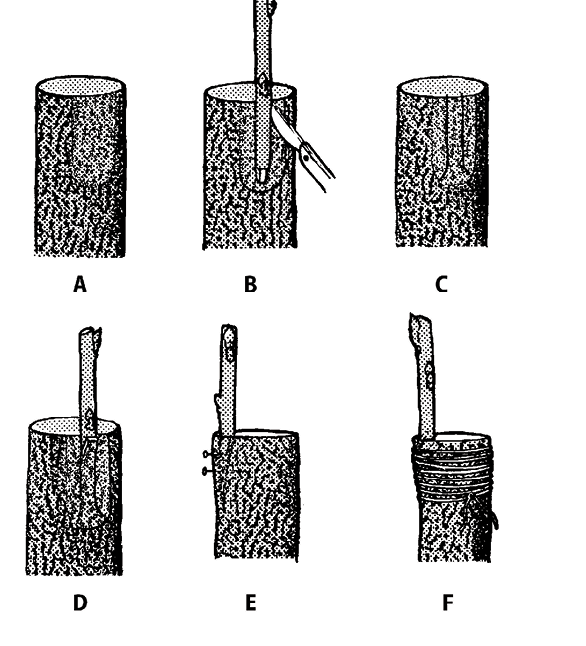
Prepare the crown of the limb to be grafted by removing the coarse outer bark (Figure 5A). Do not completely cut the bark, but remove only the rough outer portion.
Hold the prepared scion to the crown in the location in which it is to be fastened. With a knife blade, trace lines to indicate the width and length of the scion. Then make cuts through the bark (Figure 5B). The width of the slot formed when the bark is lifted should just accommodate the scion at the upper end but should be slightly wider at the lower end (Figure 5C).
Lift the bark made free by the two incisions and insert the scion underneath (Figure 5D).
Remember: Do not touch the exposed cambium area, and do not leave the cambium areas exposed longer than necessary.
Fasten the scion by nailing (Figure 5E) or wrapping with string or grafting tape (Figure 5F). Choose string or twine that will not immediately rot, but don’t use nylon since it will not deteriorate and may girdle the scion.
Another method of inlay bark grafting is shown in Figure 6. The only material not generally found in the home is grafting wax that becomes pliable with body temperature and does not require heat.
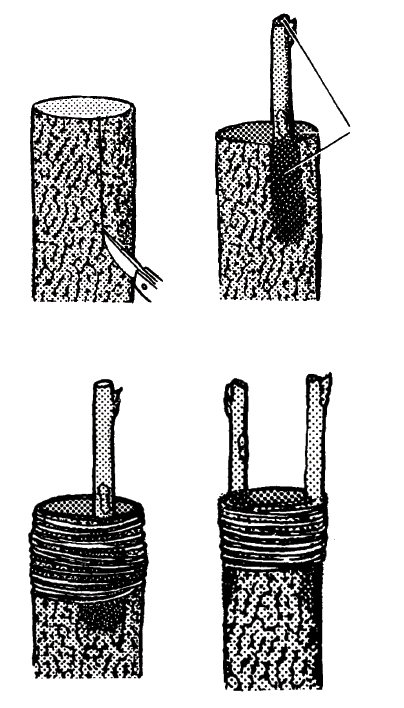
Using a knife, make only one slit about 2.5 inches long for each graft to be applied. Insert the scion into the stock. Use a wax that becomes pliable with body temperature or amber shellac to cover all exposed cuts on the stock and scion. Tie the scion securely in place with string, twine, or grafting tape.
Sealing the Graft
There are different ways to seal a graft. One method is to seal the exposed areas by applying prepared grafting wax by brush (Figure 7).

Another method is to use aluminum foil and plastic bags. With the bright side outward, crimp the foil loosely around the stock. It should extend far enough beyond the end of the stock to cover the bevel cut on the scion.
After the foil is in place, place a plastic bag over the scion and stock. Bring one corner of the bag over the end of the scion. At the point of contact, make a slit with the knife blade just large enough to let the scion through. Then pull the bag into position. The bag is somewhat elastic and can be stretched over the buds on the way down. If the hole becomes too large, close it by wrapping it with a rubber band. Pint-sized bags are large enough when small sticks are grafted, but quart-sized bags may also be used.
To close the bag, tie it against the stock, starting below the graft wound. Extend the twine or grafting tape wrap a sufficient distance to ensure that the inside of the bag will retain 100 percent humidity.
While only one graft on a single stick is shown in the figures, it is always a good idea to install two or more depending on stock size, to increase chances for success. As the grafts begin to grow, select the more vigorous graft and remove the others. Do not let more than one remain because this will result in a weak crotch, and splitting may occur in later years.
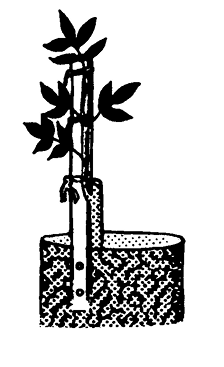
Wind and animals damage many successful grafts. This can be prevented, to some extent, by bracing the growing graft. A piece of lathe or a cut branch nailed to the rootstock can be used as a brace. The newly formed branches can be tied to the brace, and this will help prevent breakage from wind and birds (Figure 8).
Be sure to remove bags, foil, and tying material once the graft has taken and is growing sufficiently. This could be late in the summer or the following year, depending on growth rate.
Publication 3849 (POD-01-25)
Revised by Eric Stafne, PhD, Extension/Research Professor, Coastal Research and Extension Center. Written by Richard Mullenax, PhD, former Extension Horticulturist.

The Mississippi State University Extension Service is working to ensure all web content is accessible to all users. If you need assistance accessing any of our content, please email the webteam or call 662-325-2262.
