Prepare Your Broiler House for Winter Conditions
Winter is just around the corner, so it’s a good time to start prepping your broiler houses for colder weather. Fuel costs associated with winter flocks are substantial, so anything that can be done to make the process more energy efficient is well worth the effort.
Reducing heating costs is usually a combination of the “little things” rather than a single solution. Several recommendations discussed in this publication will require only a little elbow grease and a basic understanding of some of the principles of house winterization and heating system operation. This is not an exhaustive list of what can be done to winterize a house, but it’s certainly a good place to start.
Maintain Your Heaters
During the cold weather, radiant heaters are the most vital pieces of equipment for growers, yet the heaters receive little attention until there is a problem. Staying on top of any potential problems with your radiant heaters is important, as maintaining suitable brooding temperatures ensures that brooding is off to a good start. Temperatures that are too high or too low will decrease overall bird performance and comfort.
Here’s a checklist of things that can be done to ensure that you get the most from your radiant heaters.
- Visual inspection. Perform a visual inspection of all heaters during brooding to make sure that all hoses are secure and fittings are tight. Watch the heaters as they cycle on and off to make sure they work correctly. Also, double-check to ensure the temperature sensors are working and are mounted at the correct height.
- Clean heater canopies and burners. This is usually not on top of the to-do list, but it makes a difference as the process is easier with more frequent cleanings. It’s simpler to use a backpack blower and remove a thin layer of dust from a single flock than removing heavily caked-on dust. In addition, the performance of dirty, round radiant brooders can be decreased by as much as 30 percent when compared to new heaters.
- Check inlet supply and heater manifold gas pressure. This is something that can be done once a year by a certified gas technician before the first winter flock. Start with the heaters that are farthest from the gas regulator. If the inlet supply pressure is within the recommended range for these heaters, there’s probably no need to test the others. If it’s not within the recommended range, there is a gas-pressure or pipe-size problem that should be addressed. Checking the manifold pressure ensures that your heaters are burning at the correct pressure. Data shows that decreasing manifold pressure by 1 inch of water column from the rated pressure can decrease radiant energy reaching the floor by approximately 14 percent for round radiant brooders. If you notice that a heater isn’t blowing as much heat as the others, it’s more than likely a pressure-related problem.
- Check heater elevation. This does not apply to radiant tube heaters since they are not raised or lowered during any stage of production, but it is important with round radiant brooders. All round radiant brooders have recommended elevation ranges, and the safest bet is to stay within these ranges. Brooders that are too low will create “hot spots” (areas that are too warm for the birds). Brooders placed too high will not provide enough heat and may result in chilled birds and excessive fuel consumption.
Prevent Air Leaks
While newly constructed poultry houses are more airtight than older ones, unwanted air leaks are still a problem, and they will affect your ability to control house air temperature and prevent chilling birds. Under ideal conditions, the only air entering a house during minimum ventilation would be through the air inlets. In reality, air infiltrates most houses through a number of places other than the air inlets. Air leaks can decrease the velocity of air coming through the air inlets during minimum ventilation and reduce air mixing. In addition, cold air that seeps into a house has to be offset to maintain a comfortable environment for the birds, and this results in increased energy and fuel expenditures. A curtain-sided house that cannot achieve a minimum of 0.13–0.15 inch of water column (inch WC) or a solid-sidewall house that cannot achieve 0.20–0.22 inch WC during a static pressure test will use excessive amounts of heat during winter conditions.
A smoke test is a good way to find air leaks in your house. Place the house under 0.10 inch WC of static pressure and smoke the exterior. Wherever smoke enters the house is where there is a leak. Below are some common places to check for air leaks.
- Cracks between sidewalls and concrete footings
- Loose tunnel inlet curtains or tunnel curtain doors that don’t close properly
- Cracks between carpenter joints
- Sidewall or attic inlets that do not close tightly
- Cracks around doors and attic accesses
- Holes or rips in the ceiling material
- Warped or damaged fan shutters
Insulation
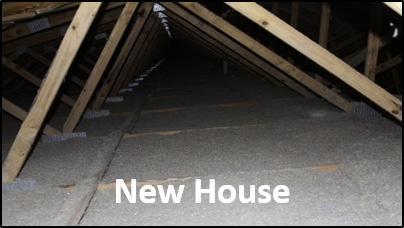
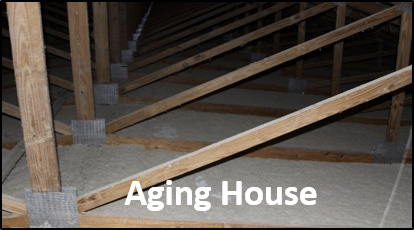
Operating a poultry house with substandard insulation leads to reduced live performance, increased energy use, and reduced profitability no matter the season. Insulation keeps warm air in the house during winter and reduces the amount of fuel needed to heat the brood chamber. Insulation performance is specified in terms of thermal resistance, or R-value. The higher the R-value, the more effective the material is at resisting the flow of heat. Most newly constructed houses in the southeast have a minimum of R-19 in the ceiling and R-11 in the sidewalls. However, decreases in R-values over time through shifting and settling of blown cellulose insulation can be a major problem (see Figure 1). Rodent activity, wind, gravity, ceiling slope angle, and constantly vibrating ceiling materials can reduce the installed R-value of attic insulation by 40–80 percent.
Although insulation R-value is subject to change over time, “an ounce of prevention is worth a pound of cure.” Here’s a checklist to make sure your insulation stays up to par.
- Visually inspect attic insulation levels. One of the easiest ways to identify and prevent insulation problems is by yearly visual inspections, especially in the attic area. Most of the heat lost in the thermal envelope of a poultry house is through the attic area. Make it a priority to visually inspect your attic insulation every year, especially if you have blown cellulose. The standard thickness for blown cellulose attic applications is 6 inches, which should provide a thermal resistance of around R-19. If you notice substantial settling or bare spots in your attic, add insulation as needed. Hiring a contractor to re-apply blown insulation to a minimum of R-19 (6 inches) will save you money in the long run and yield a quick payback in extreme cases.
- Look for condensation. If you’re seeing condensation during cold weather, whether at the walls or the ceiling, then there is air infiltration, thinning insulation, or both. Ignoring condensation problems can lead to higher fuel consumption and structural damage.
- Increase initial insulation depths in new houses. Increasing the minimum depth of blown cellulose attic insulation from 6 inches (R-19) to 8 inches (R-25) allows for some settling over time and prevents or prolongs having to upgrade insulation later down the road.
- Use blown-over-batt application method. The ceiling peak area of a dropped-ceiling house often sees shifting and settling of blown cellulose insulation. Another consideration for new construction to prevent this occurrence is to use a “blown-over-batt” application. This method uses a layer of fiberglass batt insulation that overlaps the ceiling peak by approximately 2 feet on both sides over the length of the house. Blown cellulose insulation is then blown on top of the fiberglass batt. This application prevents shifting and settling at the ceiling peak and maintains the integrity of the insulation over time.
- Consider fiberglass batt or blown stabilized fiberglass. Fiberglass batts and blown stabilized fiberglass applications are not prone to shifting and settling. However, there are considerable differences in price when compared to blown cellulose. The increased cost of 6-inch fiberglass batt versus a 6-inch blown cellulose application is about $4,000 for a 40-by-500-foot dropped ceiling house. Blown cellulose is initially cheaper, but producers operating houses with fiberglass attic insulation don’t have to worry about shifting and settling issues.
Stir Fans
Stir fans reduce fuel costs by up to 25 percent in older houses and nearly 10 percent in newer houses. Warm air in a house rises and stays close to the ceiling, while the cooler, denser air remains close to the floor. This process is called stratification, and temperatures near the ceiling can be 5–10 degrees warmer than near the floor. Stir fans mix the air and gently push the warm air back down to the floor where it is needed by the birds.
Axial fans point toward the end walls and should be tilted slightly upward to ensure that all the warm air is pushed off the ceiling. Paddle fans are effective in houses with baffles, but they should have forward and reverse settings. The air flow from a paddle fan should be directed upward toward the ceiling and not downward where it can chill the chicks. Fans can be operated continuously or alternated with the opening and closing of inlet vents. How stir fans are operated is up to the grower and must be determined on a house-by-house basis.
Litter Amendments
Ammonia concentrations above 25 parts per million can injure eye and respiratory tissues as well as reduce overall performance. When used at the right times and in correct amounts, litter amendments do a good job of reducing ammonia production, especially during the first 10–14 days of production. After this, the amendment has usually been depleted, but the benefits reaped from its use can be substantial. Ventilation rates can be lowered since moisture removal, and not ammonia reduction, is the primary objective. The value of the reduced ventilation rate depends on internal and external house conditions, but it can range from $400 to $600 during cold-weather brooding.
Take-Home Message
It takes a lot of fuel to heat a broiler house during cold weather. Some growers burn close to 50 percent of their annual fuel during two cold weather flocks. Yearly inspections of heaters, insulation, and air infiltration are necessary. They can help prevent or delay future problems and save money, and they are an all-around good management practice.
References
Campbell, J., Donald, J., & Simpson G. (2010). Is shifting ceiling insulation running up your gas bill? The Poultry Engineering, Economics, & Management Newsletter, No. 63. National Poultry Technology Center, Auburn University.
Campbell, J., Donald, J., Simpson, G., & Macklin, K. (2008). Get ready for winter! The five-step program. The Poultry Engineering, Economics, & Management Newsletter, No. 55. National Poultry Technology Center, Auburn University.
Linhoss, J.E., Purswell, J.L., & Chesser, G.D. (2017). Varying manifold gas pressure and its effects on radiant brooder performance. Mississippi State University Extension Service Publication 3084.
Tabler, T. (2012). Broiler house ventilation during cold weather. Mississippi State University Extension Service Publication 2749.
Publication 3149 (POD-01-24)
Reviewed by Jessica Drewry, PhD, Assistant Professor, Agricultural and Biological Engineering, from a previous version by John Linhoss, PhD, former Extension Associate, Agricultural and Biological Engineering, and Daniel Chesser, PhD, Assistant Professor, Agricultural and Biological Engineering.

The Mississippi State University Extension Service is working to ensure all web content is accessible to all users. If you need assistance accessing any of our content, please email the webteam or call 662-325-2262.