
Soil Testing For the Farmer
High crop yields and efficient production bring the highest farm incomes. However, high-yielding crops require large amounts of plant nutrients that must be supplied in proper balance from the soil.
Soils constantly undergo physical and chemical changes. Some plant nutrients are removed in harvested crops or are lost by leaching and erosion; others become available from the soil or are added from fertilizer. Soil tests measure available nutrients in the soil and serve as the best guide to profitable use of commercial liming and fertilizing materials.
One of the most important steps in a soil testing program is to collect the soil sample so it represents the area to be tested. If the sample does not represent an area, the test results and recommendations can be misleading. Get a representative sample so the soil test and recommendations are reliable for the area tested. The following procedures help ensure that you collect representative soil samples.
How to Take Good Samples
- Select the proper tools. A soil probe, auger, spade, and clean buckets may be used in taking soil samples. A soil probe or an auger is better than any other tool because it gets equal amounts of soil from a certain depth.
- Use the correct soil sampling technique. Sampling is best done when soil moisture conditions are suitable for plowing. Do not include cores from dead furrows, turnrows, strips near trees, old fence rows, fertilizer or lime spill areas, or any other unusual spots.
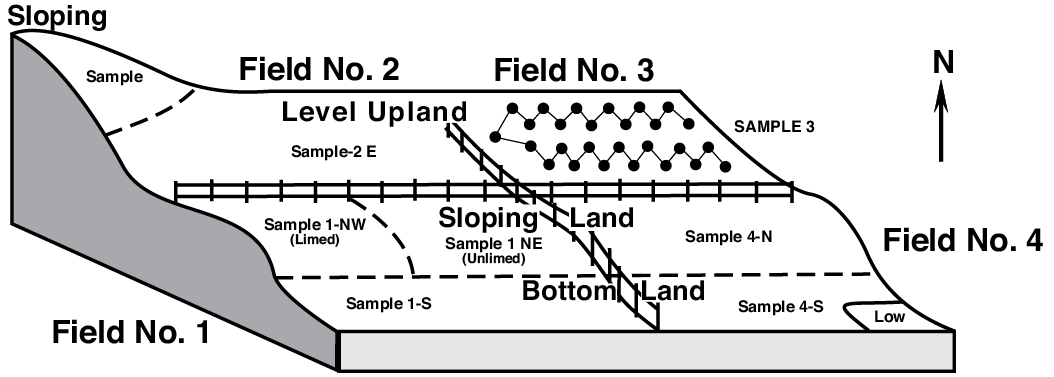
- Using a soil map, sample the soils in a field; sample separately the light- and dark-colored soils and recently limed and unlimed areas (see map next page). Scrape off crop residue before sampling.
- Sample cropland to plow depth or another constant depth, depending on crop and tillage practices. Generally, a 6-inch depth is recommended.
- Sample pastures and lawns to a 4- to 6-inch depth.
- Sample a row-crop field between the rows, thus avoiding fertilizer band areas.
- Get a composite sample. Think of a “soil sample” as the mixture of several borings or spade slices from one distinct area. The word “area” here means the field or part of a field that represents each distinct kind of land (upland as compared to bottomland), soil texture (silt loam as compared to sandy), soil organic matter (light-colored as compared to dark-colored), fertility level (as indicated by crop growth), and management unit (field or portion of field).
The biggest mistakes made in estimating the fertility level of a soil area generally are from improper soil sampling. Laboratory data can be no better than the soil sample.
- To get a representative soil sample, gather at least 15 to 20 cores. If the tilled soil has been limed or fertilized by broadcasting in the last 2 years, take 30 or more individual cores, depending on soil variability or unknown locations of fertilizer bands. Take each core the same depth, and take the same amount of soil at each site.
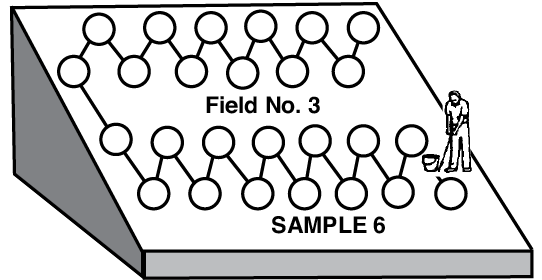
- Gather cores at random in a zigzag pattern over the area involved. This procedure is good because it lessens the effect of any one boring. For example, if you take 20 equal-sized borings in an area and one of them was, by chance, taken in an old fertilizer spill area, it would have little effect on the results of the composite sample. However, if you take more soil at the fertilizer spill area than at any one of the other sites, the larger volume of soil influences the results of the composite sample.
- Divide fields into uniform areas. Judge for yourself if an area is large enough for a different lime fertilizer rate or treatment. Examples of field situations are illustrated below. For example, Field No. 4-S has a low spot that may be too small, while the sloping area in Field 2 is definitely large enough for special lime or fertilizer treatment. Consult the soil map.
- Process the soil sample.
- Break up clods or lumps, spread them out, and dry them at room temperature. Caution: Apply no artificial heat by stove or furnace because this can change the sample for analysis.
- Thoroughly mix the soil sample after it has dried. Mildly crush the soil (but do not pulverize it) to reduce the coarser granules to about the size of wheat grains or smaller (a rolling pin works nicely).
- Keep 1 pint from the original sample. Place this pint in a soil sample box that is available from your county Extension agent or the Extension Soil Testing Laboratory at Mississippi State University.
- Label carefully to ensure identification (maximum of five digits or characters). For example, SE-10, WF1, EA8, 127, B. Prepare a map or sketch of your farm or field layout, showing areas sampled. This helps keep an accurate record of your soil test report.
How Often and When to Test
Test each field once every 3 years or once per crop rotation. If you avoid the rush times at the laboratory, you get faster service and the results of the soil test in time to serve as a guide for buying and applying fertilizer. For fall plantings, take samples in May, June, July, and early August. For spring plantings, collect the samples the latter part of October, November, December, and January.
Publication 3858 (POD-01-23)
Reviewed by Keri Jones, PhD, Laboratory Coordinator, Plant and Soil Sciences.

The Mississippi State University Extension Service is working to ensure all web content is accessible to all users. If you need assistance accessing any of our content, please email the webteam or call 662-325-2262.
