
Gladiolus Composite Flower (Glamellia) for the Professional Florist
Fresh-cut gladiolus (Gladiolus x hybridus, Iridaceae) is a useful line flower for the professional florist. Unless a customer orders a large arrangement or a sympathy tribute, it is often overlooked by floral shop design staff. Referred to in the floral trade as “glads,” these flowers are sophisticated, modern, and—dare we say—pure art in their silhouette. Let’s rethink the use of this flower, not as a stem placement in a design, but as the medium for a completely different design, a composite flower.
In floral design terminology, a composite flower is a single flower shape constructed from the petals of several flowers using wire, adhesive, or a combination of the two. (This publication provides instructions on the use of wire mechanics.) When made from multiple rose petals, it is called a duchess rose. When gladiolus florets are formed into a composite, the flower is called a glamellia, combining the words gladiolus and camellia, which it resembles!
Other composite flowers can be made from greenery like ivy, galax, salal, and many more types of foliage. These designs came into being during World War II when flower farms turned production efforts toward fruits and vegetables. Out of necessity, florists became creative with what were considered standard flowers, using them in novel ways. For example, glamellias were often substituted for difficult-to-obtain flowers like gardenias for wedding work.
Today, glamellias are considered high-impact flowers and can be made on the smaller side, proportionate for a shoulder corsage, all the way to a flowers-to-carry design measuring a foot in diameter! These aren’t the only options for glamellias. With a dose of ingenuity, they can be adapted for many applications limited only by the designer’s creativity.
Construction of this design requires practice, and, just like learning how to make a bow, your first few attempts will lead to successively better composite flowers that maintain their integrity. Indeed, it is not uncommon for them to fall apart when you are first learning this construction, so please be patient and know that you will eventually create coveted glamellias with a high price point.
Consider trying this project when the price of gladioli is low, during the summer months when they are plentiful. Even if you have paid a premium price for your flowers, this project only requires a few glad stems, some durable leaves, florist wire, and stem wrap (floral tape). You can retail this design at a premium price, and its markup should reflect the skill of the designer. When pricing wedding and event flowers, florists should consider more than just the cost of the raw materials; also determine what the market will bear in retail price. For designers who also teach floral design, glamellias make a good workshop project for professional florists and floral enthusiasts.
Keep in mind that glamellias require several florets to complete a finished bloom, so timing the opening of flowers is important. It may be difficult to complete a glamellia when gladiolus bunches have just arrived from the farm or the floral wholesaler because these flowers are harvested in the tight bud stage with some color in the outer petals of the lowest florets. This stage is best for shipping and packing because the buds are within green, sheath-like bracts that protect the delicate, colorful petals. It may take several days for many florets to open along the stem. Note that refrigeration slows down flower petal unfurling. It is best to leave these flowers at room temperature to allow them to bloom.
With proper handling, glamellias can last a long time, certainly a day or two out of refrigeration if the display environment is conducive. The keys to their longevity are
- hydrate properly before assembly,
- limit handling of the florets to only what is necessary during construction,
- expedite construction,
- use anti-transpirant spray, and
- package properly.
Though composite flowers do not take up water, they still can be used for a multitude of designs. We have used them in casket sprays and as a focal area for large arrangements. They also can be used in table centerpieces.
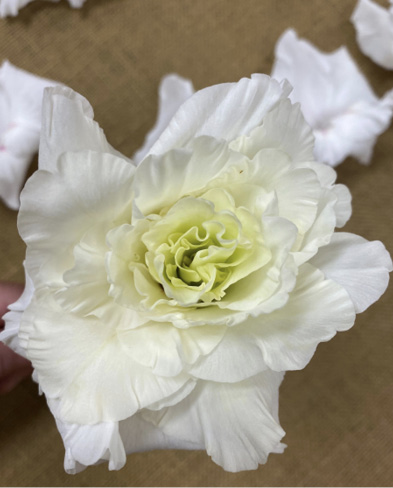
Gladioli are available in a wide range of colors. They are one of the most diverse in terms of flower color of all commercial cut flowers. In this publication’s example, White Prosperity is used. You could use two or more colors together with interesting effects. The most handsome ones combine like colors with a slight contrast. Consider pink with coral; or pale yellow, bright yellow, and orange; and other color palettes.

Materials
- 2–3 stems open gladiolus flowers
- 12 camellia leaves or similar waxy-leaved foliage (such as salal, privet, gardenia), all nearly the same size
- Stem wrap
- Florist wire, 28-, 24-, and 18-gauge (or similar gauges)
- Anti-transpirant spray (such as Crowning Glory or Chrysal Glory)
- Plastic bag for storage
- Bolt cutter, floral knife (sharp)
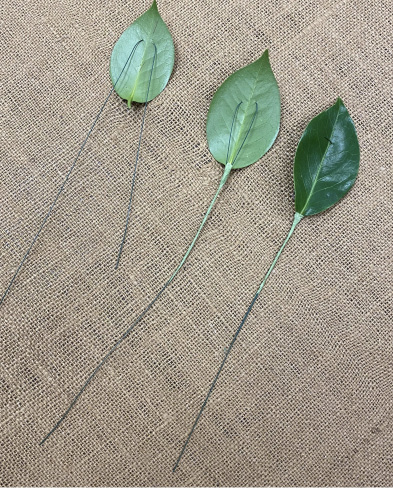
Wire the camellia foliage using the stitch technique. Insert wire approximately one-third of the way down from the top of the back side of a leaf. Run the wire through at a one-third to two-thirds proportion (left leaf). These proportions help reduce bulk. Grasp the leaf at the stitch point, then gently bend the arms of the wire downward. Cover the wire from the base of the leaf downward with stem wrap for a length of about 2–3 inches (center leaf). Adding more tape only adds bulk to the composite’s stem.
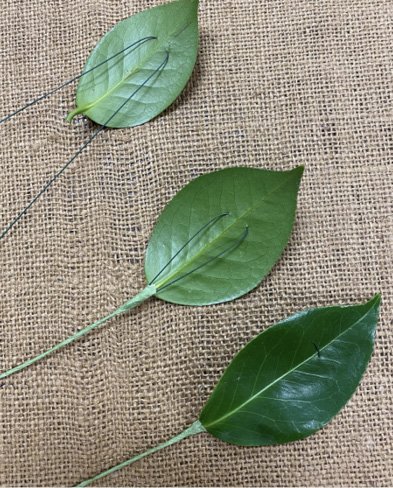
Note that the wire remains exposed (untaped) on the back of the leaf. Be sure to stretch and pull the stem wrap while applying it to keep the artificial stem slender and without bulk. An indiscernible amount of the wire shows on the front of the leaf (right leaf). The wire bracing, a result of stitching the wire close to the leaf apex, helps control the leaf’s position (it can be bent into various positions or angles) and resiliency so that it can support the back of the glamellia.

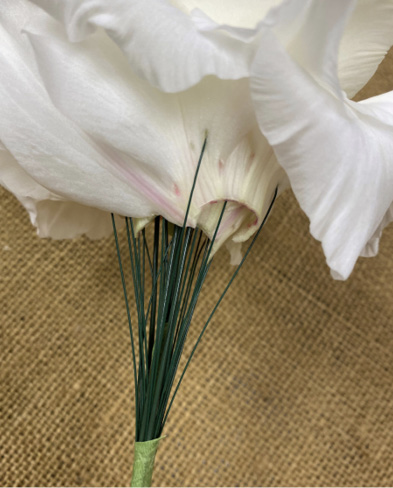
Remove gladiolus florets from the parent stems. The best practice is to remove only the florets needed for the project, beginning from the bottom of the stem. The parent stem can be used in other arrangements if you remove just a few of the bottom florets, keeping the rest of them on the stem.
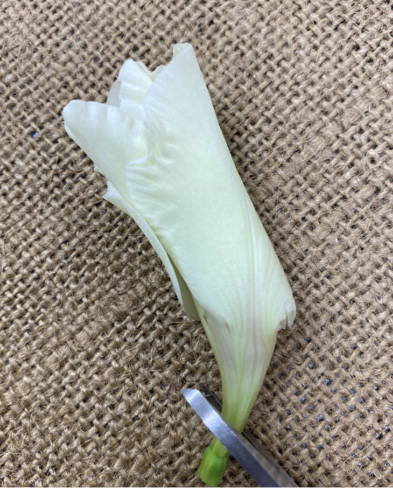
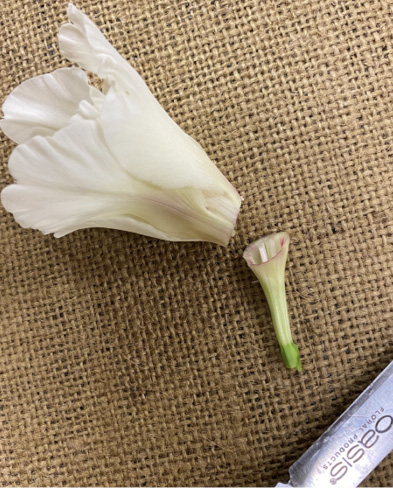
Remove the curved portion of the first floret (closed bud) using a sharp knife. This floret forms the center of the glamellia, so be sure to use an unopened floret. The green appendage at the base is the swollen ovary of the flower. Removing the curved portion will help keep the stem mechanics aligned and not bulky.

Use the cross-pierce method of wiring the bud using 28-gauge wire. Avoid piercing the wires on the same plane because this can weaken and break the flower. Note that the pierce point of the second wire is just slightly above the first, about ⅛ inch.
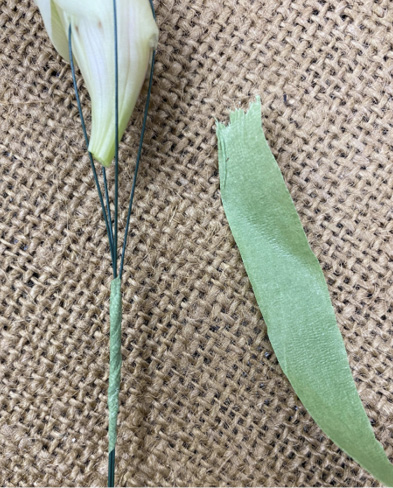
Add a small amount of stem wrap to bind the wires together.
Next, select a slightly open floret. Using a sharp knife, remove the lower portion of the flower. If the knife is dull, it will mash the floret, causing damage. A sharp knife is much more efficient for this process. The reproductive parts of the flower will fall away from the floret with its base.
Drop the bud floret into the freshly cut floret.
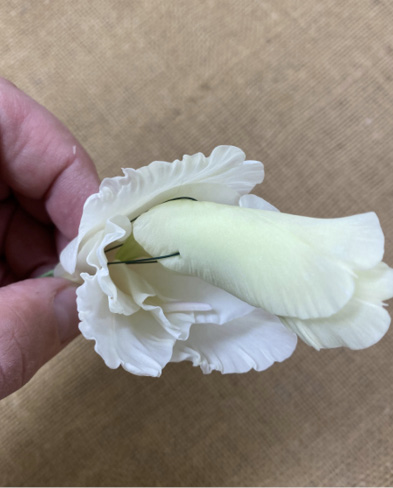
Note that you can see the wired base of the bud protruding from the second floret’s base. Align the bud so that it fits snugly within the more open floret. Much of the glamellia’s construction involves repeating this process. Be sure to nestle the unit down into the successive florets; otherwise, the flower loses a hemispherical profile and takes on a tall, pinecone-shaped profile similar to ostrich plume ginger (Alpinia purpurata).
As you add more florets, it is possible that they will split open. Do not discard these. They can be added to the glamellia simply by wrapping them around the unit. When adding split florets, take care to stagger their positioning for a symmetrical result.
Add wire to hold the split floret placement. We used the cross-pierce method in this step to hold the split floret in place. You can use 24-gauge wire in this step to add rigidity to the design. Note the height of the piercings in relation to the flower: they are relatively high to hold the petals in place yet should be placed so that they are hidden when viewing the flower from above.
Once you have inserted the wires, bend them downward. Wire is used liberally in the construction of a glamellia, so, when in doubt about its stability, add extra wires.
The side view of this glamellia illustrates the importance of tucking the initial unit deeply in each successive floret addition to keep the rounded pattern.
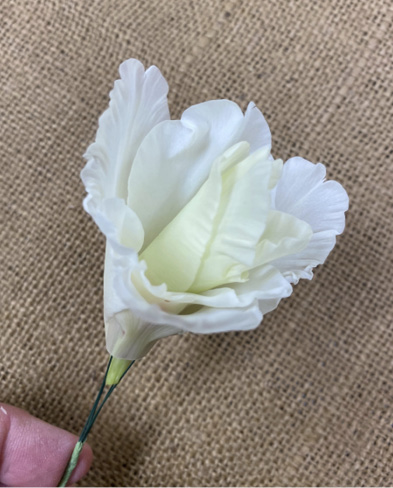
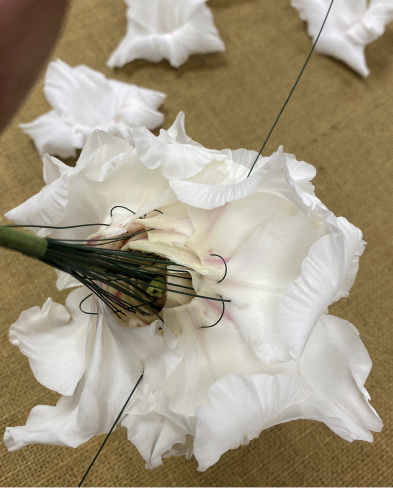
Note that successive florets added to the perimeter of the unit give the flower a symmetrical, full appearance. For a petite glamellia, four to five florets are all you need to consider the project complete. In that case, jump ahead to adding wired leaves to the back of the flower. In the next photos, you will see another method of wiring to create a larger glamellia.

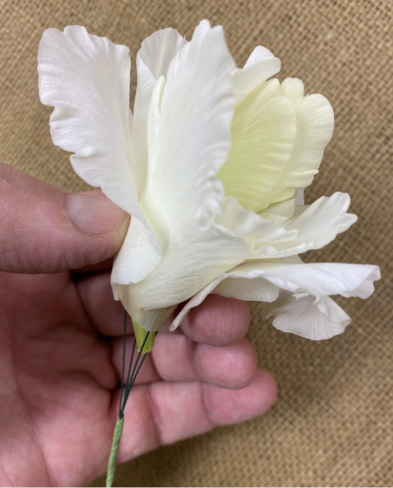
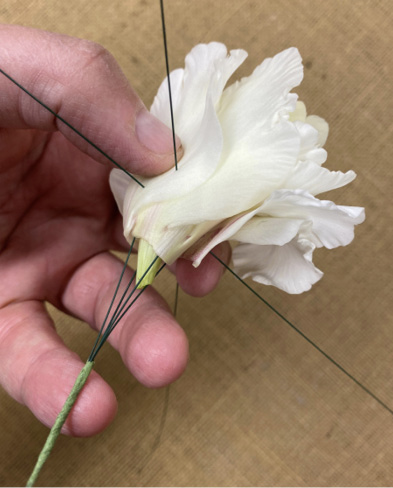
You will find that cross-pierced wiring is no longer effective when adding split florets to the wider angles of the glamellia’s axis. At this point, use hairpin wires made from 28-gauge wire to hold them in place. Cut wire at lengths around 1½ inches, then bend them in half.
Note that extra stem wrap has not been added until this point in the construction. It can be helpful to add some stem wrap to hold these fine wires in place, but the tape does not need to extend to the flower petals.

Add hairpins horizontally into the unit to hold the petals in place. These small devices significantly contribute to the stability of the composite flower. Be sure to insert them so that they are not visible from the top view.

With each successive petal layer, add hairpins for a secure fit. It is a good idea to mist the flower during construction with anti-transpirant spray.
It is recommended to make additional piercings using 24-gauge wires. These bracing wires add stability to the structure. When in doubt, continue to add wire so that your design remains stable.
.jpg)
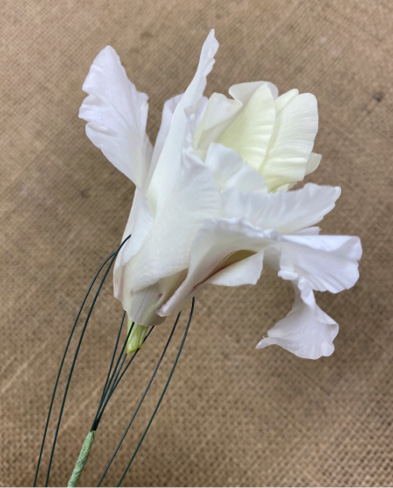
The final petal layer placements are nearly horizontal. Use numerous hairpins to hold them in place.
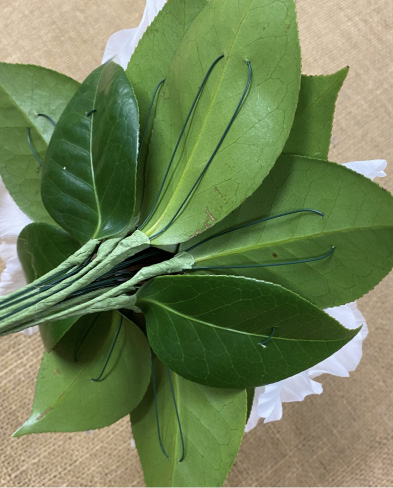
Bend the prewired camellia leaves at 45-degree angles to support the back of the composite flower. If you have extra leaves, you can add them as a second layer. Many designers add the second layer to disguise wires and provide a prize-winning finish.
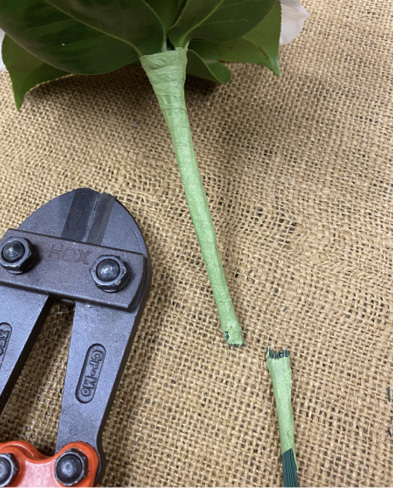
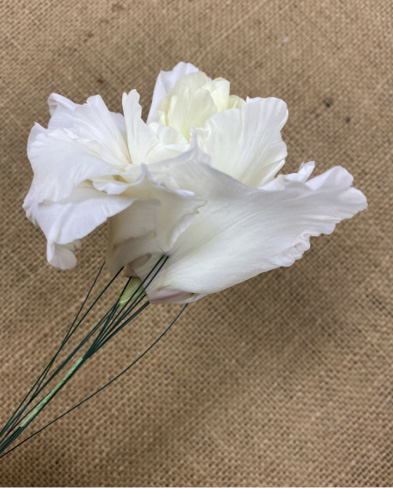
Add stem wrap to bind all the wires together, and use bolt cutters to cut the stem to a length of about 4–6 inches. For a princess-perfect finish, cover the stem with ribbon using a few dabs of adhesive. Coat the finished design with anti-transpirant spray. Once the liquid dries, within a few minutes, place the glamellia in a plastic bag. Make sure the plastic film does not contact the petals by breathing air into the bag before sealing it. This keeps the tissues from trapping surface moisture, which could lead to botrytis growth.
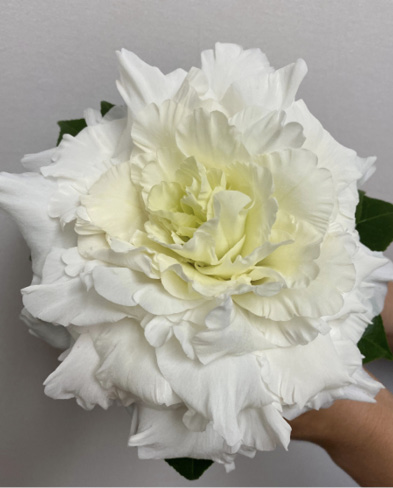
Due to the subtle coloring of White Prosperity florets from bud to open bloom, there is a natural gradation of yellow-green to white colors in this arrangement. Consider making your design unique by using ribbon or adding gradually smaller glamellias in a cascading pattern.
Give this project a try for a deeper appreciation of the beauty and versatility of gladioli. For more information, see MSU Extension Publication 3615 Gladiolus for the Farmer Florist.
References
Butler, S., DelPrince, J., Fowler, C., Gilliam, H., Johnson, J., McKinley, W., Money-Collins, H., Moss, L., Murray, P., Pamper, K., Scace, P., Shelton, F., Verheijen, A., & Whalen, K. (2005). The AIFD guide to floral design. Intelvid.
Dole, J., Stamps, R., Carlson, A., Ahmad, I., & Greer, L. (2017). Postharvest handling of cut flowers and greens (J. Laushman, Ed.). Association of Specialty Cut Flower Growers.
Hunter, N. (2013). The art of floral design (3rd ed.). Delmar Cengage.
Johnson, J., McKinley, W., & Benz, B. (2001). Flowers: Creative design. San Jacinto.
Missouri Botanical Garden. Gladiolus (group).
Scace, P. D., & DelPrince, J. (2020). Principles of floral design (2nd ed.). Goodheart-Willcox.
This publication is dedicated to the memory of Mr. Sandy White, Memphis, Tennessee, florist and teacher.
Special thanks to Corey Wheeler, MSU Coastal Research and Extension Center research technician, for floriculture production assistance.
The information given here is for educational purposes only. References to commercial products, trade names, or suppliers are made with the understanding that no endorsement is implied and that no discrimination against other products or suppliers is intended.
Publication 3736 (POD-02-22)
By James M. DelPrince, PhD, AIFD, PFCI, Associate Extension Professor, Coastal Mississippi Research and Extension Center.

The Mississippi State University Extension Service is working to ensure all web content is accessible to all users. If you need assistance accessing any of our content, please email the webteam or call 662-325-2262.
