
Beginning Beekeeping in Mississippi
This publication introduces basic beekeeping and outlines the most common method of starting colonies in Mississippi, with an emphasis on common mistakes that inexperienced beekeepers make during their first season. The specific goals of this publication are to
- prepare new beekeepers with the requirements for getting started, and
- improve survivorship of new colonies so that they are relatively strong after their first winter and capable of rapid growth during the spring of the following year.
Preparing to Receive Honey Bees
Regardless of when you actually receive bees in the spring, your preparations should begin no later than the previous autumn or winter. If this is your first year of beekeeping, you will need to
- buy personal protective gear that allows you to safely work with honey bees,
- obtain, assemble, and weatherproof the woodenware components of hives, and
- learn all that you can about basic biology of honey bees and beekeeping.
You can buy personal protective gear and hive components from several beekeeping supply companies through catalogs or online. The following tips can help you avoid some common mistakes when purchasing protective gear and hive equipment.
Personal Protective Equipment
Most beekeepers use some sort of bee suit, a bee veil, gloves, a hive tool, and a bee smoker. A bee veil is not always necessary to work honey bees, but it is highly recommended for new beekeepers. Stings can be discouraging, and stings to the face are particularly painful. Experienced beekeepers accept that bees will sting, but they know how to minimize stings while working bees. They know when they can get away with not wearing a veil. Until you gain that experience, it’s best to protect yourself.
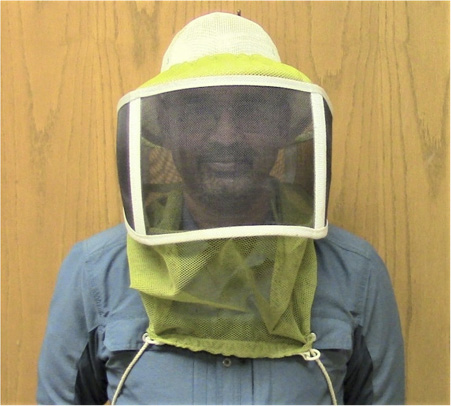
There are different styles of veils with varying types of fasteners. Experienced beekeepers often use a simple drawstring veil that fits to a vented hat or helmet. These veils can be cylindrical without a special viewing area, but the most commonly used drawstring veils have a rectangular viewing panel in front of the face (Figure 1). This type of veil is placed around the shirt collar, and the drawstrings are pulled so that the veil fits snugly against the chest and shirt. The drawstring veil has the advantage of being easy and quick to put on and take off. A disadvantage is that the drawstrings sometimes loosen during long periods of beekeeping activity, leaving a gap between the veil and shirt where bees can enter.
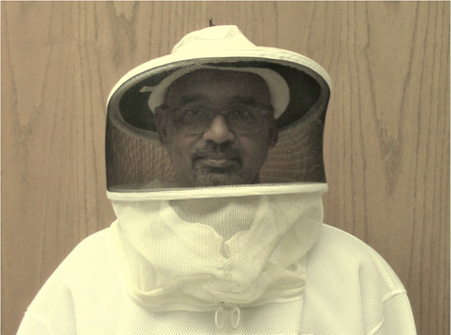
The most protective bee veils are those that zip to a jacket or full-body bee suit (Figure 2). Once zipped shut, bees cannot enter the veil. Bees may still sting if the veil is pressed closely to your skin, but most of these veils maintain a sufficient clearance from the head and face that keeps bees from being able to sting through it. Some zippered veils are worn with helmets or other hats to keep bees from being able to sting the top of the head.
As with veils, beekeepers have several options for protective clothing. Minimally, you should wear long-sleeved shirts and white or khaki pants. These light colors are less likely to trigger a defensive response from bees. Avoid black and dark blue clothing and any highly contrasting colors. Areas of highly contrasting colors, especially those with crisp borders between the color extremes, often receive the greatest number of stings. Examples of sharp contrast lines include a black belt against light-colored pants, a dark watch band against a light-skinned wrist, and a white watch band against a dark-skinned wrist. White coveralls can greatly reduce the number of stings because they conceal lines of contrast that the bees might otherwise see. White coveralls made from cotton can be very protective, but they can also be hot to wear in the summer heat. Some manufacturers make double-mesh bee suits or jackets that provide ventilation for the whole body.
Clothing texture can make a difference in the number of stings received. Coarse-textured clothing, such as heavy cotton coveralls or shirts, provide worker bees a rough surface they can easily grab as they attempt to sting. Slick materials, such as some of the newer synthetics, do not allow the bees to get as good a grip for planting their stings. Many of these materials are also lighter and more breathable than clothing made from natural fibers.
You can greatly reduce stings by sealing your pant leg and shirt sleeve openings with tape or elastic. Another option is simply tucking your pant legs into your boots. Wash your beekeeping coveralls frequently to minimize stings. Dried venom on unwashed clothing can trigger defense responses by bees and allergic reactions in family members.
Gloves are usually not necessary, but keep a pair with you at all times in case bees are unusually defensive. Most experienced beekeepers wear heavy-duty gloves for tasks that do not require dexterity. For example, it is best to wear beekeeping gloves when harvesting boxes of honey from many hives because this can trigger many stings from bees.
New beekeepers should wear gloves to avoid stings, or at least until they feel more comfortable working with honey bees. The gloves typically sold by beekeeping supply companies are heavy-duty leather or goat-skin gloves that provide maximum protection. They also have canvas sleeves that extend to cover the arms to the elbow. The drawbacks of these gloves are that they can fill with sweat during hot summer months, and they make delicate tasks—such as handling combs or marking queens—difficult.
Eventually, new beekeepers may want to stop wearing gloves. Make the switch gradually (Figure 3). The first step can be exchanging heavy bee gloves for reusable rubber dish gloves. These offer much more dexterity than bee gloves, and they are still relatively thick to protect against stings. Next, switch to latex or acetonitrile surgical gloves, which are much thinner and allow more stings to penetrate the material. However, if you choose light colors, the number of stings will be fairly low. Alternatively, some manufacturers make acetonitrile gloves that are 9 millimeters thick, and these greatly reduce stings received to the hands. Finally, switch to working bees without gloves.

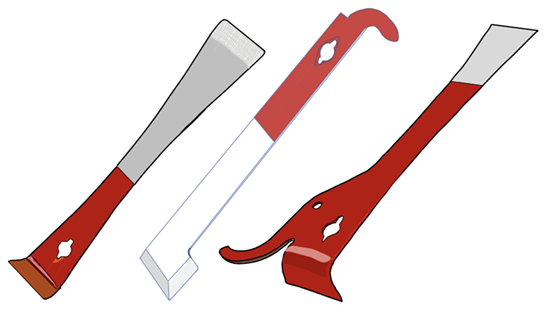
All beekeepers need a hive tool for prying apart lids, boxes, wooden frames that hold combs, and other hive components. Honey bees often seal hive components together using a weather-proofing resin called propolis. At times, it is almost impossible to open a beehive without a hive tool. Some hive tools have hooks for freeing combs from hives. Hive tools are also used to scrape wax and propolis from hive surfaces when necessary. Many tools also have a nail pulling slot that can be useful when making equipment repairs. It is easy to misplace hive tools, so having spares is highly recommended. Keep these in a beekeeping toolbox that is always with you when you work bees. There are different styles of hive tools, and it is a good idea to try different types to find the one that fits your hands and style of beekeeping (Figure 4).
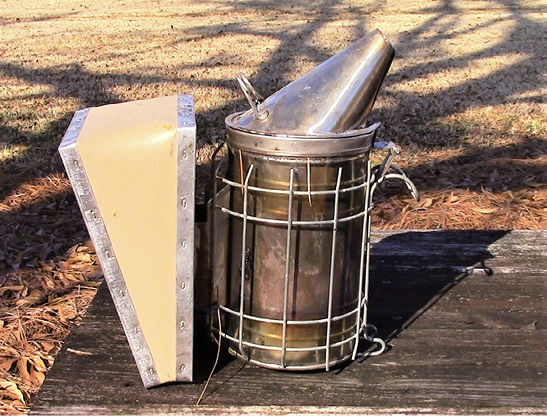
Typically, your most important protective tool will be the bee smoker. Smoldering fuels such as pine straw, burlap, saw dust, or wood pellets (that do not contain an accelerant) are burned in a metal container to generate a cool smoke that can be directed onto bees by squeezing an attached bellows. Proper use of a bee smoker reduces the defense responses of a bee colony without too much disruption to the organization within the colony. There are several styles of bee smokers, and the cost varies with choice of bellows material and whether there is a heat shield. Generally, smokers with heat shields and heavy-duty vinyl bellows (Figure 5) will cost more than those without the shield and with rubber bellows. The extra cost is well worth it because the shield protects you from burns and the more durable bellows will extend the life of the smoker for several years.
Hive Equipment Needed
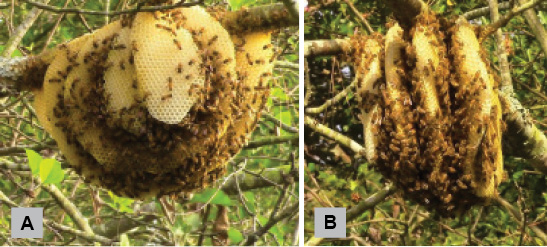
The concept of the “bee space” is fundamental for understanding the movable frame hive. When honey bees build their combs in natural cavities or on exposed structures, the oval-shaped combs are attached at the top and hang in parallel sheets. Combs are spaced at a fairly regular interval of one-fourth to three-eighths inch (6–10 millimeters). This space is observed between parallel combs (Figure 6) and between edges of combs and the cavity in which they hang. The space allows the bees to move on the surfaces freely while minimizing the distance between combs to help reduce heat loss.
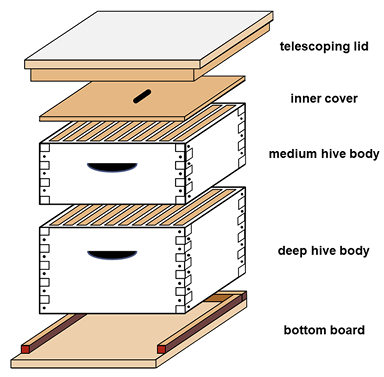
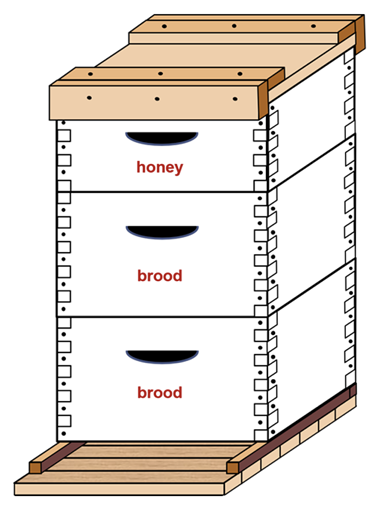
Reverend Lorenzo L. Langstroth is credited with discovering the bee space in 1851. He used the concept of bee space to construct a hive that maintains this interval between all wooden components, with the exception of the space between the floor and the bottom combs, which tends to be larger. The Langstroth hive design is modular. It can be expanded by adding boxes onto a stack and growing the hive vertically (Figure 7). A wooden frame surrounds each rectangular comb to allow the comb to be handled without damaging the beeswax surfaces.
A different movable framed hive was designed by Petro Prokopovych in Ukraine in 1814. Although his design predates the Langstroth hive, the latter was popularized by the book Langstroth on the Hive and the Honey Bee: A Beekeeper’s Manual, published and widely distributed in the U.S. starting in 1853. An edited version of this book is still published (see References section).
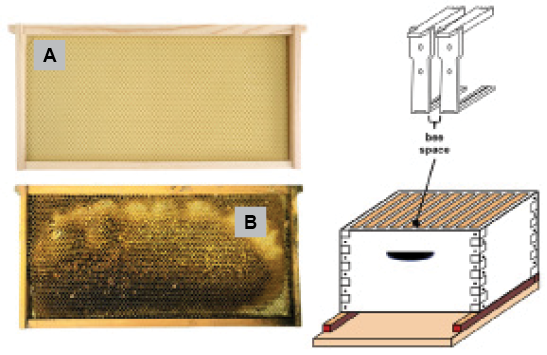
Langstroth’s original hive box held 10 framed combs. The wooden frames were designed to provide bee space between combs when they are properly spaced (Figure 8). The bee space is also maintained between frame edges and the walls of the box.
Each wooden frame is initially fitted with foundation, which is a surface where the bees construct or draw out combs. Foundation may be made of beeswax or plastic, and it is patterned with a template of shallow hexagon-shaped divots (Figure 8A). As honey bees make combs, they attach beeswax onto the edges of these depressions and continue to add wax until hexagon-shaped cells are formed and merged to produce fully drawn combs (Figure 8B).
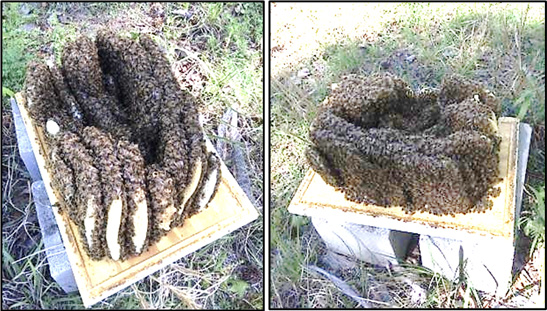
If combs are damaged or improperly spaced in a way that leaves a gap much greater than the bee space between combs, the bees respond and fill the void with new comb. Generally, such comb is irregularly shaped and may be anchored to neighboring combs, hive walls, or the hive lid (Figure 9). Beekeepers refer to this added comb as burr comb. Burr comb is generally unwanted because of the nuisance it creates. Many bees can be killed (including the queen) and honey can be spilled when these burr combs are torn while opening a hive. If combs or hive components are pushed closer together than the bee space, bees respond by filling these voids with propolis. The result is that structures are often glued tightly together by the propolis, which makes separation of the hive components difficult. Both situations can be avoided with proper spacing within the movable frame hive.
There are several suppliers of beekeeping equipment at the national, regional, and state levels. You can find most major beekeeping supply companies online. Most of these suppliers offer online catalogs, and it is fairly easy to buy equipment needed to start beekeeping using a home computer or smartphone. Of course, these same suppliers still offer paper catalogs that can be mailed upon request.
Buying beekeeping equipment can be rather daunting because there are many options, including type of hive (e.g., Langstroth versus top-bar), overall hive size (8-frame versus 10-frame), component box sizes (deep, medium, or shallow), type of floor (solid versus screen), and type of comb foundation (wax sheet, wire-reinforced wax sheet, or plastic sheet). The standard hive used by U.S. beekeepers is the 10-frame Langstroth hive, which will be the focus throughout the rest of this publication. If you are interested in top-bar beekeeping, you will need to consult other guides specific to that style of beekeeping, such as Top-Bar Hive Beekeeping: Wisdom & Pleasure Combined by Wyatt A. Mangum.
A complicating factor is that “Langstroth hive” dimensions are not necessarily standardized within the beekeeping industry. There are various forms of the Langstroth hive, and the U.S. Langstroth hive is not the same size as the Langstroth hive sold in the United Kingdom. Even within the U.S., manufacturers can have slight differences in dimensions of hive components. As a result, components from one manufacturer may not fit components of another manufacturer and preserve the bee space between hive components. For this reason, it is best to purchase all components for a hive from the same source.
The traditional Langstroth hive contains boxes that hold 10 framed combs. These boxes are vertically stackable. Think of the Langstroth hive as an artificial tree cavity that can be increased in volume by adding boxes or decreased by removing boxes (Figure 7). The artificial tree has a floor called a bottom board and a lid to seal the hive and keep rain and animals from getting into the hive. Honey bees enter and exit the hive through an entrance on the bottom board.
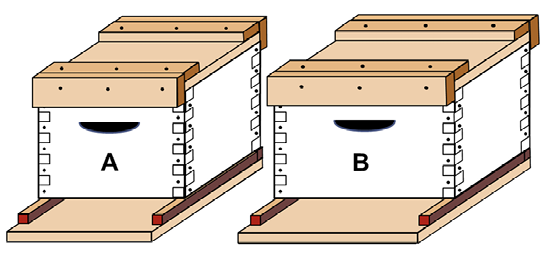
Currently, there are two main options for frame capacity in Langstroth hives (Figure 10). The first option is the standard 10-frame box. A second option involves boxes that hold a maximum of eight framed combs. These smaller Langstroth boxes are not as heavy as the 10-frame boxes, and the smaller hives are popular with older people and people who would rather lift lighter boxes while working bees. So this is the first major decision for a starting beekeeper: Will you use 10-frame or 8-frame hives? The decision is important because 10-frame boxes cannot be stacked onto 8-frame boxes and vice versa. It is generally a good idea for new beekeepers to commit to one size of equipment until they gain experience.
Once you decide on your hive capacity, you will only buy equipment of the same general frame capacity. For example, if you want 10-frame Langstroth hives, all bottom boards, lids, and inner covers must also be made to fit 10-frame boxes. Usually, beekeeping suppliers are very careful about separating 10-frame options from 8-frame options in online and paper catalogs to prevent confusion. Just be careful and stick to one of the two general frame capacities.
Bottom boards can have wooden or screened floors (Figure 11). The traditional solid bottom board has a wooden floor. It is sturdier than boards with screened floors and can withstand more wear and tear. One drawback is that hive debris can accumulate on solid floors, which attracts hive pests like small hive beetles (SHB) and greater wax moths (GWM). Additionally, solid bottom boards can collect pools of water when it rains, and this excess moisture can promote the growth of disease pathogens. It is a good idea to elevate the back of the hive a couple of inches above the front by placing a wedge under the bottom board. The slope in the floor will allow water to run out through the entrance rather than pool in the back of the hive. Another drawback is that the solid floor doesn’t allow as much air flow as screened floors, so bees will have to work a little harder to cool hives on hot days.
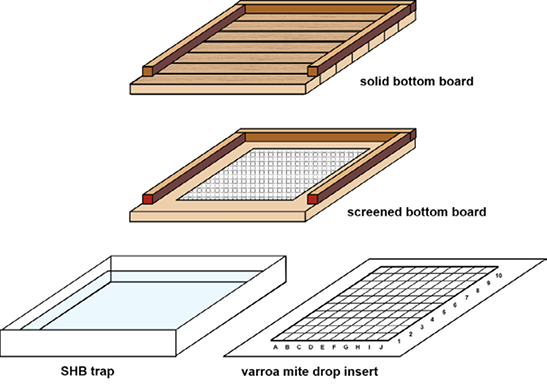
Screened floors are popular because of the cleanliness they offer. The mesh allows hive debris to fall from the hive while preventing other bees or animals from entering. Screened floors allow more light and fresh air to enter the bottom of hives than do solid floors. Both of these factors deter SHB or GWM from hiding on the bottom board. In particular, SHB like to be in the dark and away from the broodnest center, except when they seek places to lay eggs. SHB often hide between end-bars of frames and hive walls, between top bars of frames in the upper box and the hive lid, and in the dark corners, edges, and burr combs commonly found on solid bottom boards. Screen floors are much less attractive to SHB.
Another benefit of screened floors is that they can be fitted with traps for killing SHB and cardboard inserts with grid patterns that are used for sampling and estimating varroa mite populations (Figure 11). Varroa mites (Varroa destructor) are the most serious health threat that honey bees currently face. They are ectoparasitic mites that feed on adult and immature bees and vector viral diseases that ultimately kill colonies of honey bees (see Controlling Varroa Mites at the end of this publication). Some studies suggest that screened floors may help control varroa mites; however, this effect is minimal and should not be your major control strategy for this dangerous parasite.
One drawback of screened floors is that they allow cold winds and drafts into the hive during the winter. Some beekeepers insert solid barriers over the screen or replace the screened bottom board with a solid one during winter preparations. Keep in mind that bees are trying to warm only the bee cluster nearer the top of the hive and not the entire volume of a wintering hive. For this reason, in many warmer areas of the U.S., including all of Mississippi, beekeepers use screened floors year-round without any special modifications for the winter.
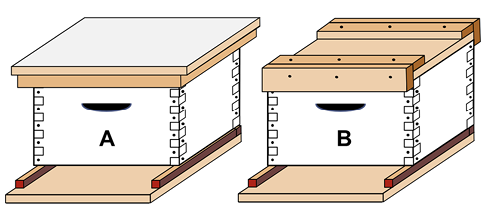
There are two general types of lids used in U.S. beekeeping: telescoping and migratory lids (Figure 12). Telescoping lids are designed to snugly cap the top box of a hive, with the edges of the lid extending a couple of inches over the edge of the box. It is designed to produce an insulating air space above an interior divider that is known as the inner cover (Figure 7). The air space between the inner cover and inner surface of the lid is typically about five-eighths of an inch. An inner cover coupled with the telescoping lid can help insulate a colony of bees from winter and summer weather.
The standard inner cover has an elliptical hole in the center of the divider, which can be fitted with a device known as a bee escape. The bee escape allows bees to exit a box of honey, but it has a physical mechanism (springs) that prevents them from reentering the box. To remove bees from a box of honey to be harvested, place the inner cover between the box of honey and the rest of the hive. Some manufacturers make inner covers with holes designed to hold inverted jars as syrup feeders.
A migratory lid fits flush to the edges of two sides of the hive and does not overhang them. It has cleats that do overhang the front and back of the hive to secure the lid. This design allows colonies to be packed tightly when they are loaded onto trucks for transportation. Migratory lids also allow two or three colonies to be fitted snugly onto one side of a wooden pallet that is used in commercial pollination service. The result is a much more stable load for shipment. The overhang of telescoping lids makes securing a load impossible because the lids touch boxes of neighboring colonies. Colonies tend to wobble with the vibration of transportation, which hammers the edges of telescoping lids against one another. Boxes can be knocked out of alignment, and colonies can be broken open and spilled.
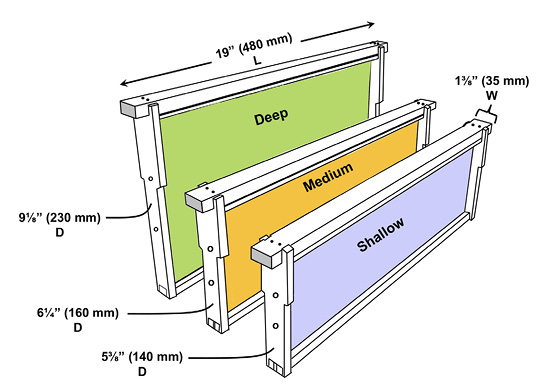
Three different box sizes can be used in a Langstroth hive. These boxes differ in depth (D) but have the same length (L) and width (W). The largest boxes are called deeps, and the interior dimensions (D × L × W) are 95/8 inches (240 mm) by 183/8 inches (470 mm) by 14¾ inches (370 mm) for the 10-frame capacity option. These boxes are typically used as components of the brood chamber.
Traditional beekeeping practices assign two deep boxes as the primary brood chamber, which is the lower portion of the hive designated for egg-laying by the queen and for rearing the brood. Deep boxes are usually not used to store surplus honey because, once filled, they are too heavy (more than 70 pounds) to easily move. Boxes destined to receive and store surplus honey for harvesting are called supers. They are available in two sizes. For the 10-frame capacity hives, medium boxes have interior dimensions of 65/8 inches (170 mm) by 183/8 inches (470 mm) by 14¾ inches (370 mm). Shallow boxes have interior dimensions of 511/16 inches (144 mm) by 183/8 inches (470 mm) by 14¾ inches (370 mm). Medium and shallow supers full of capped honey weigh 50 and 40 pounds, respectively.
The boxes are fitted with frames that hold sheets of foundation for the bees to build their combs. Foundation can be made of beeswax or plastic. Some purists reject plastic foundation as too unnatural, but many beekeepers enjoy the rigidity and strength of combs produced on plastic foundation. Additionally, plastic foundation is reusable after combs have been severely damaged by SHB or GWM. Damaged combs on plastic foundation can be cleaned from the foundation, and the surface of the foundation can be coated with a thin layer of wax and given back to bees for them to make new combs. Wax foundation is easily destroyed by comb pests, and when combs are severely damaged, new foundation must be added to the wooden frame.
There are different forms of beeswax foundation, but the main types are wire-reinforced sheets and unwired wax sheets. Each type of foundation has special mechanisms for securing them to the frames. Generally, beekeeping suppliers clearly identify the kinds of frames that are necessary to properly hold each type of foundation. Carefully match recommended frames to the type of foundation you purchase.
Given that there are three different box sizes for the Langstroth hive, there are also three sizes of frames to match the different boxes (Figure 13). Perhaps one of the biggest mistakes new beekeepers make is placing the wrong frames into a box. Always match deep frames into deep boxes, medium frames into medium boxes, and shallow frames into shallow boxes. If you put a too-short frame into a box, it will not properly fill the entire bottom of the box, and bees will build extensive burr comb in the resulting large void.
You will also need to weatherproof hive equipment to get maximum life out of it in our relatively hot and humid southern climate. Painting the exterior surfaces of hive components is probably the easiest method for protecting it. Use a primer coat followed by a couple of layers of a good exterior paint. There is no need to paint the inside walls of boxes or lids. The bees may coat those surfaces with propolis, which can protect them from the elements. Some people will paint all surfaces of the bottom board because it touches objects close to the ground, exposing it to moisture. Some commercial beekeepers dip hive components in vats of hot paraffin wax to weatherproof the hive for many years. This method can be dangerous because of the risk of fires, and it is usually beyond the means of most small-scale beekeepers.
Ordering and Transporting Your Bees
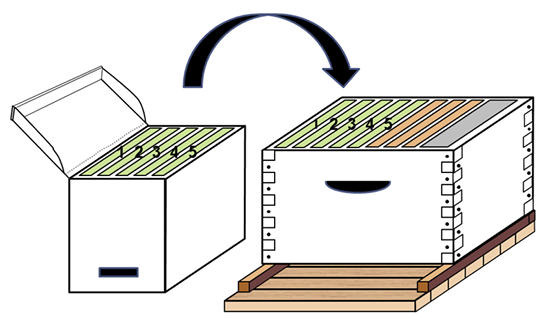
Order your honey bees early in January for a typical year. Suppliers generate customer lists during the previous autumn or soon after January 1. You will not likely get bees until very late if you order during the spring of the year you want to start your colonies. Most bee suppliers in Mississippi sell small starter colonies known as nucs (Figure 14). The word nuc is an abbreviated form of nucleus of a colony. A nuc contains about 10,000 worker bees, a freely wandering queen that is already accepted by the worker bees, and combs containing honey, pollen, and all stages of brood.
Most nucs are 5-frame and deep capacity, but some suppliers sell 5-frame medium nucs. You must specify the frame size when ordering; choose deep or medium combs based on the size of your brood boxes. Most people use deep boxes for the brood chamber and medium boxes for honey supers. However, some people prefer to use only medium boxes in their hives. A good conversion rule is that three medium boxes will equal the same volume as two deep boxes in a brood chamber.
It is highly recommended that you order bees from suppliers within our state. First, your purchase helps support our local beekeeping industry. Second, choosing a local supplier reasonably close to where you live will prevent the stress to bees of being shipped in the mail. Instead, you can drive to pick up your bees when they are ready. Most suppliers will coordinate a specific pick-up date with customers, and this allows them to minimize the stress of confining the bees before pick-up.
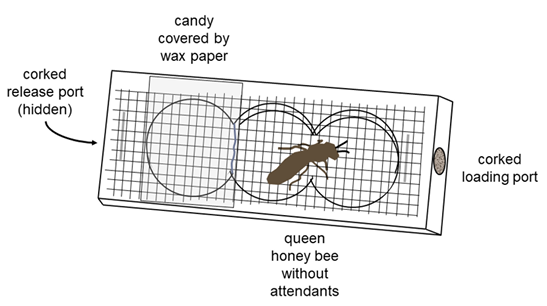
Some beekeepers buy packages of bees from bee suppliers in other states. Packages are starter units with about 10,000 worker bees. They are shipped in a mesh cage without comb. Each package contains a mated queen within a small cage (with or without attendant workers), and the cluster of bees is fed from a can of sugar syrup during shipment (Figure 15). The queen cage is typically a three-hole Benton mailing cage that contains candy for feeding the queen and any attendants (Figure 16). The queen cage is often suspended with bread ties or wire from the top of the shipping cage in order to keep the queen hanging in the center of the bee cluster during shipment. The top of the shipping cage is sealed with a piece of wood secured with heavy-duty staples or brads.

The worker bees eat the syrup through tiny holes punched in the bottom of the syrup can that rests on a support beam. The support beam is spaced to allow bees continuous access to the feeding holes during shipment. Some bee suppliers no longer ship packages with syrup cans because mailing services complain about syrup spilling onto other mail items in trucks. Instead, the bees are fed fondant or hard candy and water from a saturated sponge within the shipping cage.
Both types of starter units are mass-produced by commercial beekeepers in many southern states and sold throughout the U.S. Generally, packages and nucs are produced and sold from March to June. Be very careful while transporting the bees to your home. The best way to transport packages or nucs is inside the climate-controlled cab of a truck, van, or other automobile so that the bees stay cool. This is fairly easy to do with only a few units. Most nucs are sold in cardboard boxes with hive entrances sealed with screen or ventilated plugs. Some suppliers sell wooden nucs, and the entrances are sealed with screens for shipment. If the air temperature within the automobile is kept around room temperature (72°F) or cooler, the bees will not overheat.
Never leave nucs or packages inside a parked car without air conditioning for even short periods because the temperature can increase dramatically and threaten the bees quickly. Do not place nucs or packages in the bed of your truck and drive long distances with the bees exposed to intense sunshine. Packages have a better chance of surviving this treatment because the air flow through the cage mesh can help cool the bees; however, even package bees can be stressed if the truck stops moving for even short periods. Nucs are sealed for transportation, and bees within nucs cannot cool themselves. These bees can actually overheat and die during transportation.
After transporting from the bee supplier, place nucs at the future hive location. Immediately open the entrance to allow the bees to fly freely. Many nuc suppliers sell strong and very crowded nucs. These colonies will be highly stressed if left sealed for long periods, and they will likely overheat and die. It is best to install nucs within 1–2 days of receipt because crowded nucs tend to swarm if not transferred into a larger hive body.
If package bees are not installed the day you receive them, store them in a cool, dark place that keeps the bees relatively clustered and quiet. Lightly spray water onto the packages several times a day until they are installed. You can also lightly spray package bees with sugar syrup to feed them, but it is best to keep the syrup can filled with syrup until they are installed. Install package bees as soon as possible; survival will be highest if installed within 1–2 days of receipt.
Prepare the Site
Choose an apiary location with food, water, and protection from the elements. If your bees will be kept in a suburban neighborhood, you should probably conceal them to avoid undue anxiety from neighbors who are not enthused about honey bees. It is always a good idea to use shrubs, small trees, and privacy fences as barriers to bee flight; these help drive the flight paths of bees above your neighbors’ heads. These same shrubs and trees can be used as wind breaks to help shield your hives from cold winds, especially during the winter months. For more detailed information on choosing an apiary location, see MSU Extension Publication 2937 Choosing an Apiary Location.
Many beekeepers place their hives on stands or cinder blocks. This strategy reduces moisture on bottom boards, which can extend the hive’s useful life. A drier bottom board can also help reduce moisture within the hive, which is healthier for the bees. If the hive has a screened floor, the elevated bottom board allows debris to fall freely from the hive, which helps the bees maintain a cleaner hive environment. Minimally, each hive will begin as a single box fitted to a bottom board and covered with a lid. It is best to have two to three boxes available for adding to your new colony as it grows throughout the first season.
When to Start New Colonies
Honey bees need an abundance of incoming nectar and pollen to secure the nutrients needed for growing new bees and producing wax for building the combs where they live and store food. Pollen provides amino acids, vitamins, minerals, and sterols that are essential for feeding bee larvae. Nectar is primarily a dilute sucrose solution that is converted into honey, which is the primary carbohydrate source for honey bees. A high rate of incoming nectar also drives bees to build new comb. The bees convert sugar into the lipids needed to make beeswax. So a major concern for beekeepers is knowing when food plants bloom in their area.
Bloom periods vary between the northern and southern halves of our state by as much as 2 weeks. Every beekeeper should learn the primary food plants for bees within a 2-mile radius of their hives and when these plants bloom during the season. See MSU Extension Publication 3382 Maximizing Honey Production for a list of important nectar and pollen sources for honey bees in Mississippi.
The best areas for honey bees are poly-floral landscapes with sequential bloom periods of different plants. As the bloom period of one plant ends, that of another begins. Understanding these relationships can help you maximize bees’ use of naturally available food and predict when food will be scarce in a particular location.
The best time to start a colony of honey bees in most of Mississippi is by the end of March/early April through early May. This period represents the primary honey flow (the period of intense spring bloom that provides the nectar and pollen needed for rapid colony growth). Colonies started this early will usually have enough time to grow bees, secrete beeswax and produce new combs, and store adequate honey to get them through the summer dearth and into the autumn bloom period.
Many areas of our state experience reduced availability of food during the summer, and this dearth of resources impacts the ability of a colony to grow. Not all locations experience a dearth, but a reduction in floral resources from late June through August is typical for most of Mississippi. Colonies can be started well into May of most years, but the chances that a colony will need to be fed increase the later in the year that they are initiated. Colonies started after mid-May may need to be fed sucrose syrup to get through the summer dearth. These colonies may not have enough time to grow substantially before queens slow their egg-laying during the heat of the summer, which means that the overall colony size may be smaller than average colonies going into the winter.
It is not advisable for new beekeepers in most of Mississippi to start a colony of bees after the middle of May in most years. However, many areas around Jackson and southward to the coast have an abundance of Chinese tallow (Triadica sebifera), which blooms prolifically and often extends the honey-producing season to the end of June. This tree is an invasive plant, and it has become well established in much of the southern U.S. In fact, many commercial beekeepers in Mississippi earn most of their annual income from the honey of this plant. It is also possible that colonies started near row crops like soybeans or cotton may grow well into summer because these plants will continue to bloom long after spring flowering has ended.
Although it is best to start colonies in March, it is impossible to get nucs or packages before the middle of April in most years. Honey bee suppliers need time to grow their own colonies in order to produce surplus bee populations and newly mated queens to sell to other beekeepers. The growth of bee colonies depends on the availability of flowers, and the first steady periods of bloom occur in March. So it is likely that the first shipments of honey bees from southern producers will take place in mid- to late April.
Installing Nucs
Initial Feeding of a New Colony
The equipment needed to install a 5-frame deep nuc into a new hive includes a bottom board, a deep hive body, a lid or hive top, three deep frames fitted with foundation, a 1-gallon division board feeder (Figure 17), and at least 1 gallon of 50 percent sucrose syrup (w/w: 8 pounds sucrose dissolved into 1 gallon of water) for feeding the bees. The primary job of a new beekeeper is to grow new honey bees and new combs. Both targets depend on amount and quality of incoming food.
Growing new bees requires ample numbers of nurse bees that are able to convert nutrients from stored pollen (bee bread) that they eat into brood food or jellies used to feed developing larvae. A colony cannot feed large numbers of larvae without a large influx of fresh pollen. If pollen is not abundant, or if it is intermittent during an early spring flow, feed protein supplements to help the bees grow brood. Protein supplements are nutritionally inferior to natural pollen; however, most commercially available brands support brood rearing. Be careful when feeding protein supplements—give small colonies only about one-third of a commercial patty of protein supplement to avoid giving SHB places to lay eggs. Bees will eat the smaller amounts faster, and the beetles will have less time to find the food and less space to lay eggs. Usually, bees can eat smaller portions before SHB eggs can hatch and develop into beetle larvae.
Growing new combs requires synthesis of beeswax, and beeswax production depends on the availability of carbohydrates from incoming nectar. Nectar is the primary carbohydrate source in the honey bee’s diet. It is processed to produce honey, which is stored for surviving periods when plants are not blooming, such as during a summer dearth or the winter. Additionally, carbohydrates are biosynthetically converted into beeswax within the bodies of young worker bees. Worker bees secrete wax scales through special glands on the ventral surface of their abdomens. Worker bees mold these scales with their mouthparts to actively build new comb. It takes 8 pounds of honey to produce 1 pound of beeswax.
Sugar is more than the precursor to beeswax. The rate of incoming nectar is a major driver for building new comb. During heavy nectar flows, a new colony with just a few combs quickly fills available cells with nectar to be converted into honey. As the intense bloom period continues, the bees race to build more comb for storing a heavy inflow of nectar. Although honey bees may be collecting nectar and pollen from blooming plants, offer sucrose syrup to newly installed colonies. Feeding syrup to honey bees helps them grow by
- providing dietary sugar that supplements any incoming nectar,
- providing sugar for rapid conversion into beeswax for new comb construction, and
- driving new comb construction as bees respond to running out of available space on existing combs.
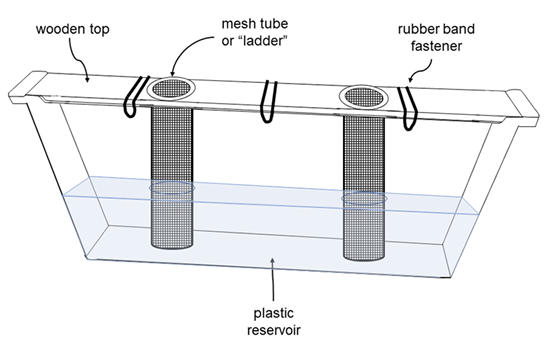
After the initial installation of a nuc, offer sugar syrup multiple times over several weeks or until the bees no longer need it. This publication emphasizes using a division board feeder for delivering sugar syrup to bees (Figure 17). Other feeder styles can be used, but gravity feeders or internal feeders, such as top feeders or division board feeders, are recommended.
A gravity feeder is a bucket or bottle inverted and placed over a hole in an inner cover or in the external lid of the hive (if no inner cover is used with a migratory lid, for example). The feeder’s lid has holes punched into it to allow syrup to slowly dribble from the feeder. When the feeder is inverted over the hole of an inner cover, an empty deep rim is often placed over the feeder and fitted with the hive top, which encases the feeder and protects it from raccoons and other wildlife. This also keeps “robber bees”— worker bees from one hive that steal food from another—from finding the syrup. If a gravity feeder is fitted to the external lid or top of the hive, make sure it fits very tightly to prevent robber bees from gaining access to the interior of the hive.
A large zip-top bag (1-quart capacity) can be used as a disposable gravity feeder inside a hive. Fill the bag two-thirds with syrup and seal it. Lay it on the top bars of the hive, and then score the plastic bag just above the air bubble (or meniscus) with a razor blade. Make about a 1½-inch cut at the top center of the bag. This will allow the bees to access the syrup, and, if done carefully, it will not pour out of the bag. When the bees have stored the syrup, give them a new bag and discard the old bag. As with bucket feeders, the bag should be protected by an empty box (shallow or medium) and the hive lid to keep robber bees and wildlife out.
Do not use entrance feeders, which most often use an inverted jar as a gravity feeder fitted to a special entrance wedge that allows bees to access the syrup when the wedge is inserted into the hive entrance. Robber bees from neighboring colonies can be attracted to the sugar syrup at the hive’s entrance. A strong neighboring colony can overtake and kill a weaker colony to steal its food. The best way to prevent robbing is to place the sugar syrup inside the hive away from the entrance; a division board feeder is the most common feeder for this purpose. A second reason to avoid entrance feeders is that, during cold nights, the bee cluster will move to the interior of the hive to stay warm and protect the brood. They will not be able to access the syrup feeder until it is warm enough to allow the cluster to expand.
It is better to offer sugar syrup as a continuous dribble from above with a gravity feeder, or from a division board feeder inside the hive. Not all division board feeders are equal. A common problem with some older styles of division board feeders is that large numbers of bees drown in the syrup as they attempt to feed. These older styles are not capped and rely on textured walls of the reservoir to give the bees a foothold while they drink. Quite often this simple mechanism is not enough to prevent bees from slipping into the syrup. Hundreds to thousands of bees can drown during a single round of feeding using these feeders.
The best division board feeders are fitted with a solid wooden or plastic top to keep the bees off of the surface of the syrup. The only access to the syrup is through ladders or similar anti-drowning devices (Figure 17). Ladders are typically cylinders made of a plastic mesh that provide bees access to the syrup. Bees drink the syrup through the mesh, and they grip the walls of the cylinder to keep from falling into the syrup. As the syrup level decreases in the reservoir, the bees advance down the ladder to stay near the surface of the syrup to drink it.
Division board feeders are typically made to fit deep hive boxes. They are sold with a volume capacity of 1 or 2 gallons. The 1-gallon feeder is commonly used when feeding bees in deep brood chambers, and this is the size highlighted in this publication. Division board feeders are also made to fit medium boxes. Deep feeders will not fit medium boxes, but it is possible to use a medium feeder within a deep box.
The sucrose used to make syrup should be refined, white table sugar that has no yellow or brown coloration. Raw cane sugar (or brown sugar) and partially refined cane sugar can have other sugars and toxins that can kill bees. Additionally, when making the sugar syrup, it is best to heat the water to near boiling before removing it from heat to add the sugar. Boiling or heating the sugar solution can lead to rapid formation of 5-hydroxymethylfurfural (5-HMF), which can kill honey bees at low concentrations (ppb). 5-HMF is a natural breakdown product of sugars in acid environments, and levels of the chemical increase as honey ages over several years. Sugar syrup that is overheated may show browning caused by caramelization and charring. This syrup should be discarded and not fed to honey bees.
Installing the Nuc and Adding Boxes
In the best-case scenario, a nuc has been at its new location with an opened entrance for 1–2 days after being transported from the bee supplier. The colony has settled from the initial disruption of travel. If the weather is favorable, there will likely be a steady stream of worker bees flying to and from the nuc as they forage for food in the surrounding environment.
It is best to install the bees into new hive equipment when it is relatively warm and sunny, and when foraging traffic is steady. Steady foraging traffic suggests that there is food to be collected from blooming flowers nearby, and bees’ defense reactions are lower under these conditions. Many of the older workers, which are more prone to sting, will be away from the colony looking for food. Additionally, honey bees have lowered defense reactions when they are well fed, so a typical warm, sunny day in mid-April will likely be ideal for installing your new bees.
After lightly blowing a little smoke into the entrance of the nuc, lift it from the hive and set it on the ground. Place a bottom board on cinder blocks or a hive stand, and position a deep hive body onto the bottom board. Be sure that the entrance of the new hive is oriented in the same direction as the entrance the nuc had been facing; otherwise, returning foragers will become confused and disoriented. Worker bees are likely to fly into the new hive body even before combs are transferred from the nuc box. Stand beside or behind the new hive body to avoid blocking the entrance from these returning bees.
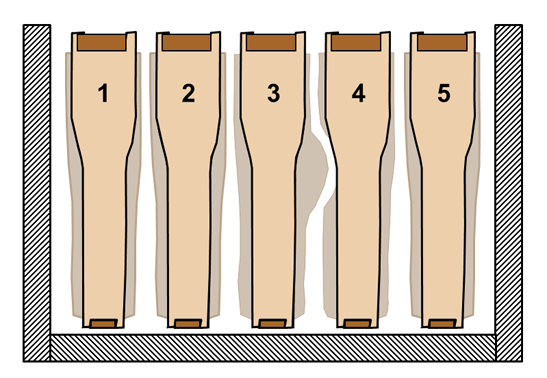
The step-by-step procedures for installing and growing your colony bees in this publication are accompanied by several diagrams to illustrate the procedure. In these diagrams, the original combs from the nuc are light green. Frames of foundation are beige, and newly drawn combs produced by the colony are dark green. The division board feeder is represented by a wider gray bar.
Many beekeeping textbooks recommend transferring the combs from a nuc into the center of the new hive body (Figure 18). The idea is that bees clustered on either end of the transferred group of combs will be able to build new comb on the foundation in an adjacent frame. The bees will tend to cluster around the original five combs that contain all of their stored food, all stages of brood, and the queen. However, bees on the outside of the cluster will attempt to build new combs when conditions are favorable. Bees can begin working on two combs at a time with this arrangement. Workers on the outer surface of comb 1 can make new comb on the neighboring sheet of foundation, while bees on comb 5 can do the same with the sheet of foundation between the feeder and the transferred combs.

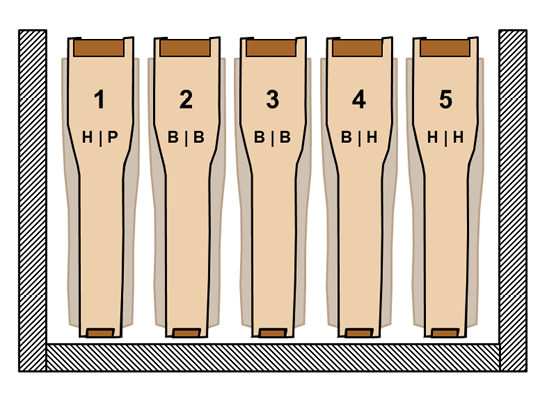
The most important rule of thumb is that combs should be transferred from the nuc into the new hive body and arranged in the same order as they were in the nuc. This is why the combs are numbered 1 to 5 in the diagrams. There are a few reasons for maintaining this comb order. Honey bees raise brood on the centermost frames (Figure 19), and this area is called the broodnest. The broodnest is kept at 93–95°F (34–35°C) for proper development of the immature bees. Adult worker bees cluster over the combs and generate heat by shivering their wing muscles to keep brood warm during cold periods. Clustering bees use their bodies to hold heat around brood combs and to heat the entire bee cluster. Bees need access to stored honey to fuel this warming mechanism. Pollen can be stored within the broodnest, but often excess pollen is stored on combs immediately adjacent to brood combs. Surplus honey is most often stored on the outermost combs of the hive.
Rearranging the broodnest during the transfer puts stress on the new colony. For example, if order is not maintained, it is possible that a full comb of honey will be placed between combs that contain brood. This mistake divides the broodnest into separate compartments. Essentially, two separate and inferior clusters of bees will form to try and keep the separated brood combs warm. If you maintain the original order, all brood combs will be near the hive center, and a single, larger cluster of bees will envelope the combs. This more natural cluster will be more efficient at warming and feeding the brood.
Another very important rule is to avoid rotating transferred combs. Although combs made by bees on foundation tend to be very straight, the drawn combs are not always perfectly formed. Sometimes one side of a comb will have a bulge. If the bulge encroaches on the normal bee space in the gap between the combs, the adjacent comb will have a recess that matches the bulge of the neighboring comb (Figure 20). This lock-and-key relationship between the two combs allows the bee space to be maintained in areas with abnormal surfaces or contours. If one of the combs is accidentally rotated, the lock-and-key fit will be lost. The comb side with the bulge may be squeezed tightly and pressed into a neighboring comb on the opposite side that does not have the matching recess. Adult bees and brood can be killed when these combs are pressed together.
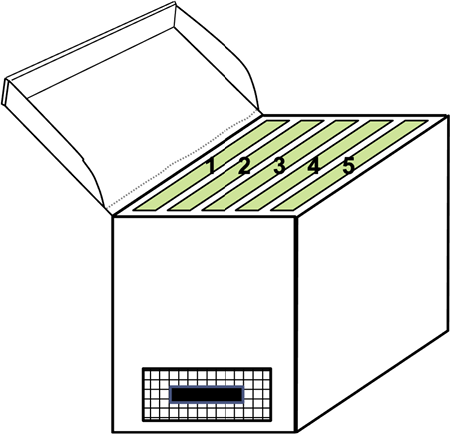
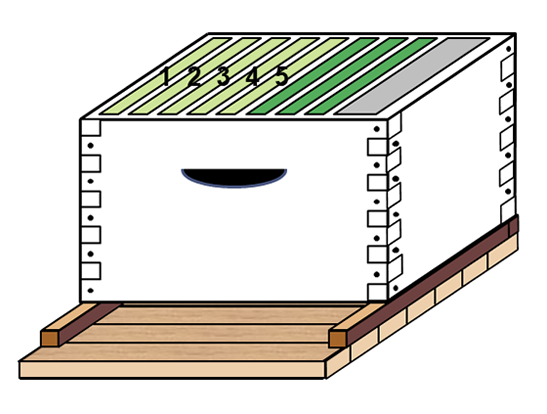
Notice that only eight total frames or combs are involved with the initial transfer of the colony from the nuc (Figure 18). Three frames of foundation were added to the deep hive body to bracket the five original fully drawn combs from the nuc. The division board feeder is placed on an outer edge of the new hive body. Although division board feeders are supposed to be the same width as the wooden frames holding combs or foundation, the feeders tend to be wider and fit tightly if a full complement of nine frames or combs are added to the hive body. For this reason, it is recommended to add only eight frames or combs to the hive body when a feeder is being used. It will be much easier to remove the feeder or frames/combs when the extra frame is left out of the box. All frames must be pushed together, and the entire group should be centered in the deep hive body. This will ensure that all frames are evenly spaced so that the foundation will be properly drawn into straight combs with optimal width.
MSU Extension apiculturists collectively have more than 50 years of experience growing nucs. Our experience suggests that the combs from a nuc do not need to be placed into the center of the new hive body for rapid and successful production of new combs. We often install the combs from a nuc at one end of the new hive body. Three frames of foundation and the division board feeder are still used to fill the hive body, but the frames of foundation are grouped between the older combs and the feeder (Figure 21). One reason we like this arrangement is that it is easier to squeeze the frames of foundation close together by pushing the division board feeder against them and gently edging the whole group to a snug fit against comb 5 of the transferred group. This simple manipulation helps to keep the frames of foundation properly spaced, and the new combs produced on them will be straight and at the proper width.
Regardless of where combs from the nuc are transferred, fill the feeder with about 1 gallon of sugar syrup before placing the lid on the hive. Bees will take the syrup from the feeder and try to store it in the older combs, and if there is not enough space, they will build new comb on the foundation. They will store syrup and incoming nectar in new combs as they are made.
Bees can make beeswax quickly if food intake is high, so if you keep putting syrup into the feeder, the bees will keep making new comb. Refill the division board feeder every 4–5 days while the new colony is making new combs.
Depending on the natural nectar flow that occurs simultaneously with the feeding regime, it usually takes no more than 1–2 gallons to get the first three frames of foundation converted into fully drawn combs. It is best to leave the bees alone during the intervals between feeder refills and allow them to work undisturbed. You don’t have to remove the lid completely to fill a feeder. You can gently slide a migratory lid (or an inner cover) aside to expose the feeder while leaving the combs covered by the lid. You can quickly fill division board feeders by placing a funnel into one of the ladders and pouring the syrup from a bucket into the funnel. Do not spill syrup on the ground or outside of the hive body because this can attract robber bees from neighboring colonies. Once filled, gently slide the lid back to completely seal the hive. These procedures will minimize disturbance to the bees that are actively building new combs.
How do you know when to stop feeding syrup to a new colony of bees? First, if the bees stop taking syrup from a division board feeder, they are on a heavy nectar flow and no longer need syrup. Second, if you are feeding too much syrup, the queen may not find empty brood cells for egg-laying in the broodnest. This occurs because the workers have transferred syrup into all available cells in the broodnest. They may also have filled cells in newly drawn combs. The broodnest in this scenario is said to be “honey-bound.” The remedy is to add more foundation to be drawn or stop feeding syrup, or both.
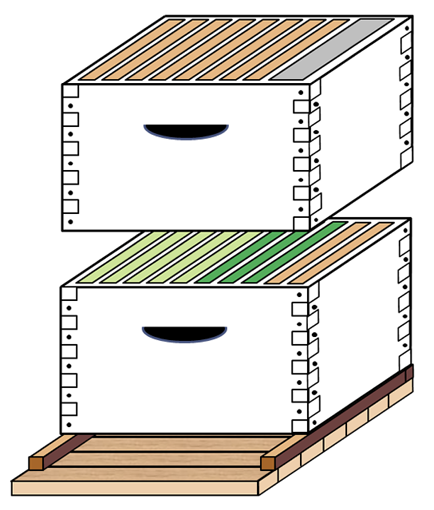
Once the bees have drawn out the first three combs from foundation, there will be eight fully drawn combs and the division board feeder in the original hive body (Figure 22). This is the time to add a second box of foundation. Many new beekeepers stop feeding their bees after they have filled a single deep box with comb, but this is a big mistake. There is a limited period in the spring when bees can be stimulated to produce combs and grow bees at a high rate. You should take advantage of this situation to push the bees to grow and occupy as many boxes as possible before the typical summer dearth. In traditional beekeeping, the second box will be a deep hive body because brood chambers use two deep boxes. When you stack new boxes on the growing hive, move the division board feeder into the top box to maintain access for refilling just below the lid. When the feeder is moved upward, two frames of foundation replace it in the bottom box.
There are two methods for adding the second box of foundation. In the first, the second box is filled with eight frames of foundation and the division board feeder (Figure 23). The deep hive body is set onto the bottom hive body and positioned so that box edges are perfectly aligned. All frames of foundation and the feeder are pressed snugly together, and the entire group is centered within the hive body. The feeder is filled every 4–5 days to push comb construction. It will likely require 3–4 gallons of syrup before another box can be added. This method of adding the second box of foundation is specifically designed for new beekeepers who are unsure about moving combs out of the bottom box. There is no manipulation of combs from the bottom hive body, so there is little or no risk of injuring the queen. The bees may be hesitant to enter the upper box, but they will draw out the frames of foundation eventually.
The second method for adding the second box of foundation involves extensive manipulation of the fully drawn combs from the first box. The general idea is to create a corridor of drawn combs that bridges the two hive bodies and allows the colony of bees to move freely between the two boxes while they build new combs (Figure 24). The corridor of drawn combs should be in the center of both boxes. It is imperative that all brood combs be kept to the center of both hive bodies. Combs filled with honey or pollen are positioned on either end of the brood combs within each box. The bottom box is given frames of foundation to completely fill available space. The division board feeder is moved to the outer edge of the top box, and frames of foundation are added to give a total of eight frames/combs in the top box. All frames in both boxes should be pressed together with a hive tool by prying against the hive walls. Each group of frames should also be centered within each box. These manipulations usually allow a cluster of bees to produce new combs faster and more evenly than with the first method.

When should you add the third box? When seven to eight frames of the second batch of foundation have been drawn, it may be time to add a third box. This decision may depend on whether the spring honey flow continues or is waning. If the bees continue making beeswax at a relatively fast rate, they will likely continue drawing foundation if the feeding regime continues. Quite often, the third box to be added will be a medium box. You cannot place a deep division board feeder in a medium box, so you have two options:
- Leave the deep division board feeder in the second, deep box, and place the box of medium foundation above it.
- Remove the deep feeder from the second, deep box, and replace it with two frames of foundation. Then, place a medium-sized feeder in the upper, medium box so that syrup can be added to the top box. You must purchase two sizes of feeders for this strategy.
A newly installed nuc is growing extremely well if two to three boxes of foundation have been drawn during the first 2 months after installation. The likelihood that a colony will survive its first year depends on its strength going into the winter. Growing the colony into two to three boxes before mid-July should be your primary goal (Figure 25). Colonies this large can better handle the summer dearth of food resources. Additionally, the worker population size will be large enough to rapidly respond to the future autumn nectar and pollen flow. It takes bees to raise bees, and stable colonies with larger populations will be positioned for responding and growing new worker bees that will serve as winter bees. Managing your colony through the end of the first year should follow the same general seasonal management scheme that is used for preparing well-established colonies for overwintering (see MSU Extension Publication 2941 Colony Growth and Seasonal Management of Honey Bees).
Installing Packages
Starting from packages is probably the most difficult because the bees are literally starting with nothing. There are no drawn combs, so the package bees must make all of their combs from foundation. The bees will need a lot of natural nectar to make wax and pollen for brood rearing. They will also need supplemental syrup to further stimulate wax production. Because almost all suppliers of bees in Mississippi sell nucs, only an abbreviated outline of installing a package is presented here.
Honey bees are attracted to empty beeswax combs, and they are greatly attracted to odors emitted by bee larvae and pupae in brood combs. Unlike in a nuc, package bees have no combs or brood on which to anchor them. As a new beekeeper, you may have only foundation for installing the package bees. Without combs to center the bees, they can fly or drift during the installation process. This is especially troublesome if other well-established hives of bees are located nearby. The worker bees may smell other colonies and migrate to them. Therefore, it is best to install package bees late in the afternoon when it is cooler. Spray the bees lightly with sugar syrup about 15 minutes before they are transferred. The syrup will quiet the bees, and they will be less flighty after filling their crops (honey stomachs) with syrup.
The best arrangement for installing package bees when only frames of foundation are available is to place eight frames of foundation and a division board feeder into the deep hive body (Figure 17). Fill the division board feeder with syrup before the bees are transferred. To remove the sugar can and tethered queen from the shipping cage, tap the package lightly on the ground to knock all the bees to the bottom of the shipping cage. Open the top of the cage and quickly remove the syrup can and tethered queen cage (Figure 15). Temporarily replace the wooden lid to keep bees from escaping the shipping cage while you work with the queen cage.
Because there are no drawn combs, the queen cage cannot be gently pinched between two drawn combs to hold it in place (which is usually done when packages are transferred into hives with drawn combs). For this reason, the queen cage should now be tethered to a frame. Staple the free end of the wire that is already anchored to the back of the queen cage to the top bar of a frame of foundation in the new hive. The goal is to keep the queen cage from slipping to the floor. The tether should be long enough that the queen cage hangs 2–3 inches below the top bar of the frame. This arrangement allows the queen cage to hang between frames and serve as a focus on which the transferred worker bees will cluster.
Inspect your queen to make sure she is alive and in good condition. Carefully remove the cork from the candy end of the queen cage (Figure 16). Try to position the queen cage so that the mesh of the cage faces and is parallel to the floor of the hive. The bees will eat the candy in the queen cage within 2–4 days, and this mechanism will self-release the queen. The frame with the tethered queen should be positioned in the center of the new hive. Once in place, squeeze together all frames of foundation and the feeder, and center the whole group in the new hive body.
Next, add the bees from the shipping cage to the new hive body. Tap the package a few times on the ground to knock them to the bottom of the shipping cage. Remove the square lid and begin to gently shake the bees from the package over the tops of the frames and the tethered queen cage. Once you have shaken most of the bees from the package, place the inner cover and top cover on the hive. Place the package on the ground in front of the hive so that the few bees remaining in the cage can fly out and find the entrance to the hive.
Refill the division board feeder every 4–5 days as described above for feeding a nuc. The queen should self-release within 2–4 days of initial installation, and you will want to check to see if she has left the cage within 3–4 days. If she is still inside the cage, you can leave her there for a couple of days before releasing her yourself. Hold the queen cage over the inside of the hive body and carefully pull back the screen to release her. After the queen has left the cage and is freely moving within the cluster of bees, remove the cage and gently reposition the frames before refilling the feeder. Return the lid and allow the bees to continue making new comb. You will want to look for eggs and larvae on subsequent trips to refill the feeder to make sure the queen is accepted and producing brood. At this point, the feeding regime should follow the same course as described for the nuc installation, and the bees should be grown to fill two to three boxes by midsummer.
Controlling Varroa Mites
As a new beekeeper, there is at least one disease you will have to manage. The varroa mite (Varroa destructor) will be the biggest threat to your bees. Adult female mites feed on adult bees, but the biggest harm to colonies is mites feeding on pupae. Varroa mites transmit viruses to bees while feeding on them, and colonies die when viral infections skyrocket within the bee population. One way to keep the viral load low is to keep mite populations from growing too large.
Our recommendation on miticides in the first year has evolved because there are many complications with managing varroa mites, and new beekeepers are already overwhelmed with learning to grow bees. It is very disappointing to work hard to grow a colony of bees only to lose them in the winter from high varroa mite loads. Growth of varroa mites is directly correlated to growth of bee populations, and newly installed colonies are encouraged to grow rapidly. This means mite populations could be nearing dangerous levels before the end of the first year of growth of a new colony.
While it can be a controversial recommendation, MSU Extension apiculturists now advise treating new colonies of bees with a miticide beginning in early to mid-July of the first year. We recommend using neurotoxic miticides (e.g., amitraz formulated as Apivar) for 40-plus days to achieve a high kill rate. This will keep mite loads low going into the autumn. Always follow the pesticide label for proper use of any miticide.
However, we strongly urge all beekeepers to develop a long-term varroa management plan after the first year that reflects their personal perspective on using chemicals in beehives. Total reliance on chemical treatments to control any pest is not sustainable. Pests become resistant to chemicals, and chemical residues accumulate in bees, pollen, honey, and wax, potentially causing chronic poisoning of bees. Therefore, chemical treatments should be viewed as a last resort rather than a routine intervention.
There are several chemicals and physical methods that can be used to control mites. Additionally, there are various personal philosophies about the use of chemicals in beehives. Some people never want to use chemicals to control varroa mites or any other pest. Quite often, these beekeepers use physical methods (e.g., drone trapping techniques or brood breaks) to control mite populations. Some also practice natural beekeeping to control mites.
Natural beekeeping is an approach that keeps colonies small and allows them to swarm naturally. Mite populations cannot grow as large in these colonies. This is an extremely simplified summary of natural beekeeping, but the goal is to raise honey bees organically without the use of pesticides, antibiotics, or artificial diets (see References section).
Of course, there are beekeepers who do not object to using pesticides to control varroa mites. For these beekeepers, it is important to use an integrated pest management approach. Sample colonies to know when mite populations exceed the threshold that triggers a pesticide treatment.
Additionally, there are many types of chemicals that can be used for treatments. The synthetic pesticides are called “hard chemicals,” and many of them can contaminate beeswax combs for long periods. Some natural organic acids (formic acid and oxalic acid) and a few essential oils (thymol) are collectively termed “soft chemicals” by beekeepers. These chemicals tend to contaminate beeswax for short periods, but their effectiveness at killing mites can be highly variable. Some of them (e.g., formic acid) can have detrimental effects on bee brood.
For more information about managing varroa mites, see Tools for Varroa Management: A Guide to Effective Varroa Sampling and Control from the Honey Bee Health Coalition and MSU Extension Publication 2826 Managing Varroa Mites in Honey Bee Colonies. For a summary of the varroa mite problem and discussion of the pros and cons associated with the different control methods, see Honey Bee Biology and Beekeeping (listed in the references below). The Honey Bee Health Coalition also offers a varroa management tool for making decisions about what type of chemicals to use at different times of the year.
Remember: You must develop a long-term plan for managing varroa mites. Regular treatment with pesticides is not a sound long-term approach to this problem.
References
Caron, D. W., & Connor, L. J. (2013). Chapter 19: Bee Mites. In Honey bee biology and beekeeping (pp. 309–330). Wicwas Press.
Conrad, R. (2013). Natural beekeeping: Organic approaches to modern apiculture. Chelsea Green Publishing.
Graham, J. M., & Langstroth, L. L. (2015). The hive and the honey bee: A new book on beekeeping which continues the tradition of Langstroth on the hive and the honeybee. Dadant & Sons.
Harris, J. W., & Collison, C. H. (2016). Colony growth and seasonal management of honey bees. Mississippi State University Extension Publication 2941.
Harris, J. W., & Fulton, H. (2019). Maximizing honey production and heating honey. Mississippi State University Extension Publication 3382.
Harris, J. W., Sheridan, A. B., & MacGown, J. A. (2015). Managing varroa mites in honey bee colonies. Mississippi State University Extension Publication 2826.
Honey Bee Health Coalition. (2018). Tools for varroa management: A guide to effective varroa sampling & control (7th edition). The Keystone Policy Center on behalf of the Honey Bee Health Coalition.
Mangum, W. A. (2012). Top-bar hive beekeeping: Wisdom and pleasure combined. Stinging Drone Publications.
Sheridan, A. B. (2014). Small hive beetle. Mississippi State University Extension Publication 2825.
Sheridan, A. B. (2018). Minor pests of honey bees in Mississippi. Mississippi State University Extension Publication 3195.
Sheridan, A. B., Fulton, H., & Zawislak, J. (2010). Small hive beetle management in Mississippi. Pamphlet produced by Mississippi Beekeepers Association and Make Mine Mississippi.
Sheridan, A. B., & Harris, J. W. (2016). Choosing an apiary location. Mississippi State University Extension Publication 2937.
The information given here is for educational purposes only. References to commercial products, trade names, or suppliers are made with the understanding that no endorsement is implied and that no discrimination against other products or suppliers is intended.
Publication 3594 (POD-06-24)
By Jeff Harris, PhD, Associate Extension/Research Professor, Entomology.

The Mississippi State University Extension Service is working to ensure all web content is accessible to all users. If you need assistance accessing any of our content, please email the webteam or call 662-325-2262.
