P3402
Basic Grafting Techniques
Grafting is a method of asexual plant propagation that joins plant parts from different plants together so they will heal and grow as one plant. This technique is used to propagate plants that do not root well from cuttings, to utilize superior root systems, or to maintain clonal production.
Nursery workers and fruit tree producers must know how to graft. Hobbyists also can learn this useful technique. This publication discusses the basic techniques used to graft fruit trees and other plants that cannot be propagated by cuttings or seeds.
The part of the vegetative wood, usually the stem or other aboveground plant part, from the desired variety to be propagated is called the scion. It consists of a shoot with several dormant buds that will produce the new stem and branches. The rootstock is the part of a plant that becomes the root system of a grafted or budded tree. In order to be a successful graft or bud, the cambium layer of cells located on both plant parts must align and grow together. This cambium region is between the xylem and phloem and is where all new plant growth occurs.
Grafting includes budding and is usually done in winter or early spring with dormant scion wood. Budding is accomplished by inserting a mature single bud of the desired cultivar into the rootstock in contact with the cambium. This procedure is usually done during the late growing season (July, August, or early September), but it may be done at other times.
Budding is becoming the grafting method of choice in fruit tree production. Budding uses incisions rather than major cuts, which takes much less time and makes it more economical. Budding also uses individual buds per rootstock, so more plants can be produced. The major disadvantage is that budding is mostly limited to active growth periods of the year when labor demands may be high for other growing operations.
Grafting or budding a tree is essentially the same, but the procedures differ. The grafting method is determined by the kind of plant, time of year, plant materials at hand, or grafter’s preference. Peaches, plums, apples, and pears are commonly propagated by budding, while apples and pears are commonly grafted.
Why Graft?
Reproduce vegetatively. Numerous selections of plants will not reproduce true from seeds or cannot be economically reproduced from vegetative cuttings (fruit varieties, flowering ornamentals, etc.).
Change variety. Established orchards of fruit trees may become obsolete as newer varieties are developed. Newer varieties may offer improved insect or disease resistance, better flavor, or higher yields. Rather than destroy the established root system, the older orchard may be top-worked using the new, improved variety.
Add pollinizer. Certain fruit trees are not self-fertile; they require cross-pollination by a second fruit tree, usually of another variety. Some hollies are dioecious, meaning that a given plant has either male or female flowers but not both. To ensure good berry production on the female plant, a male plant must be growing nearby. Where this is not possible, the chances that cross-pollination will occur can be increased by grafting a scion from a male plant onto the female plant.
Change root system. Certain rootstocks have superior growth habits, disease and insect resistance, and better anchorage. For example, when used as rootstock for commercial apple varieties, some rootstocks can increase resistance to crown gall and root aphids. Some are also used as dwarfing rootstocks.
Produce certain plant forms. Plants with a weeping growth habit are often grafted or budded onto a standard rootstock. It may require staking for several years until the standard is large enough to support the weeping top.
Repair damaged plants. Large trees or specimen plants can be damaged easily at or slightly above the soil line. The damage may be caused by maintenance equipment or by disease, rodents, storms, or vandalism. This repair procedure is referred to as inarching, approach grafting, or bridge grafting.
Create designs. Advanced grafters may want to join plants to create designs such as hearts, chairs, or anything they can imagine.
Grafting Tools
Grafting has been practiced for thousands of years. Concepts remain the same, but tools have evolved. This publication focuses on basic tools that the average gardener can easily obtain.
There are numerous types of grafting/budding knives available (Figure 1). Grafting knives are characterized by being flat on one side of the blade. Sharpen the blade frequently to get clean cuts. Be sure to clean any sharpening oil off the blade before using it.
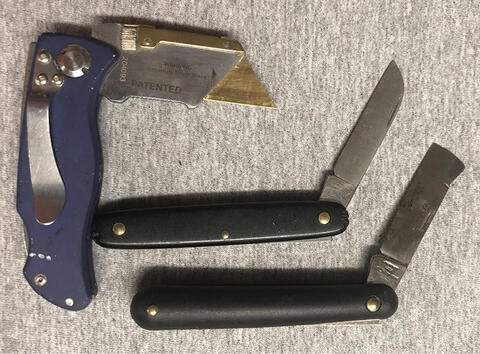
A good alternative to a grafting knife is a box cutter (Figure 1). The blade is thin and can be easily replaced when it becomes dull. The disadvantage is that, on larger diameter wood, the blade is too flimsy and may break.
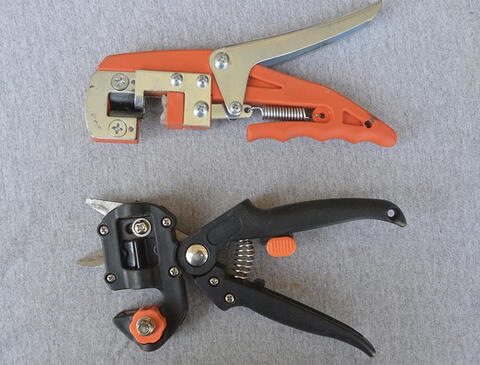
Various grafting tools have been developed to speed the grafting process and make more precise, matching cuts (Figure 2). These tools work best with scion and rootstocks very closely matched in size.
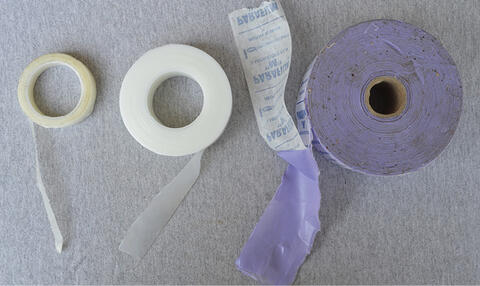
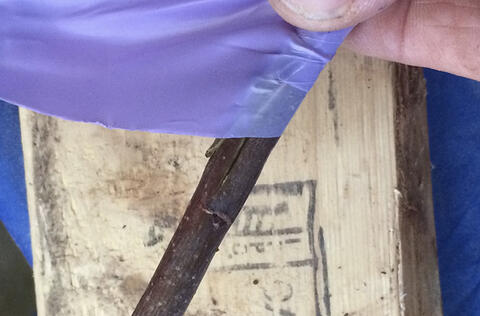
Newer methods involve using a stretchable, plastic film (parafilm). The film holds the scion and rootstock snuggly together and provides an airtight seal around the area. The film breaks down gradually, eliminating the need for cutting it out as the graft grows. The film comes in various widths (Figure 3).
Using Grafting Tools
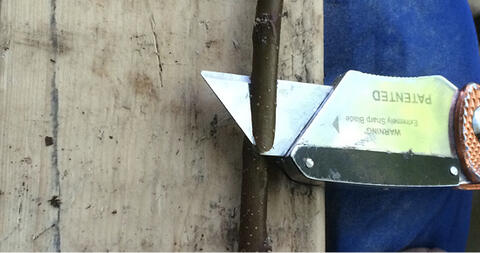
Grafting tools work best on scions and rootstocks that are three-eighths of an inch or smaller in diameter. The pieces need to be equal in size to make a successful graft. Use the tool to make a v-shaped notch in the rootstock, then make a matching v-shaped cut on the scion (Figure 4). Join and wrap the pieces tightly with the grafting tape (Figure 5).


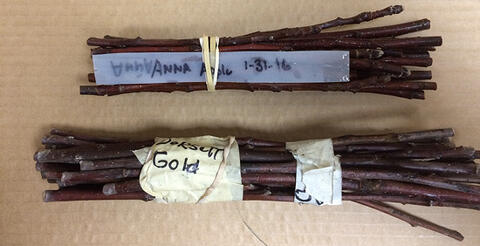
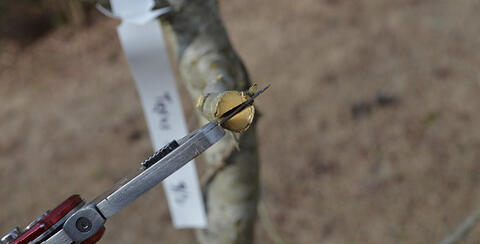
Tie the bundles of each variety together and label them. Use a pencil or a horticultural pen for marking wooden tags.
Regardless of what type tag you use, make sure the name will stay on it under adverse conditions (Figure 6).
To store the scion wood, place each variety in a moist (not saturated) medium, such as sphagnum moss, sawdust, or paper towels, and place in a sealable plastic bag. All bundles should be labeled by cultivar name and date collected. A garbage bag is good for large quantities of scion wood. Do not let the wood dry out. Store the wrapped packages of propagating wood in a refrigerated room at 34–38°F. Properly stored scion wood should remain in good condition until it is ready for use in late winter through early spring.
Collecting Scion Wood for Budding
Collect scion wood or bud wood early in the day while temperatures are cool and the plants are still fully turgid. It is a good idea to bring a cooler with ice to the field to ensure cuttings stay fresh. The best vegetative buds usually come from the current season’s growth or dormant wood that grew the previous year. Mature buds are most desirable; discard terminal and younger buds. To keep buds from drying out, getting hot, or freezing (depending on the season), place the bud wood into plastic bags or wrap it in moist towels as you collect it. As the bud wood is selected, the leaves should be cut off immediately, leaving only a short piece of the leaf petiole attached to the bud to aid in handling. Place bud wood of only one variety in a labeled bag.
Bud sticks that will not be used immediately should be bundled, labeled, and stored in moisture-retaining containers such as plastic bags or waxed cardboard boxes, which should be kept cool (32–45°F). The longer bud wood is stored, the less likely it is to form a union with the rootstock. Generally, bud wood stored for more than a few days should be discarded.
Rootstocks
Grafting and budding require a compatible rootstock onto which you attach your desired variety of plant. An inexpensive way to obtain a rootstock is to collect seeds from the type of plant you are propagating and grow your own. It will usually take at least 1 year to grow a grafting-size rootstock.
The seeds of all common tree fruits (apple, pear, peach, and persimmon) require a chilling period before they will germinate. This process is referred to as stratification. Once the seeds are collected, they need to be stored in a sealed container in a refrigerator. Pear and apple seeds should be stored 70–90 days before planting. Peach and persimmon seeds require 90–120 days of cold storage.
Another method to get rootstock is to order from companies that specialize in production rootstocks (see Grafting Supply Resources below). These companies sell seedling rootstocks as well as clonal rootstocks. Clonal rootstocks were developed to manipulate tree size and will often provide resistance to soil-borne insects and diseases. These clonal rootstocks are preferred because they have well-known characteristics that seedling rootstocks do not.
Clonal apple rootstocks recommended in Mississippi are Malling-Merton 106 (MM 106), MM 111, and Merton 7A (M 7A). They reduce the mature size of an apple tree by 50–70 percent compared to a seedling grafted tree. Recommended clonal pear rootstock is Old Home X Farmingdale 333 (OH X F 333). This rootstock produces a tree that is 50–66 percent smaller than a seedling grafted tree.
Other clonal rootstocks are available, but most have not been evaluated under Mississippi growing conditions.
Grafting Techniques
Whip & Tongue Graft
Seedlings or clonal rootstocks are whip grafted in February or early March while still dormant. Following grafting, they are placed in moist sawdust, peat, or sphagnum moss and stored where the temperature is approximately 45–50°F. Be sure to check them for drying while in storage; they should be moist but not wet.
They can also be planted directly into containers and kept in a protected area to prevent freezing. A last option is to plant in the nursery row or directly in the planting hole where the tree is to be located. This is usually done in April.
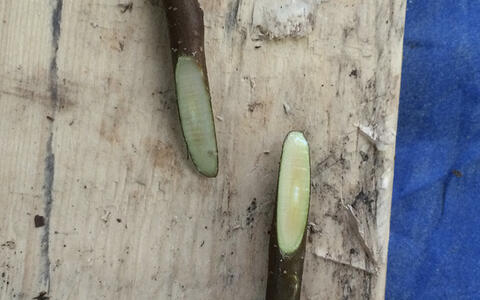
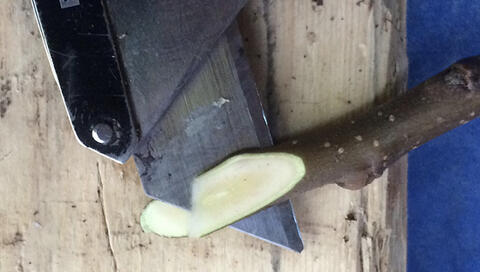
To make the graft, use a sharp knife and make cuts approximately 1 inch long at the base of the scion and at the selected place on the rootstock (Figures 7 and 8). Clonal rootstock should be grafted 10–12 inches above the roots. Seedlings are grafted 1–2 inches above the roots.
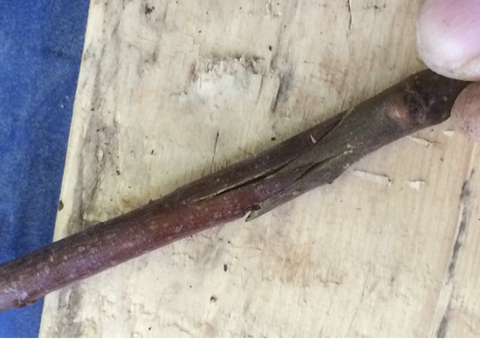
Make a second cut one-third of the way in each piece to form the “tongue” (Figure 9).
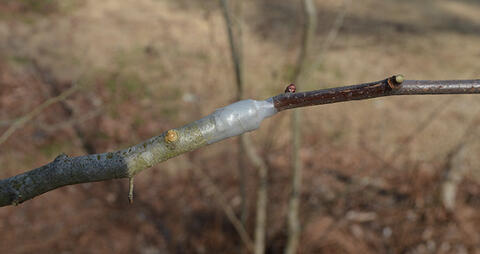
Then, fit the scion piece and the rootstock together so the cut surfaces match, preferably on both sides (Figure 10). Complete the whip and tongue grafting operation by tying the graft with a rubber band, tape, or film and painting with a tree wound dressing (Figure 11). The simple version of this graft technique, the whip graft, is also used to graft many vegetables.
Cleft Graft
Gather and store scion wood as discussed previously. Late February and March—just before new growth begins—is the time to cleft graft.
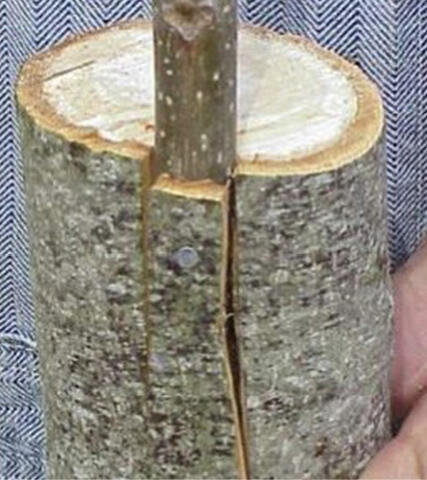
To cleft graft, cut the desired limbs off with a smooth cut. These limbs should be 1 inch or larger in diameter. Split the stock with a cleft grafting tool or hatchet, being sure not to split any knots. Open the split by inserting the end of the cleft grafting tool or a screwdriver into the center of the split (Figure 12).
With cleft grafting, it is best to leave a nurse limb to keep the tree alive until the grafted scions are growing well. The nurse limb can be removed in midsummer or top-worked the following winter if the scions are growing well.
Cut scions with three or four buds on the lower end on each side to form a wedge-shaped cut that is narrower on the opposite side (Figures 13 and 14).
Insert the scion into the cleft with the narrow side of the scion toward the center of the stock (Figure 15). Gently remove the cleft grafting tool or screwdriver so the stock will close tightly on the scion. Extreme care must be taken to match the cambiums of the scion and stock. Finish by wrapping with parafilm (Figure 16).

Six to eight weeks after the grafts begin to grow, cut the tape or film on two sides of the stock away from the grafts. This will allow the tape to eventually peel off, preventing the possibility of girdling. Do not remove the tape; let it peel off naturally.
Bark Graft
Bark grafts are used on branches or rootstocks that are more than 2 inches in diameter. Timing for this type graft depends on the crop but is typically done in late spring, when the bark of the rootstock is easier to work with. Cut the top of the branch from the rootstock tree as if you were making a cleft graft, but do not split the stock. On each side of the stock, make a cut through the bark, downward, about 2 inches long (Figure 17). The bark will then safely peel back.

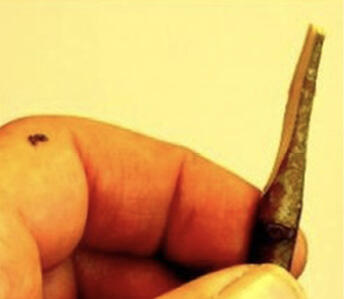
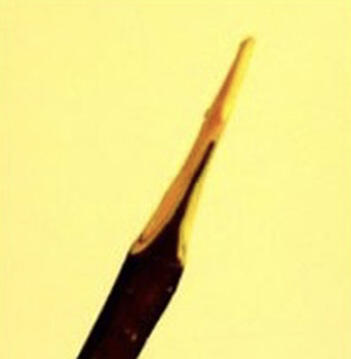
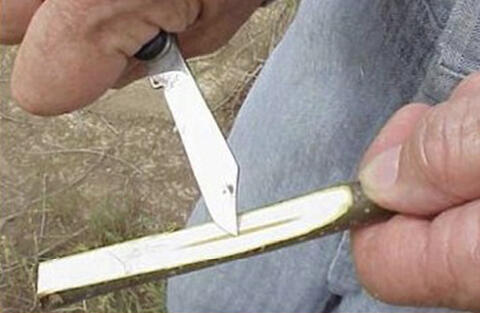
Make a 2- to 3-inch-long cut in the scion, slicing only halfway through the wood (Figure 18).
Pull the bark from the tree and slide the sharpened part of the scion between the bark and wood. Drive one or two small nails through the bark and scion wood to hold it to the rootstock (Figure 19). This will keep the scion from being dislodged.
Cover all of the exposed wood and cracks with grafting tape. You can add reflecting aluminum foil and a plastic bag to increase moisture and reflect sunlight (Figure 20).

Budding
Budding is done during the active growing season (from June to early September). Budding early in the growing season is preferable to later, so the bud will make sufficient growth before winter.
Approximate Budding Times
- Peach: Memorial Day to July 1
- Apple: June 22 to August 1
- Pear: July 4 to September 15
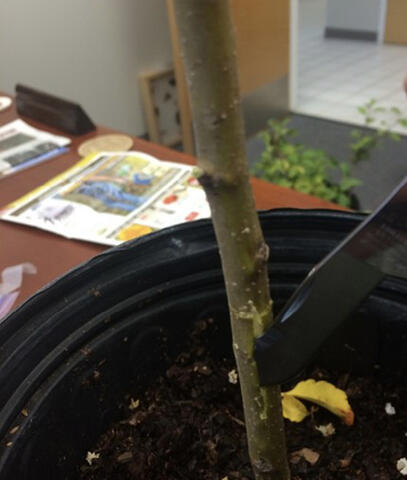
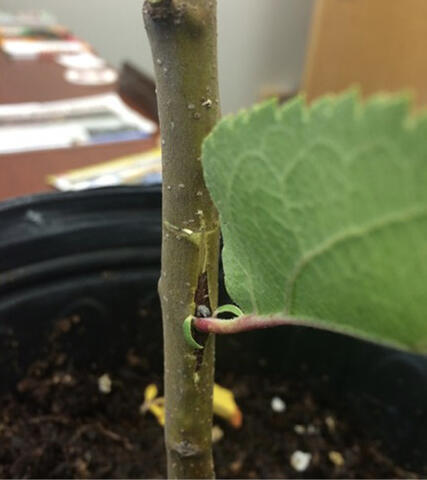
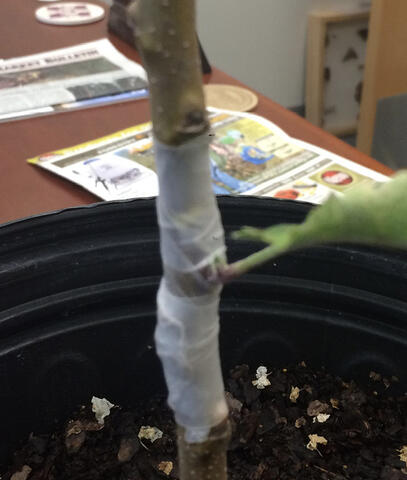
For T-budding, make the T cut on the stock in a clear area of the stem away from buds as much as possible. Make a vertical slit 1–1½ inch long and top slit ½ inch long by inserting the knife into the trunk until it meets the resistance of the wood layer of the stem (Figure 21). Open the slit enough to insert the bud shield to be cut from the bud wood. Cut the bud from the stick by starting the cut 1 inch below the bud, coming up underneath, and exiting about ½ inch above it. Make the cut shallow; wood underneath the bud does not need to be removed. Hold the top part of the excised bud between the blade and your thumb, and insert the bud into the T cut on the stock (Figure 22). If part of the bud sticks out above the T, cut it off so the flaps can be closed tightly. Firmly wrap polyethylene budding tape around the stem to close the incision (Figure 23).
Reasons for Graft Failure
Sometimes, in spite of our best efforts, the grafts do not take. Below are some possible reasons for graft failure:
- The stock and scion were not compatible.
- The cambium layers did not meet properly.
- The scions were upside-down.
- The understock or scion was not healthy.
- The scions were dried out or injured by cold weather.
- The scions were not dormant.
- The graft was not properly covered with grafting wax/tape.
- The scion was displaced by storms, birds, or other means.
Grafting Supply Resources
Orchard Valley Supply
888-755-0098
www.orchardvalleysupply.com
A.M. Leonard Inc.
241 Fox Drive
Piqua, OH 45356
800-543-8955
www.amleo.com
OESCO, Inc.
PO Box 540, Route 116
Conway, MA 01341
800-634-5557
www.oescoinc.com
Ben Meadows Company
PO Box 5277
Janesville, WI 53547
800-241-6401
www.benmeadows.com
Willamette Nursery
25571 S Barlow Rd.
Canby, OR 97013
503-263-6405
www.willamettenurseries.com
Forestry Suppliers
PO Box 8397
Jackson, MS 39284
800-647-5368
www.forestrysuppliers.com
Raintree Nursery
391 Butts Rd
Morton, WA 98356
800-391-8892
www.raintreenursery.com
The information given here is for educational purposes only. References to commercial products, trade names, or suppliers are made with the understanding that no endorsement is implied and that no discrimination against other products or suppliers is intended.
Publication 3402 (POD-12-22)
By Jeff Wilson, PhD, Assistant Professor; Wayne Porter, PhD, Associate Professor (retired); and Casey Barickman, PhD, former Assistant Research Professor, North Mississippi Research and Extension Center.
Download

P3402
Basic Grafting Techniques
2.14 MB