P3513
Creating a Pressed Floral Design

Pressed-flower designs capture and preserve the beauty of nature.
Creating pressed-flower pictures is a great way to capture the beauty of nature and preserve it for years, maybe decades, of enjoyment. Historically, entire plants or plant parts were harvested and pressed to preserve them for scientific study. Plant explorers sought native plants that showed promise for food, fiber, or medicinal uses from distant lands and preserved them by the press method.
Wooden boards with screw-like fittings and layers of absorbent paper allowed botanists to dry plant specimens, store them flat, and add them to collections termed herbaria. They studied and compared the plants so that they could be identified and classified, noting any similarities in plant structures (morphology) among the collection. Many botany and horticulture courses encourage students to develop individual herbaria so they can learn how to identify various plants according to leaf morphology.
There is beauty in the pattern of plants. As a design element, pattern is defined as the outline or the silhouette of an object. While a globe or sphere is a form, its pattern is a circle. Pressing plants and plant parts allows the viewer to appreciate the patterns of flowers, petals, stems, leaves, and roots.
It was a natural progression for people to preserve plant parts for aesthetic purposes, keep them protected under glass, and display them where they could be appreciated. This practice came about in the Victorian Era, also sometimes described as the “Age of Flowers.” As the middle class developed and grew, people made time for hobbies and crafts and had some extra money for purchasing necessary materials to support their projects. Sunday outings or otherwise boring days at home could be devoted to collecting, pressing, and designing with botanical specimens.
There are examples of fragile 18th and 19th century pressed plants and flowers. Many are kept safe in research collections. It is not unusual to find pressed-flower pictures, whether antique or reproductions, in historic homes. Over
the decades, pressed floral designs have fallen in and out of fashion, but the methods to complete them and their beauty endures. Pressed flowers can be arranged and adhered to paper to create two-dimensional pictures as well as bookmarks and greeting cards. They can also be used to decorate glass vases and hurricane globes, and they can be made into pendants, brooches, and earrings.
This publication allows you to try the first steps of successfully creating a basic pressed-flower picture. After several tries, you can expand to the many levels of floral design using a multitude of pressed flowers and other plant parts. Amateurs and professionals have preserved bridal bouquets this way. Some floral enthusiasts create a stationery prototype with pressed flowers, then have a high-quality printing service replicate their work, enabling them to create (and even sell) note cards or invitations from a single, pressed-flower prototype.
Pressed floral design is an activity best conducted slowly, with care and planning. Indeed, this is one of the benefits of this exercise in today’s hectic world. While professional florists are trained to increase design speed and output, pressed floral design cannot be hurried.
As you read this publication, create goals for yourself. Even simple projects with just a few petals glued to paper can be beautiful. You may want to create an invitation for a shower or create meaningful pressed floral design gifts. Projects can be built into student science and art curricula at the elementary, secondary, and post-secondary levels.
Getting Organized
Press
Select what tool you are going to use to dry-press your flowers. Books with non-glazed pages offer an inexpensive and effective way to accomplish this task. Magazines often have a clear glaze to make their pages shiny and attractive, but the glazing slows down the flowers’ moisture loss, which is necessary for proper drying. Trapped moisture makes the flowers and leaves susceptible to mold. If flowers and foliage are moldy, they cannot be used.
Often, people will add paper towel layers to the book or press to facilitate drying. Flowers will take on the texture of the towel as they dry, so this practice is not recommended.
Telephone books yield good results. Add petals and leaves at the back of the book, and then skip several pages. Place additional plant materials on the next page, working toward the front cover. Once all materials are in the book, place it in a location where its contents will not be disturbed. Select a high perch where air can circulate around the book. Flowers will dry quickly in warmer parts of the room than in cool areas. Stack additional books or another heavy object on top of it, then leave it in place for about a month.
Flower presses offer good results because of their absorbent paper, corrugated cardboard, and clamping hardware. This combination allows materials to dry under pressure and results in flat petals and leaves with vivid colors. They require minimal materials and are easy to make if you are handy with woodworking tools. You’ll need two pieces of plywood; four screws, washers, and wing nuts; and several pieces of cardboard and typing/blotting paper for layering.
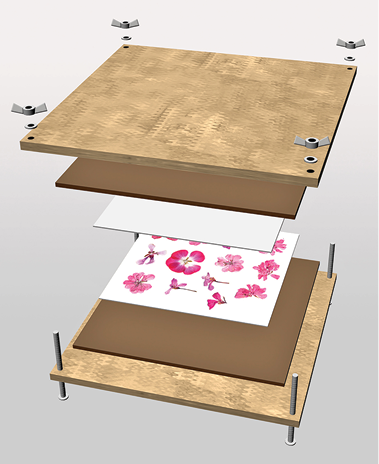
A flower press is easy to make if you are handy with woodworking tools.
Microwave flower presses allow for quick drying. They are effective and result in quality flowers and foliage ready for design within minutes. Expect to pay more for these presses, but they are durable for those who intend to create many projects over the months and years.
Follow the manufacturer’s directions because different flowers require different baking times.
Supplies
School glue (white or clear) works well for this project. It dries clear and forms a light but reliable bond. You will need an inexpensive paintbrush to spread glue on the flowers, petals, and leaves. Small rocks will help flatten and adhere placements to the background paper. It is a good idea to have about six clean, dry stones, about 2–3 inches long, for this purpose.
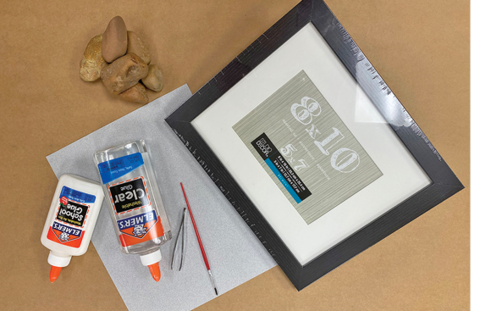
Supplies for this project include paper, tweezers, glue, a paintbrush, rocks, and a picture frame.
The best background paper for this project is heavyweight card stock (about 130 pound) in neutral colors such as light gray, buff, black, or off-white. Note that pressed flowers and greenery lose their original hues and
take on a grayish cast. Bright-colored paper emphasizes the contrast between the two, over-whelming the flowers and making them look out
of place. It is better to emphasize the antiqued color of preserved materials by using subdued, natural colors. The same is true of the picture frame you select for the project. Avoid brilliant colors like red or bright pink and, instead, opt for varnished wood, black, gray, or other earthy colors and finishes.
Scissors or floral snips are handy when harvest-ing materials for pressing. Ordinary household tweezers make the task of moving flowers from
the pressing paper to the display paper easy.
Plant Materials
Set aside time to collect your flowers. Getting close to nature is one of the best aspects of the pressed-flower picture project. Gather materials when it is dry, after rain and dew have evaporated,
to avoid mold growth.
Think Small
Collect very small flower petals, minute leaves, and tendrils. Select materials that are close to the size of a postage stamp, with some smaller and a few a bit larger. You want a good selection of pressed materials to choose from, but they should all be small. This is a very important point: the size of the material is more important than the type of material you collect. One of the common pitfalls in this project is harvesting materials that are too large.
Wafer-thin
In addition to being small, you’ll find the best results with flowers and leaves that are also thin. Pansies, Johnny-jump-ups, carnation petals—all of these are thin-tissued, which makes them good for pressing. Avoid leaves from succulent plants or petals that are naturally thick and watery.
Where the Flowers Grow
The plant materials used in pressed-flower pictures are abundant, even in urban areas. Look close to the ground and you will find innumerable plant parts to press, even in the cracks of sidewalks. Showy, colorful flowers are not the only candidates for pressed-flower projects. Seek the diminutive in your yard, garden, and open fields, and keep an open mind toward humble-looking plants, too.
Good Seasons
The season of the year will affect materials available in the yard, garden, or cityscape. As you may expect, winter is typically lean when it comes to flowers and leaves to press, but it is still possible to find materials that are special in their own way. Spring, summer, and fall offer some good selections, from flowers to colorful leaves.
Size Them Up
This message is worth repeating! A common error in this project is to collect materials that are too large. It is fine to have numerous materials, but it takes very few petals and leaves to make a stunning design. It takes numerous, small placements to develop an elegant pressed-flower picture. One large leaf will completely fill a frame.
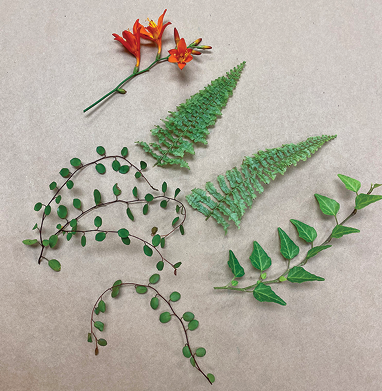
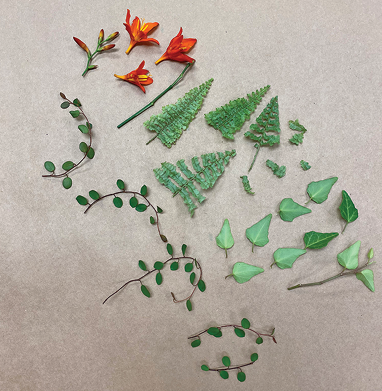
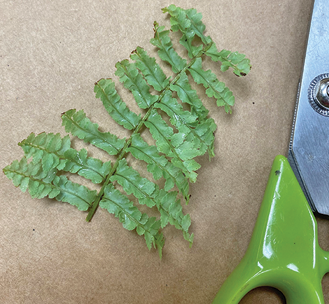
These six stems (left) were separated into 28 suitable-sized pieces of plant material for pressing.
A Numbers Game
Aim for 50–75 individual petals, leaves, or small flowers for pressing. There should be some repetition in your collection to provide unity in your finished design. This may seem like a daunting task at first, but remember that individual petals, small flowers, leaves, and stem segments count in the number. The best practice is to press-dry specimens immediately after harvest, avoiding storage in plastic bags or boxes.
Stylish and Wild
Just about any type of cultivated plant material or weed can be used for this design. Indeed, materials considered wild or weedy can give beautiful results. Remember to look for flowers and leaves that are naturally thin. Avoid fleshy, spongy, or succulent flowers and leaves. If the plant material is thick, it contains more water and will take longer to dry. The longer it takes to dry-press, the greater the chance for mold growth. Feel free to take flowers apart and dissect them into their smallest parts. Separate petals, sepals, and flower bases. Each of these parts can be pressed, and the results can be just right for a project. Avoid pressing materials that are bug-eaten or otherwise damaged. They will not be best for the final picture.
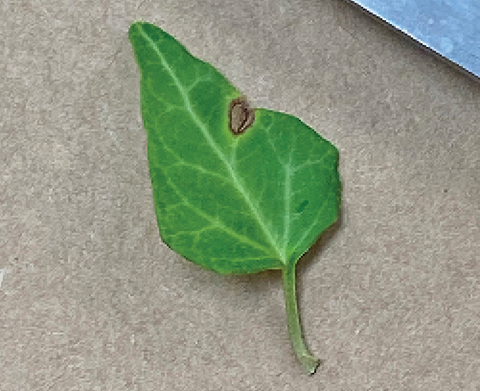
The margin of this ivy leaf was burned by the sun’s energy. This happens when water droplets magnify bright sunshine after a rain shower.
Some suggested plant materials include:
Abelia
Alyssum
Angel vine
Borage
Carnation petals
Clover leaves
Coreopsis
Cosmos
Crocosmia
Dahlia petals
Delphinium
Dusty miller leaves and flowers
Ferns
Grass blades
Ivy
Japanese maple leaves
Johnny-jump-ups
Larkspur
Marigold petals
Nicotiana
Pansies
Queen Anne’s lace
Rose petals
Roses (small varieties)
Rosemary
Salvia
Verbena
Wild ranunculus
Zinnia petals
Feel free to experiment!
This method is not best for preserving a long-stemmed rose or other entire cut flower. Intact flowers are often too thick and large for a flower press. The flower will retain moisture when it should be drying, creating the right environment for mold. Consider other preservation methods for these flowers, including air-drying or silica gel.
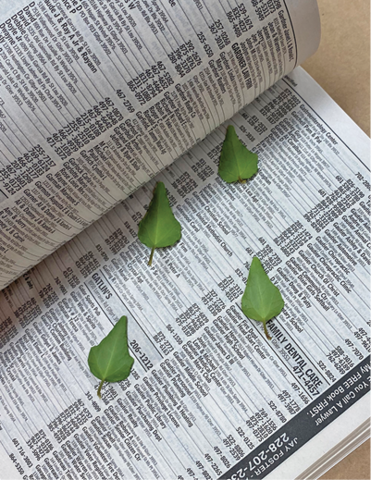
A telephone book makes a good flower press.
Group similar flowers and/or colors together in the book or press. This will keep your materials organized and help when you’re ready to assemble the design. Always keep flowers and leaves from touching each other. Overlapping plant materials take longer to dry
and may create unwanted textures.
It takes about 4 weeks to completely dry plant materials before they can be used. Fill the book or press, add weight or screw down the corners, and do not disturb it for a month. If you open the press earlier, flowers may stick to the paper and tear apart. Opening and closing the book may cause petals and leaves to fold onto themselves, resulting in unwanted creases.
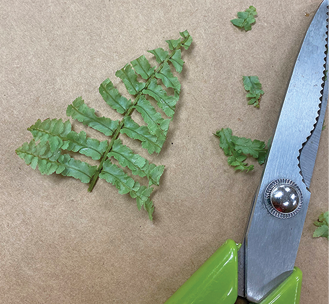
Tip: To get more from one fern frond, use shears to shape each section to a point.
Creating the Design
Materials
plant materials
book or flower press (an old telephone book, book with non-glazed pages, or flower press with blotting paper and cardboard layers)
inexpensive paintbrush
school glue
rocks (clean, approximately
2–3 inches in length)
card stock (130 pound paper is best)
tweezers
ordinary picture frame
(8 × 10 inches)
scissors or snips for harvesting
Directions
Make sure the paper is the correct size for the frame.
Create a margin of “white space.” This negative space provides a transition from your design to the frame. It may be helpful to lightly sketch four lines approximately 1 inch from the paper’s edge.
The next stage is to lay out the design without gluing it in place. Take some time to arrange flowers and leaves, using tweezers to move them from the press to the card stock.
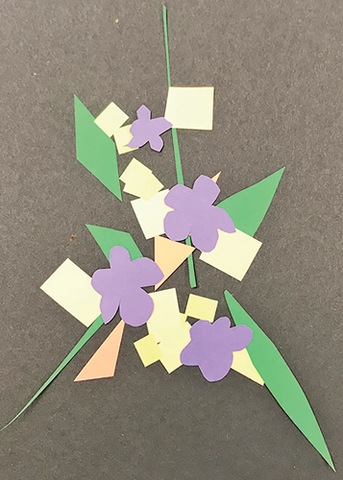
Use small bits of colorful paper cut into floral shapes to lay out your design. This radial design in the shape of a scalene triangle could easily be made using pressed flowers and leaves.
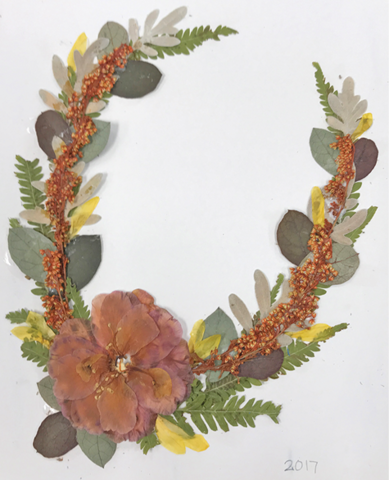
These leaves and flowers are formed into a crescent. Design by Sarah Gentry.
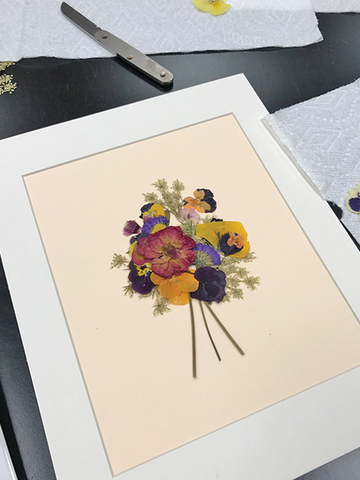
To recreate a bouquet of flowers, it is best to take them apart, press dry, then reassemble on a flat page. Design by Gay Davis.
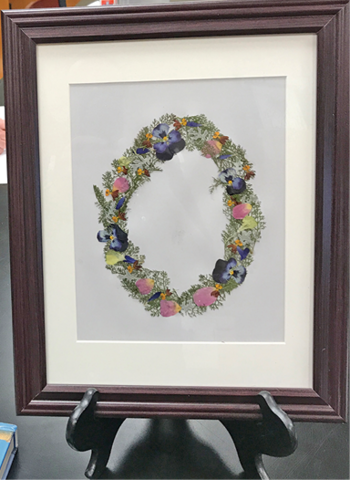
An oval-shaped wreath is a classical form, following the oblong shape of the paper and frame. Design by Linda Darphin.

This design has the look of a hand-tied bouquet and uses the curved lines of vines to their best advantage. Design by Tamela Gartman.
When assembling your design, do not hesitate to cut or divide compound leaves and use just the leaflets. The same is true for filler flowers like baby’s breath or goldenrod. It is fine to cut the stem into smaller segments to get the sizes you need to create your desired pattern. Overlap leaves and flowers to suggest design depth.

Once they have settled on a design pattern, some artists like to take a digital image of it to recall where to make each placement. Design by Connie Belk.
Once you’ve achieved a pleasing design, remove all plant materials from the page. Some like to take a photo of the preliminary design they have created as a guide, but this is not required. Remember that each design attempt is valuable practice.
Place a small amount of glue (about the size of a quarter) on a spare piece of card. Using a small paintbrush, add a light, thin layer of glue to the first placement and adhere it to the background card. Continue this process and use clean rocks to weight down the placements as the glue dries. As you work, you will get a sense of how much glue you need to adhere the placement without using too much or too little.
Once the design is finished, store it in a safe place to dry. The next day, sign and date your work of art, and then place it in the frame.
Your pressed floral design picture has the potential to stay beautiful for decades or longer. Keep it out of direct sunlight or other strong light sources to preserve the flowers’ colors. Enjoy this work of art you have created, and continue practicing with additional projects in the future.
Bridal bouquets or memorial floral designs can be processed and remade into pressed floral designs for many years of display. As soon as the wedding or event is over, carefully take the bouquet or arrangement apart and separate and press-dry the flowers. Then, reassemble the pieces so that they appear similar to the original, three-dimensional design. It is best to practice basic pressed floral design techniques before attempting advanced projects.
References
DiNoto, A., & Winter, D. (1999). New pressed floral designs. New York: Stewart, Taboori & Chang.
Morris, A. (1997). The pressed plant. London: Merehurst.
Sultzbaugh, K. How-to: Pressing flowers. Fine Gardening, 74. https://www.finegardening.com/article/pressing-flowers
Trinklein, D. Drying flowers and foliage for arrangements. University of Missouri Extension. https://extension2.missouri.edu/g6540
Special thanks to the MSU Extension Master Floral Designers for their assistance with the content of this publication.
Publication 3513 (POD-09-20)
By James DelPrince, PhD, Assistant Extension Professor, Coastal Research and Extension Center.
Copyright 2020 by Mississippi State University. All rights reserved. This publication may be copied and distributed without alteration for nonprofit educational purposes provided that credit is given to the Mississippi State University Extension Service.
Produced by Agricultural Communications.
Mississippi State University is an equal opportunity institution. Discrimination in university employment, programs, or activities based on race, color, ethnicity, sex, pregnancy, religion, national origin, disability, age, sexual orientation, genetic information, status as a U.S. veteran, or any other status protected by applicable law is prohibited. Questions about equal opportunity programs or compliance should be directed to the Office of Compliance and Integrity, 56 Morgan Avenue, P.O. 6044, Mississippi State, MS 39762, (662) 325-5839.
Extension Service of Mississippi State University, cooperating with U.S. Department of Agriculture. Published in furtherance of Acts of Congress, May 8 and June 30, 1914. GARY B. JACKSON, Director
The Mississippi State University Extension Service is working to ensure all web content is accessible to all users. If you need assistance accessing any of our content, please email the webteam or call 662-325-2262.
Download

P3513
Creating a Pressed Floral Design
2.85 MB