P3231
Composter Operation and Management

Composting is the most widespread method for proper and complete decomposition of poultry carcasses. The materials needed (poultry carcasses, litter or alternative carbon sources, and perhaps water) are readily available on every commercial poultry farm. Availability of cost-share funds to offset composter facility construction costs has contributed to an increase in the use of composting. However, attention to management is essential for success. Failure to properly manage the system will create odors and flies and attract unwanted scavengers and other vermin to the site. Proper management is vital to avoid nuisance complaints. Orderly loading of ingredients is critical for efficient compost activity.
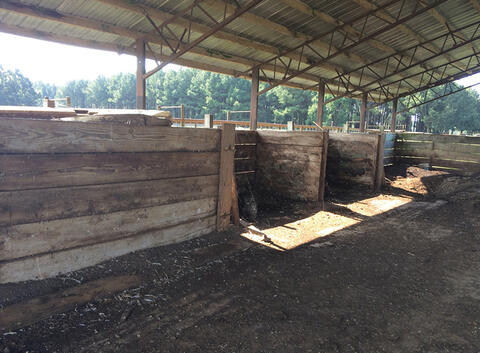
Static bin composters are generally one of two types:
1. A series of various-sized bins constructed of treated lumber set on a concrete slab with a roof overhead (Figure 1). The slab prevents material from seeping into soil or groundwater, the walls keep the compost contained, and the roof protects the material from the elements.
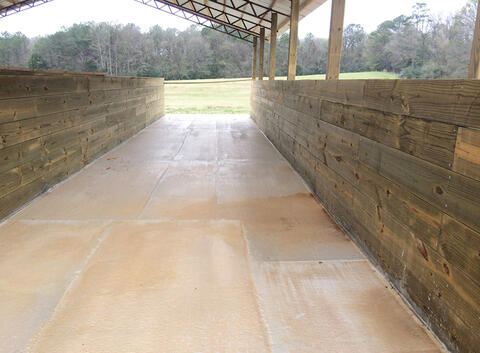
2. One long bin (or alleyway) also set on a slab and covered by a roof (Figure 2).
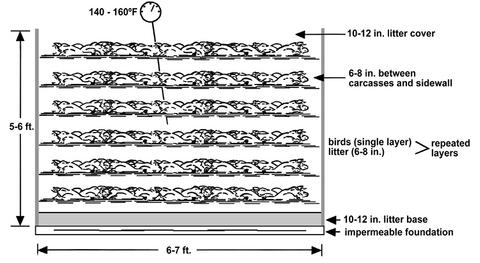
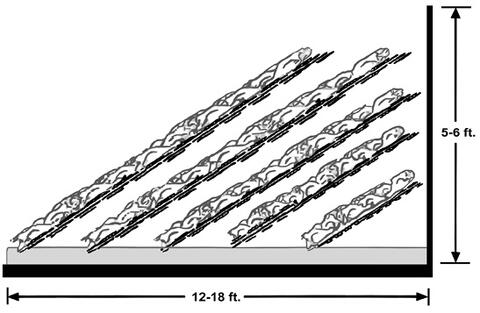
Regardless of type, ingredients should be layered into the composter as illustrated in Figures 3 and 4.
- Place an initial layer of 8–12 inches of fresh litter on the concrete slab floor. This litter will supply bacteria to start the process and will also help absorb carcass fluids or excess water that may be added to the composter.
- Next, add a layer of bird carcasses. Arrange the carcasses in a single layer side by side, touching each other. Place carcasses no closer than 6 inches to the walls of the compost bin. Carcasses placed too near the walls will not compost as rapidly because of lower temperatures there and may cause odorous liquids to seep from the compost.
- Next, add a layer of litter. This layer should be twice as thick (8–10 inches) as the layer of carcasses underneath. If only a partial layer of birds is needed for a day’s mortality, the portion used must still be covered with litter. The rest of that layer can be used with subsequent mortality in the coming days.
- After completing the initial layer, add subsequent layers of carcasses and litter/bulking material until a height not exceeding 5–6 feet is reached. The top layer will be a cap of 8–10 inches of litter. A height of 5–6 feet with adequate porosity and moisture levels is not a fire hazard. Keep in mind, however, the potential for spontaneous combustion, and monitor temperatures throughout the composting process. Excessive height can induce higher compost temperatures that exceed 170°F and increase the chance of spontaneous combustion. Additional carbon/bulking material may need to be added to better facilitate the decomposition process with birds larger than 8.5 pounds.
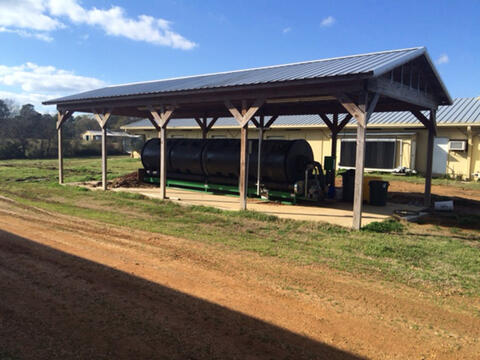
- In-vessel or rotary drum composters (Figure 5) are the latest innovation in composter technology. These systems use controlled air infusion and simplified aeration techniques to decrease the time and daily management needed to compost material. However, the same principles apply as with bin/alleyway composting, and proper management is critical to success.
Static bin composters with both primary and secondary bins are more labor-intensive because, once a smaller primary bin is full, it needs to sit for roughly 2 weeks. During this time, microbes break down roughly half the carcass material. However, they eventually run short of oxygen and the material has to be turned into the secondary bin for the process to be completed. After 2 weeks in the secondary bin, carcass material will be decomposed if temperature and moisture levels are correct. Therefore, it may take 5–8 weeks or more from the time you start to fill a bin until you have finished compost. Once finished, the compost material is ready to spread as a soil amendment, similar to chicken litter.
|
Problem/Symptom |
Probable Cause |
Suggestions |
|---|---|---|
|
Improper temperature |
Too dry (<40% moisture) Too wet (>60% moisture) Improper C:N ratio Improper mixing of ingredients Adverse environment |
Add water Add bulking material and turn Evaluate and adjust bulking material Layer ingredients properly Ensure adequate cover over top |
|
Failure to decompose |
Improper C:N ratio Carcasses layered too thickly Carcasses too close to outside edge |
Evaluate and adjust bulking material Single-layer the carcasses Maintain minimum of 6 inches between carcasses and outside edges |
|
Odor |
Too wet Too low C:N ratio Inadequate cover between layers and on top |
Add bulking material and turn Evaluate and adjust bulking material Use 6–8 inches of cover between layers and 10–12 inches over the top |
|
Flies |
Too wet Poor sanitation conditions Failure to reach proper temperature Inadequate cover between layers and on top |
Add bulking material and turn Avoid leaching from pile Assess C:N ratio; layer properly Use 6–8 inches of cover between layers and 10–12 inches over the top |
|
Scavenging animals |
Inadequate cover over carcasses |
Use 6–8 inches of cover between layers and 10–12 inches over the top Avoid initial entry with fence or barrier Use 6–8 inches of cover between layers and 10–12 inches over the top |
|
Scavenging animals |
Inadequate cover over carcasses |
Use 6–8 inches of cover between layers and 10–12 inches over the top Avoid initial entry with fence or barrier |
Publication 3231 (POD-05-21)
By Tom Tabler, PhD, Extension Professor, Poultry Science; Jessica Wells, PhD, Assistant Clinical/Extension Professor, Poultry Science; and Nikki Jefcoat, Poultry Division Director, Mississippi Board of Animal Health.
The Mississippi State University Extension Service is working to ensure all web content is accessible to all users. If you need assistance accessing any of our content, please email the webteam or call 662-325-2262.
